We’ve all been there: caught in an unexpected downpour, stepped in a puddle, or perhaps just finished a sweaty workout. Whatever the cause, wet shoes are an uncomfortable reality. But beyond the discomfort, improper drying can lead to a host of problems: unpleasant odors, mildew growth, damaged materials, and a significantly shortened lifespan for your beloved footwear.
Fear not! Drying wet shoes doesn’t have to be a destructive process. With the right techniques, you can restore your shoes to their former glory without causing any lasting damage. This guide will walk you through the best methods, what to avoid, and even how to prevent your shoes from getting soaked in the first place.
The Don’ts: Common Mistakes to Avoid
Before we dive into the best practices, let’s address the crucial “don’ts.” These common drying methods might seem quick, but they can irreversibly damage your shoes:
- Don’t use direct heat: This is the golden rule! Avoid placing shoes directly on radiators, in front of space heaters, under direct sunlight, or in a clothes dryer. Extreme heat can:
- Shrink materials: Leather, suede, and even some synthetics can shrink and stiffen.
- Melt adhesives: The glues holding your shoes together can weaken or melt, causing soles to detach.
- Crack leather: Rapid drying causes leather to lose its natural oils, leading to cracks.
- Damage delicate fabrics: Synthetics can warp or melt.
- Don’t use a hairdryer on a hot setting: While a hairdryer can be useful, using it on a hot setting too close to the shoe can mimic the effects of direct heat.
- Don’t leave insoles inside: Wet insoles trap moisture and can lead to mildew and odor. Always remove them.
- Don’t store them in an airtight container: This creates a perfect breeding ground for bacteria and mold. Air circulation is key.
The Do’s: Effective & Safe Drying Methods
The best way to dry your shoes depends on the material and how wet they are. Here are several safe and effective methods:
1. The Newspaper Method (Best for Most Shoes)
This is a classic for a reason – it’s effective, gentle, and readily available.
Steps:
- Remove insoles and laces: This allows for maximum air circulation and ensures these parts dry separately.
- Clean off excess dirt: If your shoes are muddy, gently wipe off the exterior with a damp cloth.
- Crumple newspaper: Take sheets of newspaper (black and white print is best to avoid ink transfer) and crumple them into balls.
- Stuff the shoes: Firmly stuff the crumpled newspaper into the shoes, ensuring it fills the toe box and main cavity. The newspaper will absorb moisture.
- Wrap (optional): For very wet shoes, you can also wrap the outside of the shoes with a few layers of newspaper.
- Place in a well-ventilated area: Find a spot with good airflow, away from direct heat or sunlight. A fan can significantly speed up the process.
- Change newspaper regularly: Replace the damp newspaper every few hours (or once it feels saturated). You’ll be surprised how quickly it absorbs moisture.
- Allow to air dry: Once the newspaper no longer gets damp, let the shoes air dry completely for another few hours.
- Pros: Very effective, inexpensive, gentle on materials.
- Cons: Can be messy, requires frequent newspaper changes for very wet shoes.
2. The Towel Method (Good for Less Wet Shoes)
Similar to newspaper, towels can absorb moisture, especially from the exterior.
Steps:
- Remove insoles and laces.
- Wipe down: Use a clean, dry towel to wipe off as much external moisture as possible.
- Stuff with towels: For smaller shoes or less wet interiors, you can stuff them with small, dry towels.
- Wrap: Wrap the shoes in a larger dry towel.
- Press: Gently press the towel-wrapped shoes to squeeze out more moisture.
- Air dry: Place in a well-ventilated area.
- Pros: Less messy than newspaper, good for surface moisture.
- Cons: Less absorbent for internal moisture compared to newspaper, towels need to be changed/dried.
3. The Fan Method (Excellent for Speed & Air Circulation)
Combining air circulation with an absorbent material is often the fastest and safest way.
Steps:
- Prepare shoes: Remove insoles and laces.
- Stuff with newspaper or cedar shoe trees: This helps maintain shape and absorbs initial moisture.
- Position the fan: Place the shoes a foot or two in front of a fan. You can even hang them from a clothes hanger or shoe rack to ensure air circulates all around them.
- Run the fan: Let the fan run for several hours, or overnight, depending on how wet the shoes are.
- Pros: Speeds up drying significantly, good for all shoe types, helps prevent odors.
- Cons: Uses electricity.
4. The Rice/Silica Gel Method (Great for Delicate or Very Wet Shoes)
Both rice and silica gel packets are excellent desiccants, meaning they absorb moisture from the air.
Steps (Rice):
- Prepare shoes: Remove insoles and laces.
- Find a container: Get a large, sealable container or a pillowcase.
- Bury the shoes: Place the shoes inside the container and completely cover them with uncooked rice.
- Seal and wait: Seal the container and leave the shoes buried for 12-24 hours. The rice will draw out the moisture.
- Clean up: Brush off any rice grains stuck to the shoes.
Steps (Silica Gel):
- Collect packets: Save those little silica gel packets that come with new shoes, bags, or electronics.
- Place inside shoes: Put several packets inside each shoe.
- Place in a container: For best results, place the shoes with the silica gel packets in a sealed container.
- Wait: Leave them for several hours or overnight.
- Pros: Highly effective for deep moisture, safe for delicate materials.
- Cons: Rice method can be messy, requires collecting silica gel packets.
5. The Hairdryer Method (Use with Caution!)
This can be used for a quick touch-up, but only with proper technique.
Steps:
- Remove insoles and laces.
- Set to cool/low heat: Crucially, set your hairdryer to the “cool” or “low heat” setting.
- Keep distance: Hold the hairdryer at least 6-8 inches away from the shoe.
- Keep moving: Continuously move the hairdryer around the shoe, focusing on the interior. Do not concentrate heat on one spot.
- Ventilate: Ensure the area is well-ventilated.
- Pros: Quickest for minor dampness.
- Cons: High risk of damage if misused, not ideal for thoroughly soaked shoes.
Special Considerations for Different Materials:
- Leather: Be extra gentle. Avoid direct heat at all costs. The newspaper or fan method is best. Once dry, condition them with a leather conditioner to restore oils and prevent cracking.
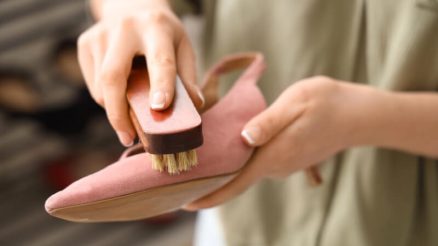
- Suede/Nubuck: These are very delicate. Use the newspaper or fan method. Avoid rubbing too hard when cleaning. Once dry, use a suede brush to restore the nap.
- Canvas/Mesh/Synthetics: These are generally more forgiving. All methods are usually safe, but still avoid direct high heat.
- Wool/Knit: Treat gently, similar to suede. Stuff with newspaper and air dry.
Preventing Wet Shoes in the First Place:
An ounce of prevention is worth a pound of cure!
- Waterproof sprays: Apply a waterproof or water-resistant spray (suitable for your shoe material) regularly.
- Weather-appropriate footwear: Choose shoes designed for wet conditions (e.g., waterproof boots) when rain is expected.
- Avoid puddles: Simple, but effective!
- Rotate shoes: Allow shoes to fully dry out between wears, even from sweat. This prevents odor and extends their life.
Conclusion
Drying wet shoes doesn’t have to be a chore that results in ruined footwear. By understanding the dangers of direct heat and employing safe, effective methods like newspaper stuffing, fan drying, or desiccants, you can ensure your shoes remain in excellent condition for years to come. Remember, patience and proper airflow are your best friends in the battle against dampness. Happy stepping!


