Cramped counters, overflowing cabinets, and a drawer that refuses to close? You’re not alone. Here’s how to turn your small kitchen into a calm, functional space you’ll actually love cooking in — no renovation required.
Why Small Kitchens Feel Chaotic (and Why It’s Fixable)
A small kitchen isn’t the problem. Unused space and too much stuff usually are. Most tiny kitchens have hidden storage potential in three places we forget about:
- Vertical space — walls, the backs of doors, the gap above cabinets
- Dead zones — corners, under the sink, the sides of the fridge
- Inside cabinets — where a single shelf often leaves half the height empty
The goal isn’t a magazine-perfect kitchen. It’s a kitchen where everything has a home, you can find what you need in seconds, and your counters stay clear enough to actually cook.
Step 1: Declutter Before You Organize
Buying bins before decluttering is the #1 mistake. You’ll just organize clutter beautifully.
The 15-Minute Kitchen Edit
- Empty one cabinet or drawer at a time. Don’t do the whole kitchen at once — that’s how you end up with stuff everywhere and no dinner.
- Sort into four piles: Keep, Donate, Toss, Relocate (belongs elsewhere in the house).
- Ask yourself: Have I used this in the last 6 months? Do I own a duplicate?
- Be honest about “someday” gadgets. The spiralizer you used once? The third set of measuring cups? Let them go.
Common Duplicates to Cut
| Item | How Many You Actually Need |
|---|---|
| Spatulas | 2–3 |
| Cutting boards | 2 (one for raw meat, one for everything else) |
| Mixing bowls | 1 nesting set |
| Wooden spoons | 2–3 |
| Mugs | 2 per household member + a few for guests |
| Food storage containers | Only those with matching lids |
| Takeout utensils & sauce packets | Zero (really) |
💡 Pro tip: Put “maybe” items in a box with today’s date. If you haven’t opened it in 3 months, donate it unopened.
Step 2: Master Your Countertops
Clear counters instantly make a small kitchen look bigger and cleaner.
1. Keep only daily-use items out
Coffee maker? Yes, if you use it every morning. Stand mixer you use twice a year? Into a cabinet it goes.
2. Corral items on a tray
A pretty tray (wood, marble, or rattan) groups oil, salt, pepper, and utensils into one tidy “zone.” It reads as décor instead of clutter — and makes wiping counters a 10-second job.
3. Use a tiered stand
A two- or three-tier stand holds fruit, onions, garlic, or coffee pods while using only one small footprint.
4. Add an over-the-sink cutting board
It extends your prep space right where you need it and slides away when you’re done.
5. Go vertical with a utensil crock
One crock beside the stove frees up an entire drawer.
Step 3: Use Your Walls (Your Most Underused Storage)
6. Install a magnetic knife strip
Frees up counter space from bulky knife blocks and looks sleek. Bonus: it works for metal spice tins too.
7. Hang a pegboard
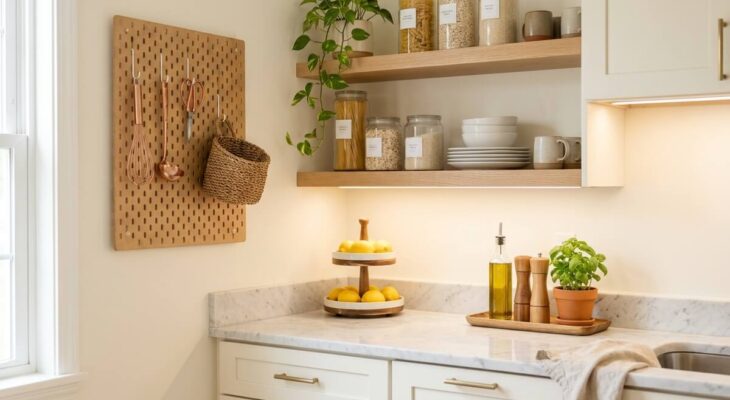
Pegboards are the ultimate customizable wall — hang pots, pans, utensils, mugs, and baskets, and rearrange anytime. Paint it a soft sage, blush, or cream for a Pinterest-worthy look.
8. Add floating shelves
Open shelves for everyday dishes, glass jars, and cookbooks. Keep them styled with a simple rule: stack, group, and leave breathing room.
9. Mount a rail with S-hooks
A simple rod under your cabinets holds mugs, ladles, dish towels, and small hanging baskets for herbs.
10. Use the space above your cabinets
Store rarely used items (holiday platters, large serving bowls) in matching baskets up top. Uniform baskets look intentional, not cluttered.
Step 4: Make Cabinets Work Twice as Hard
11. Add shelf risers
A wire riser instantly doubles one shelf into two — perfect for plates, bowls, and mugs.
12. Store pans vertically
Use a file organizer or pan rack to stand baking sheets, cutting boards, and lids on their sides. No more pulling out the whole stack to reach the bottom one.
13. Use the inside of cabinet doors
Adhesive hooks and slim racks hold measuring spoons, pot lids, foil and wrap, or a mini cleaning caddy.
14. Install a lazy Susan in corner cabinets
That deep, dark corner cabinet becomes fully accessible with one spin. Great for oils, sauces, and spices too.
15. Pull-out drawers for deep cabinets
Sliding baskets or bins in lower cabinets mean nothing gets lost in the back. If you rent, freestanding pull-out organizers need no drilling.
Step 5: Tame Your Drawers
16. Use drawer dividers
Adjustable bamboo dividers keep utensils, gadgets, and tools in their own lanes.
17. Create a tiered spice drawer
Lay spices flat on an angled insert so every label faces up. You’ll stop buying your fourth jar of cumin.
18. Keep one “junk drawer” — but organize it
Small trays for batteries, rubber bands, tape, scissors, and pens. Everyone needs one; it doesn’t have to be chaos.
Step 6: Organize the Pantry (Even If You Don’t Have One)
19. Decant into clear containers
Pasta, rice, oats, flour, and snacks in clear, airtight, stackable containers save space, keep food fresh, and let you see what’s running low.
20. Label everything
A simple label maker or handwritten labels keep the system working long-term. Add expiration dates on the back with a piece of tape.
21. Group items into bins
Create categories: Baking, Breakfast, Snacks, Pasta & Grains, Cans. Grab the whole bin when you need it.
22. No pantry? Make one
- A rolling slim cart fits in the gap between the fridge and wall
- An over-the-door organizer on a pantry or closet door holds cans and spices
- A freestanding bookshelf or cabinet in a nearby hallway becomes a pantry with matching baskets
Step 7: Conquer the Under-Sink Zone
23. Use a two-tier organizer
Designed to fit around pipes, it doubles your storage for cleaning supplies.
24. Hang a tension rod
Spray bottles hang by their triggers, freeing up the floor of the cabinet.
25. Add a small bin for sponges and brushes
Use a waterproof tray or caddy to catch drips and keep everything easy to grab.
Quick Reference: Hack by Problem
| Your Problem | Best Hack |
|---|---|
| Cluttered counters | Tray zones, tiered stands, magnetic knife strip |
| Not enough cabinet space | Shelf risers, door storage, pegboard |
| Messy pantry | Clear containers, labels, category bins |
| Deep, dark corners | Lazy Susans, pull-out drawers |
| Pots and pans everywhere | Vertical racks, hanging rail |
| Renter (can’t drill) | Adhesive hooks, tension rods, rolling carts, freestanding shelves |
| Tiny budget | Declutter first, dollar-store bins, repurposed jars |
Budget-Friendly Organization Ideas
You don’t need to spend a fortune for a beautiful, organized kitchen:
- Reuse glass jars from pasta sauce and jam for spices, nuts, and grains
- Shop dollar stores for bins, baskets, and drawer trays
- Use shoeboxes covered in contact paper as drawer dividers
- Repurpose a magazine holder to store foil, wraps, and cutting boards
- Buy in phases — start with one problem area and invest as you go
Make It Look Pretty (The Pinterest Touch)
Organized and beautiful can go hand in hand:
- Stick to a color palette. White, wood, and one accent (sage green, terracotta, or soft gold) looks calm and cohesive.
- Match your containers. Uniform jars and baskets create instant visual order.
- Add one living thing. A small herb pot or a trailing plant on a shelf softens the space.
- Use warm lighting. Stick-on LED strips under cabinets brighten your workspace and make the room feel bigger.
- Swap hardware. New cabinet knobs or handles are an inexpensive way to refresh the whole kitchen.
How to Keep Your Kitchen Organized for Good
The real secret isn’t the organizers — it’s the habits.
- “One in, one out” rule: New mug? An old one leaves.
- Nightly 5-minute reset: Clear counters, load the dishwasher, wipe surfaces.
- Weekly fridge check: Toss expired food before your grocery run.
- Seasonal edit: Every 3 months, do a quick declutter of one zone.
- Store by frequency: Daily items at eye level, rarely used items up high or down low.
Final Thoughts
A small kitchen can be one of the most efficient and charming spaces in your home. Start small — one drawer, one shelf, one counter — and build from there. Within a weekend, you’ll have a kitchen that feels lighter, works smarter, and makes you want to cook.
📌 Save this pin for your next kitchen refresh, and start with just one hack today!