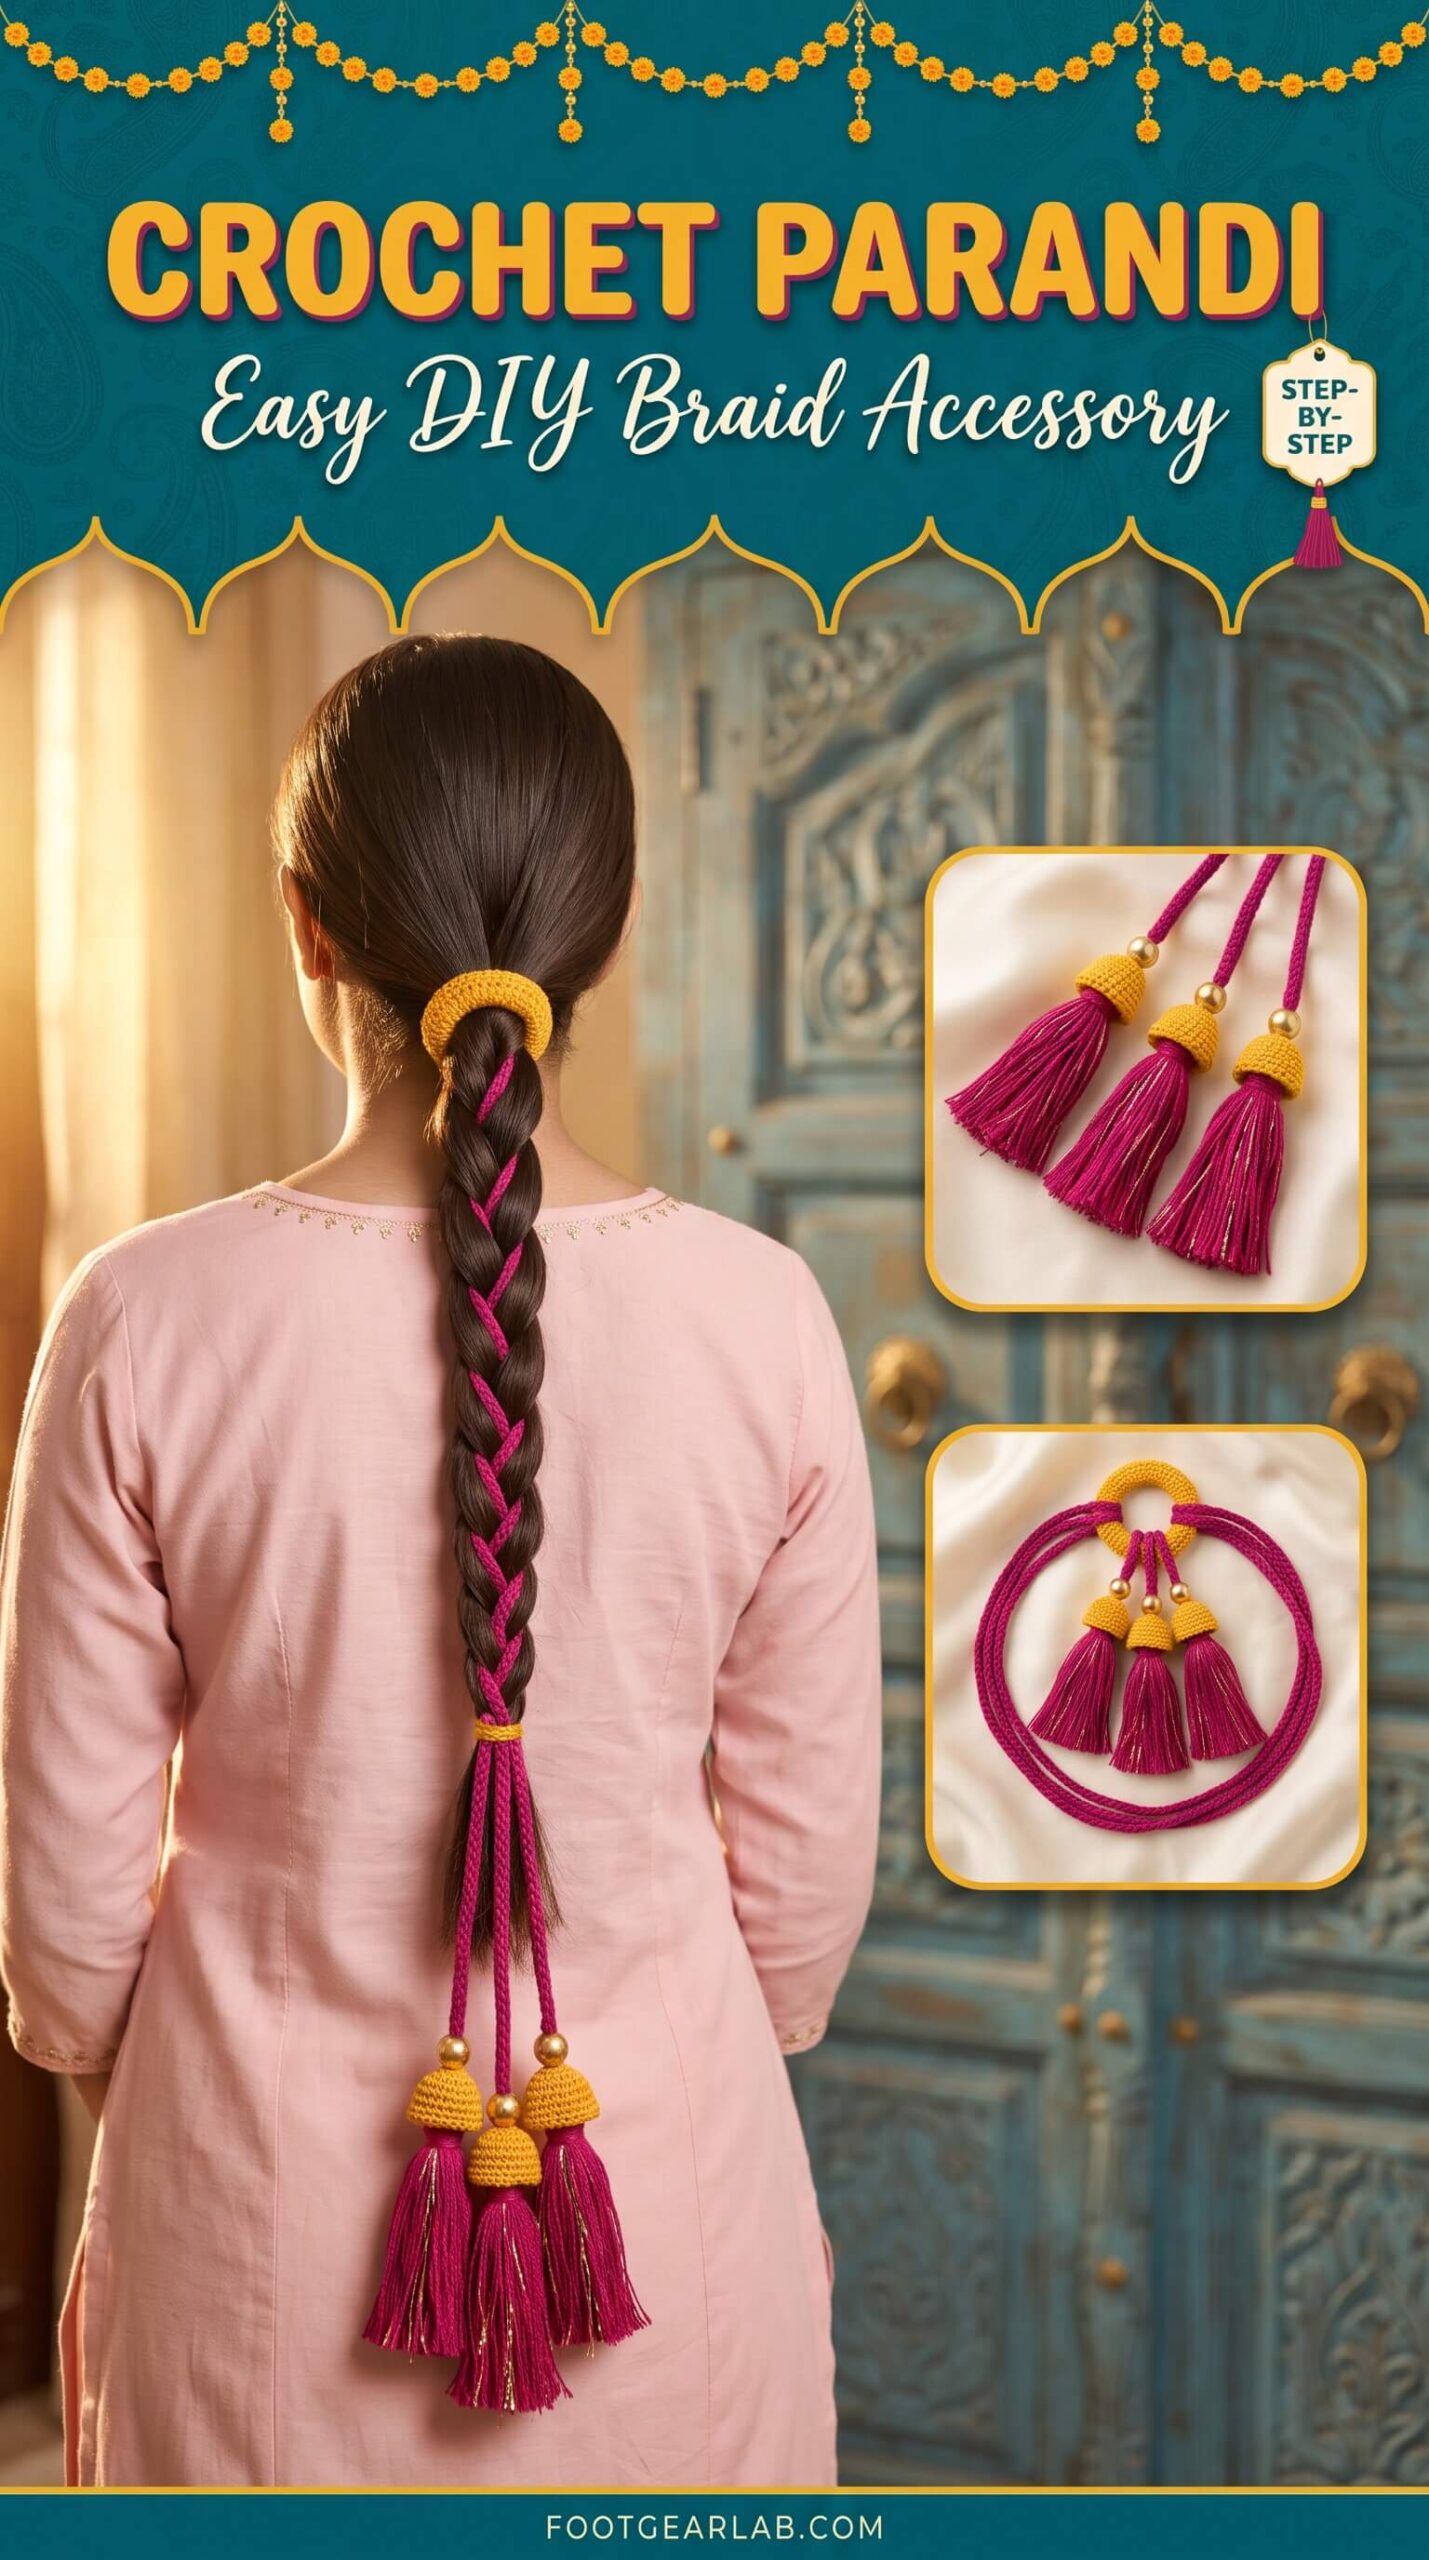
If you have ever watched a bride at her mehndi swing a long braid finished with jingling, colorful tassels, you already know the magic of a parandi. This traditional South Asian hair accessory, also called a paranda, has been loved for generations in Punjab and across Pakistan and India, and it is having a beautiful moment again among women who want a touch of heritage, color and handmade charm in their hairstyles. The best part is that you do not need to buy one: with a crochet hook, a ball of soft yarn and an afternoon, you can make a crochet parandi that looks boutique-made and is completely customized to your outfit.
In this guide you will learn exactly what a parandi is, which materials work best, how to crochet the cords, the top ring and the decorative bell-capped tassels, and how to braid it into your hair so it stays put all day. You will also find color ideas for weddings, Eid and everyday wear, care tips, and answers to the most common questions beginners ask.
What Is a Parandi?
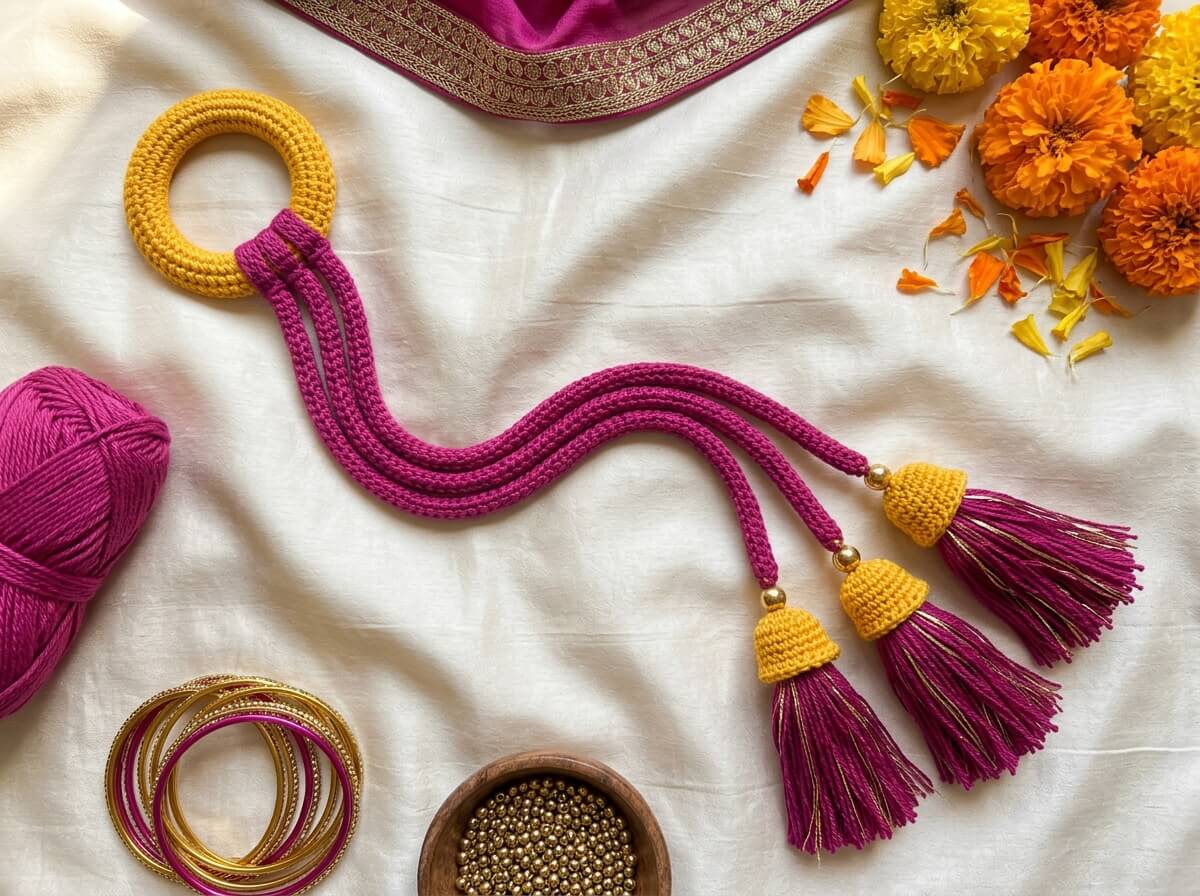
A parandi is a long hair accessory made of three cords that are joined together at the top and finished with tassels at the bottom. You fasten the top at the base of your braid, add one cord to each of the three hair sections, and braid everything together. The cords travel down with your hair and continue past the ends, so the tassels swing below the braid. Traditionally, parandis were made from silk or cotton threads in bright jewel tones, decorated with metallic thread, beads, tiny mirrors and little bells, and they were worn for festivals, weddings and everyday life in Punjabi villages.
A crochet parandi follows the same idea but replaces twisted threads with crocheted cords and adds crocheted details like covered rings and bell-shaped caps over the tassels. Crochet makes the accessory sturdier, easier to make at home, and far more personal, because you choose every color, every bead and every finishing touch yourself. It is also a wonderful way to make your hair look longer and fuller, since the cords add length and volume to even a shoulder-length braid.
Why You Will Love Making a Crochet Parandi
A crochet parandi is one of those rare projects that is quick to make but looks impressive when it is finished. The stitches involved are basic, so it is perfect if you have just learned to chain and single crochet, yet the result is a statement accessory that people will ask about. Most women can finish one in two to four hours, which makes it ideal for last-minute festival or wedding outfits.
It is also a thoughtful handmade gift. A parandi in a bride’s mehndi colors, a matching set for bridesmaids, or a soft pastel version for a daughter’s Eid outfit carries much more meaning than a store-bought accessory. And because it uses very little yarn, it is a lovely way to use up leftover cotton from bigger projects.
Materials You Will Need
Before you start, gather everything in one place so you can work without interruptions. The list is short, and you probably already own most of it if you crochet.
| Material | What to Choose | Why It Matters |
|---|---|---|
| Yarn | DK or light worsted cotton, or a cotton-acrylic blend (one 50 g ball is plenty) | Cotton has a lovely sheen, holds its shape and does not pill when rubbed against hair |
| Crochet hook | 3 mm to 3.5 mm (US C/2 to E/4) | A slightly small hook makes firm, neat cords that will not stretch out of shape |
| Hair elastic | One round, seamless hair tie about 4 cm (1.5 in) across | This becomes the top ring that holds the parandi at the nape |
| Beads | Three round beads with holes large enough for yarn (6–10 mm) | They sit between the cord and the tassel and add a festive sparkle |
| Metallic thread (optional) | Gold or silver embroidery or crochet thread | A few strands mixed into the tassels catch the light beautifully |
| Cardboard | A piece cut to 10 cm (4 in) wide | Used as a template to wrap even, same-size tassels |
| Tapestry needle | Blunt needle with a large eye | For sewing the cords to the ring and weaving in ends |
| Scissors and measuring tape | Any sharp pair and a soft tape | For cutting tassels evenly and measuring cords against your hair |
A note on crochet terms: this pattern uses US terms. A single crochet (sc) in US terms is called a double crochet (dc) in UK terms, so if you learned with UK patterns, simply swap the name while working the same stitch.
Step 1: Measure and Plan Your Parandi
The secret to a parandi that looks right is getting the cord length correct before you start. Each cord should be roughly as long as the braid you want, measured from the nape of your neck down to where you want the tassels to begin. If your hair is short, make the cords longer than your hair so the braid continues with cords alone, which is exactly how parandis make hair look longer. If your hair is very long, match the cords to your hair length so the tassels hang just below the ends.
Use the table below as a starting guide, then hold your measuring tape against your back in front of a mirror to fine-tune it.
| Your Hair Length | Suggested Cord Length | Result |
|---|---|---|
| Shoulder length | 35–40 cm (14–16 in) | The cords extend past your hair and create a longer-looking braid |
| Mid-back | 45–55 cm (18–22 in) | Tassels sit around the waist for a classic look |
| Waist length or longer | 60–70 cm (24–28 in) | Tassels swing at the hips for a dramatic bridal style |
It also helps to choose your colors at this stage. A simple and very traditional combination is one main color for the cords and tassels and a contrasting color for the ring and bell caps. The sample in this guide uses magenta cords and tassels with marigold-yellow details and gold beads, but you will find many more palettes later in the article.
Step 2: Crochet the Top Ring
The top ring is the part you secure at the base of your braid. Covering a hair elastic with crochet stitches makes it soft, stretchy and comfortable, and it gives you a sturdy base to sew the three cords onto.
Make a slip knot with your ring color (marigold in the sample) and place it on your hook. Hold the hair elastic in your other hand, insert the hook through the center of the elastic, yarn over and pull up a loop, then yarn over again and pull through both loops on the hook. That is your first single crochet worked around the elastic. Keep working single crochet stitches around the elastic, pushing them close together as you go, until the elastic is completely hidden. For a 4 cm elastic this usually takes about 30 to 36 stitches, but always go by sight rather than by count. Join with a slip stitch into the first stitch, fasten off, and leave a long tail of about 20 cm so you can use it later to sew the cords in place.
Step 3: Crochet the Three Cords
The cords are the heart of your parandi, and they are made with only two basic stitches. Using your main color (magenta in the sample), leave a tail of about 20 cm and make a long foundation chain that matches the cord length you chose in Step 1. Instead of counting chains, lay the chain along your measuring tape every so often until it reaches the right length, then add five extra chains, because the next row will tighten the chain slightly.
Now turn your chain over so you can see the little bumps along the back. Skip the first chain from the hook and work one single crochet into the back bump of each chain all the way to the end. Working into the back bumps gives a smooth, rounded cord that looks the same on both sides, which is important because the cords will twist and turn inside the braid. Fasten off and leave another 20 cm tail. Repeat to make three cords in total, and lay them side by side to check that they are the same length; if one is noticeably shorter, it is worth remaking it, because uneven cords make the braid pull to one side.
Step 4: Attach the Cords to the Ring
Thread the long tail from the top ring onto your tapestry needle. Place the top end of the first cord against the outer edge of the ring and sew it on with several firm stitches through both the cord and the crocheted ring stitches. Attach the second cord right beside the first, and the third right beside the second, so the three cords sit side by side on one small section of the ring, about 1 cm apart. Keeping them close together means they all start from the same point at your nape, which makes braiding much easier and looks neater from behind.
Once all three are secure, tie off the ring tail and weave it into the stitches of the ring. Then thread each cord’s top tail onto the needle and weave it down inside the first few centimeters of its own cord to hide it completely. Give each cord a gentle tug to make sure it is firmly attached; it will be pulled while you braid, so this is not the place to save stitches.
Step 5: Make Three Matching Tassels
The tassels, called phumman in Punjabi, are what give a parandi its joyful swing. To make them identical, use your 10 cm piece of cardboard as a template. Hold your main yarn together with two or three strands of gold metallic thread and wrap them around the cardboard 25 to 30 times, keeping the tension even but not tight. More wraps give a fuller, more luxurious tassel, so feel free to go up to 40 if you like a dramatic look.
Slide a 25 cm piece of yarn under all the wraps at the top edge of the cardboard and tie it in a tight double knot; this tie will later attach the tassel to the cord, so leave both ends long. Then cut through all the wraps along the bottom edge of the cardboard and remove it. To form the tassel’s head, wrap another piece of yarn tightly around the tassel about 1.5 cm below the top, tie it firmly and tuck its ends down into the tassel. Finally, trim the bottom so all the strands are perfectly even. Repeat until you have three tassels.
Step 6: Crochet the Bell Caps
Bell-shaped caps over the tassel heads are a lovely crochet twist on the metal or thread-wrapped tops of traditional parandis. Each cap is a tiny cup worked in the round, and it takes only a few minutes.
Using your accent color (marigold in the sample), make a magic ring and work 6 single crochet into it, then pull the ring closed, leaving a small hole in the center. In Round 2, work 2 single crochet into each stitch for a total of 12 stitches. For Rounds 3, 4 and 5, work 1 single crochet into each stitch around, keeping 12 stitches in every round; this builds the sides of the bell without increasing, so the cap curves into a neat rounded cup. Slip stitch into the next stitch to finish, fasten off, and leave a 20 cm tail for sewing. Make three caps and check that each one fits snugly over the head of a tassel; if your caps are loose, try again with a smaller hook.
Step 7: Assemble the Cord Ends
Now everything comes together. Thread the bottom tail of the first cord through a gold bead and slide the bead up so it rests against the end of the cord. Take one bell cap and pass the long top-tie ends of a tassel up through the small hole at the center of the cap, from the inside out, so the cap slides down over the tassel’s head like a little hat. Then tie the tassel’s top-tie ends tightly to the cord tail just below the bead, so the order from top to bottom is cord, bead, bell cap, tassel. Use the cap’s own tail to sew a few small stitches between the rim of the cap and the tassel’s neck so the cap cannot slide up.
Repeat for the other two cords. Weave every remaining tail up inside its cord or down into the tassel and trim it. Lay your parandi flat and check that the three ends line up at the same length; if one hangs lower, you can adjust its tie before trimming.
Your Finished Crochet Parandi
Take a moment to admire your work: a soft crocheted ring at the top, three smooth matching cords, and three swinging bell-capped tassels with a glint of gold. If the cords feel a little stiff or curly, hold a steam iron a few centimeters above them for a few seconds, without touching the yarn, then let them dry flat and straight. This light steaming relaxes cotton stitches and helps the parandi drape beautifully into your braid.
How to Wear Your Crochet Parandi
Wearing a parandi is easier than it looks, and after one or two tries it becomes second nature. Start with brushed, tangle-free hair, and lightly mist it with water or a little leave-in cream if it is very silky, because slightly textured hair grips the cords better.
Gather your hair into a low ponytail at the nape and secure it with a regular hair tie. Slip the parandi’s crocheted ring over the ponytail and push it up so it sits snugly on top of your hair tie, with the three cords hanging down at the back. Divide your ponytail into three equal sections and lay one cord along the center of each section so it becomes part of that strand. Now braid as usual, keeping each cord together with its section of hair as you cross the strands over. When you reach the end of your hair, simply keep braiding the three cords on their own until you are a few centimeters above the bead. If you like a tighter finish, you can wrap the last part of the braid with a small clear elastic, but with crocheted cords the braid usually holds by itself.
For a softer, romantic look, gently pull the outer edges of the braid with your fingertips to “pancake” it and make it look fuller. For a sleek bridal look, braid tightly and smooth any flyaways with a little hair serum.
Beautiful Color Ideas for Every Occasion
One of the joys of making your own parandi is choosing colors that match your outfit perfectly. Here are some combinations that look especially lovely, along with where they shine.
- Classic Punjabi red and gold: Deep red cords and tassels with gold caps and plenty of metallic thread give the most traditional look, and they are perfect for wedding functions, Lohri and Vaisakhi celebrations where bold, festive color is expected.
- Mehndi green and yellow: Leaf green cords with marigold tassels and caps echo the colors of a mehndi night, and they look wonderful with yellow and green outfits, floral jewelry and bangles.
- Soft pastel bridal: Blush pink, mint or lilac cords with ivory caps and pearl beads create a delicate, modern style that suits nikah ceremonies, bridal showers and daytime Eid gatherings.
- Black and silver elegance: Black cords with silver metallic thread and silver beads look sophisticated with dark formal outfits and evening events, and they are a great choice if you want something less traditional but still festive.
- Rainbow phulkari: Making each cord a different jewel tone, such as magenta, orange and turquoise, with multicolor tassels, gives a playful folk-inspired look that is fun for festivals, summer outings and little girls’ outfits.
- Neutral everyday boho: Cream, beige or soft terracotta cords with wooden beads make a subtle accessory you can wear with jeans and a simple kurti for college, work or weekend brunches.
Easy Ways to Customize Your Parandi
Once you have made your first parandi, it is easy to give the next one its own personality. You can thread small beads onto your yarn before you start the cords and slide one into place every few centimeters as you single crochet, creating sparkling dots all along the braid. Tiny crocheted flowers sewn onto the ring turn the top into a pretty focal point at the nape, which is especially charming for brides and little girls.
For extra sound and movement, sew a small ghungroo bell just above each bead so your parandi jingles softly as you walk, just like the traditional ones. You can also replace the yarn tassels with crocheted pom-poms or long crocheted spirals if you want a more modern look. Experiment with tassel length too: short, plump tassels look playful, while long, slim tassels look elegant and flowing.
Common Problems and How to Fix Them
Even simple projects can surprise you, so here are the issues beginners run into most and how to solve them quickly.
- The cords curl or twist on their own: This usually happens when the foundation chain is much tighter than the single crochet row. Try making your chain with a hook one size larger than the one you use for the single crochet, and lightly steam the finished cords so they relax and lie straight.
- The cords are different lengths: Crochet tension changes as you relax into a project, so the third cord is often longer than the first. Measuring each chain against the tape instead of counting stitches keeps all three cords matching, and it is worth checking them side by side before attaching them to the ring.
- The tassels shed strands: If strands slip out, the top tie or the neck wrap is not tight enough. Re-tie the top with a double knot, wrap the neck several times very firmly, and add a tiny dab of fabric glue inside the bell cap for extra security on parandis that will be worn often.
- The parandi slides down the braid: A loose ring or very silky hair can cause slipping. Push the ring firmly over your own hair tie rather than using it alone, and braid a little tighter in the first few crossings near the nape, where the grip matters most.
- The bell caps are loose: If caps wobble on the tassels, your stitches are a little loose for the tassel size. Make the caps again with a hook half a size smaller, or add extra wraps to the tassel so its head is fuller.
How to Care for Your Crochet Parandi
A well-made crochet parandi can last for years if you treat it gently. Hand wash it only when needed in cool water with a drop of mild shampoo or wool wash, swishing it softly rather than rubbing, especially around the tassels. Press out the water with a towel without wringing, then lay it flat on a dry towel with the cords straight and the tassels combed out with your fingers, and let it air dry away from direct sun so bright colors do not fade.
To store it, coil the cords loosely in a circle with the tassels resting in the center and keep it in a small fabric pouch or box. Avoid hanging it by the ring for long periods, because the weight of the tassels can slowly stretch the elastic. If the tassels look a little messy after wear, hold them over a steaming kettle for a few seconds and comb them gently with your fingers, then trim any uneven ends.
Frequently Asked Questions
Is a crochet parandi suitable for beginners? Yes, it is one of the best first accessory projects you can make. The whole design uses chains, single crochet and a magic ring, and the tassels are made without a hook at all. If you can make a chain and a single crochet, you can make a parandi.
How long does it take to make one? Most women finish a parandi in about two to four hours, depending on cord length and how much decoration they add. The cords take the longest, so if you are short on time, crochet them first and make the tassels and caps while relaxing in the evening.
Can I wear a parandi with short hair? Absolutely, and this is one of the best reasons to wear one. With shoulder-length hair, the cords continue past the ends of your hair, so the braid looks longer and the tassels still swing below your shoulders. Just make the cords a little longer than your hair, as shown in the length table above.
Which yarn is best for a parandi? Cotton or a cotton-acrylic blend in DK or light worsted weight is the best choice because it has a soft sheen, holds its shape and does not pill or catch on hair. Very fuzzy yarns like mohair can tangle with your hair, so they are best avoided for the cords, although they can be fun for decorative pom-poms.
Can I make a parandi for a child? Yes, a parandi makes a sweet accessory for little girls at weddings and Eid. Use shorter cords, lighter tassels with fewer wraps, and skip small beads or bells for young children, sewing on crocheted flowers or embroidered details instead.
Will the parandi damage my hair? A crochet parandi is very gentle because the soft cotton cords replace rough metal fittings. Just avoid braiding too tightly at the scalp, and remove the parandi before sleeping to give your hair a rest.
Final Thoughts
A crochet parandi is so much more than a hair accessory. It connects you to a beautiful tradition, lets you express your own style through color and detail, and turns a simple braid into something joyful and full of movement. Whether you make a bold red and gold parandi for a wedding, a soft pastel one for Eid, or a neutral boho version for everyday wear, every stitch carries a little bit of your personality.
Start with the simple version in this guide, then let your creativity lead the way with beads, bells, flowers and new color combinations. Before long, you may find yourself making matching parandis for your sisters, friends and every celebration on the calendar. Save this guide to your crochet board so you have it ready the next time a special occasion comes around.