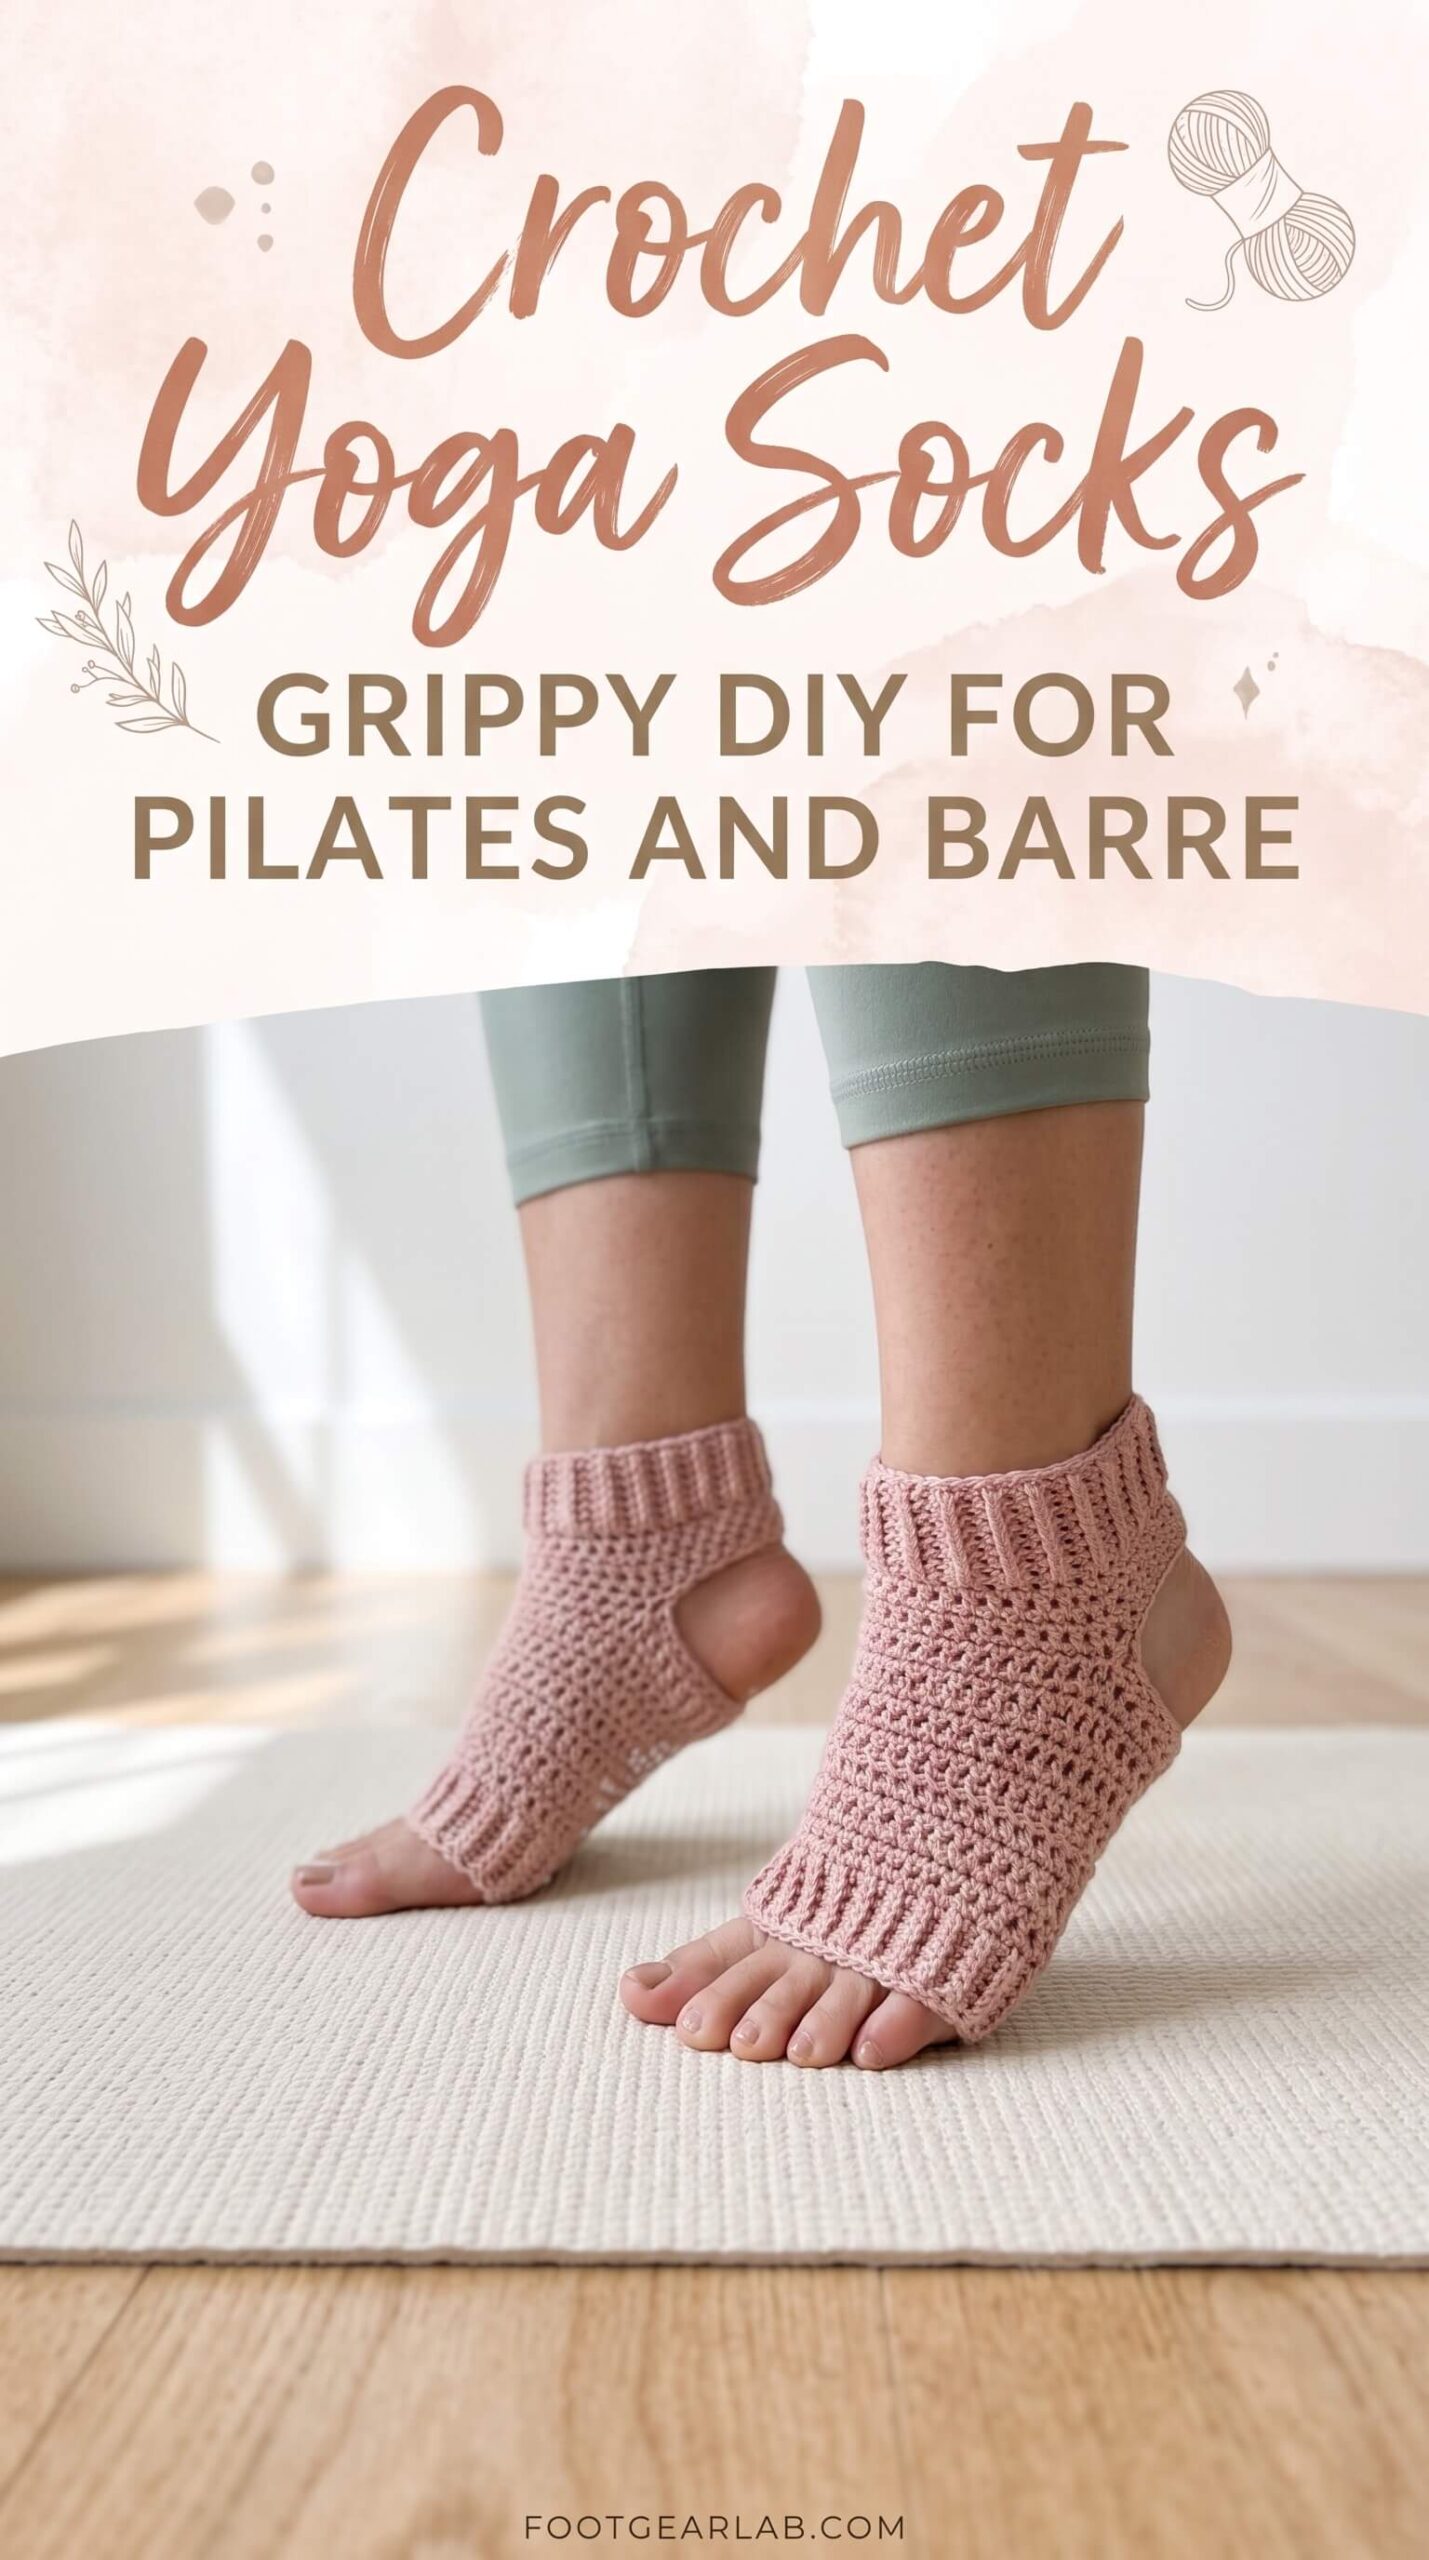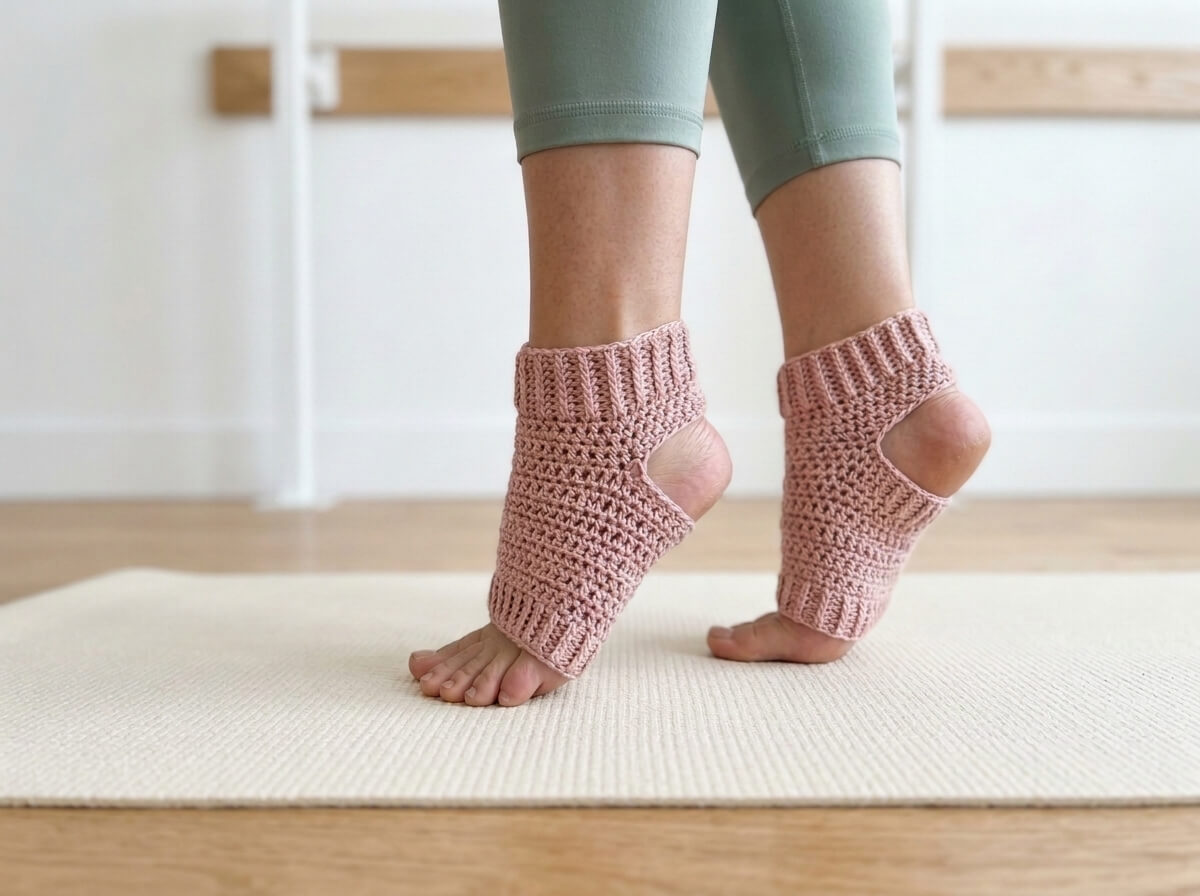
If you’ve ever paid studio prices for a single pair of grip socks, you already know how fast that habit adds up. A good pair can cost as much as a drop-in class, and they tend to come in the same handful of colors as everyone else’s. Crocheting your own yoga socks fixes both problems. You choose the yarn, the color and the fit, and you add the non-slip grip yourself with simple supplies from any craft store.
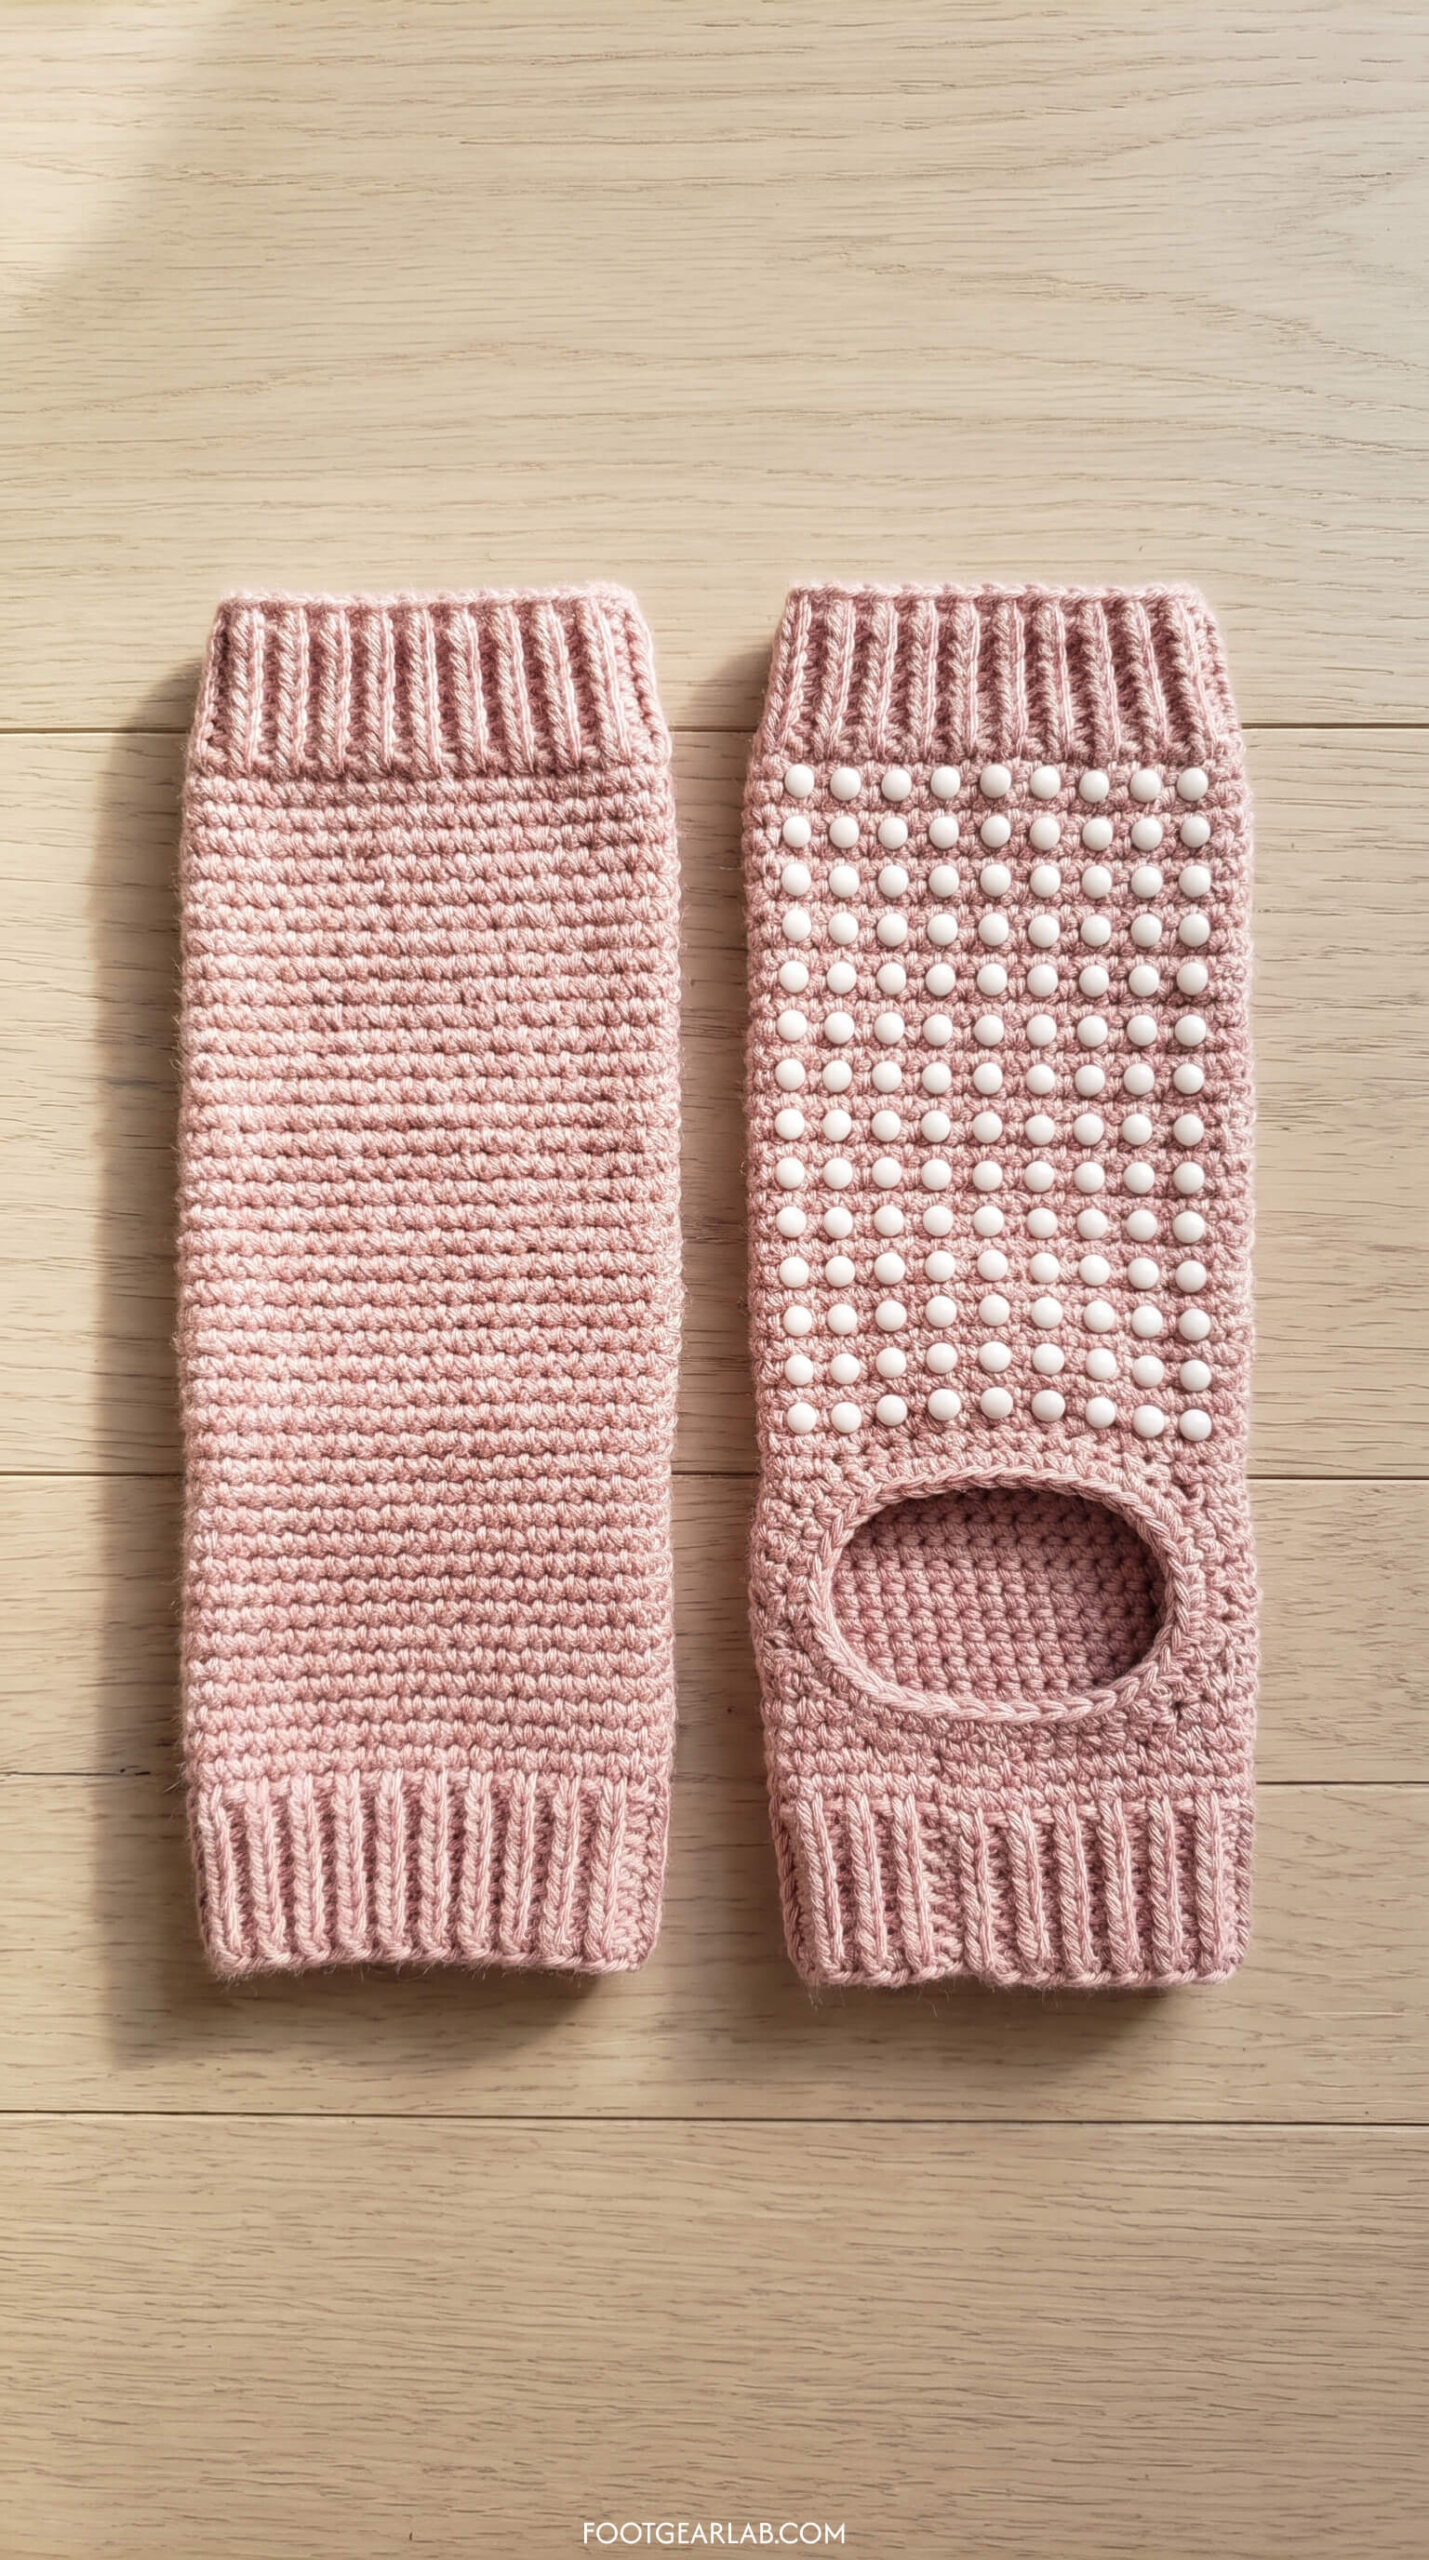
This guide walks you through a classic crochet yoga sock: toeless and heelless. Think of it as a fingerless glove for your foot. It covers the top of the foot and the arch, with a stretchy ribbed band across the base of the toes, an open hole for the heel and a short ribbed cuff around the ankle. Your toes and heel stay bare, so they can press into the mat for balance, while the sock keeps your feet warm and adds grip under the ball of the foot. With no heel to shape, it’s one of the quickest and most beginner-friendly socks you can make. Many crocheters finish a pair in one or two evenings.
Why Yoga Socks Have No Heel (or Toes)
Bare skin grips better than fabric. Your heel and toes do a lot of the work in balancing poses, footwork and relevé. Leaving them uncovered lets them press straight into the mat or floor, which is steadier than any fabric. The sock covers only the middle of the foot, where warmth and a little extra grip help most.
Your feet can move freely. Without a heel to pull against, the sock never shifts or bunches as you point and flex. Your toes can spread naturally, and your ankle moves through its full range without fabric pulling across the back of the heel.
They’re easy to make and to fit. Shaping a heel is the trickiest part of any sock. A heelless yoga sock is mostly a simple tube with one opening, so it’s a perfect first sock project. The fit is also more forgiving, because there’s no heel that has to land in exactly the right spot.
They’re versatile. Yoga socks work for mat Pilates, barre, yoga, stretching at home and even pedicures. They keep the top of your feet and ankles warm on a cold studio floor without covering the parts of your foot you need for grip.
Why Make Your Own?
You get a fit made for your foot. Store-bought yoga socks usually come in one or two sizes, which means the toe band can slide or the heel opening can sit in the wrong place. When you crochet your own, you measure your foot and work to your exact length.
You choose a breathable, comfortable fiber. A cotton or cotton-blend yarn breathes, absorbs a bit of sweat and feels soft against the skin. That matters in a warm or high-rep class, where hot feet are distracting.
They’re cheap and quick. Because there’s no heel and no toe, a pair uses very little yarn. One 100 g ball of DK cotton blend is usually enough for two pairs, and a single bottle of puffy fabric paint can grip several pairs.
They look like you. Your socks can match your favorite leggings, mix a contrast toe band with the main color, or carry little grip hearts instead of plain dots. It’s the kind of small detail people notice and ask about after class.
Materials You’ll Need
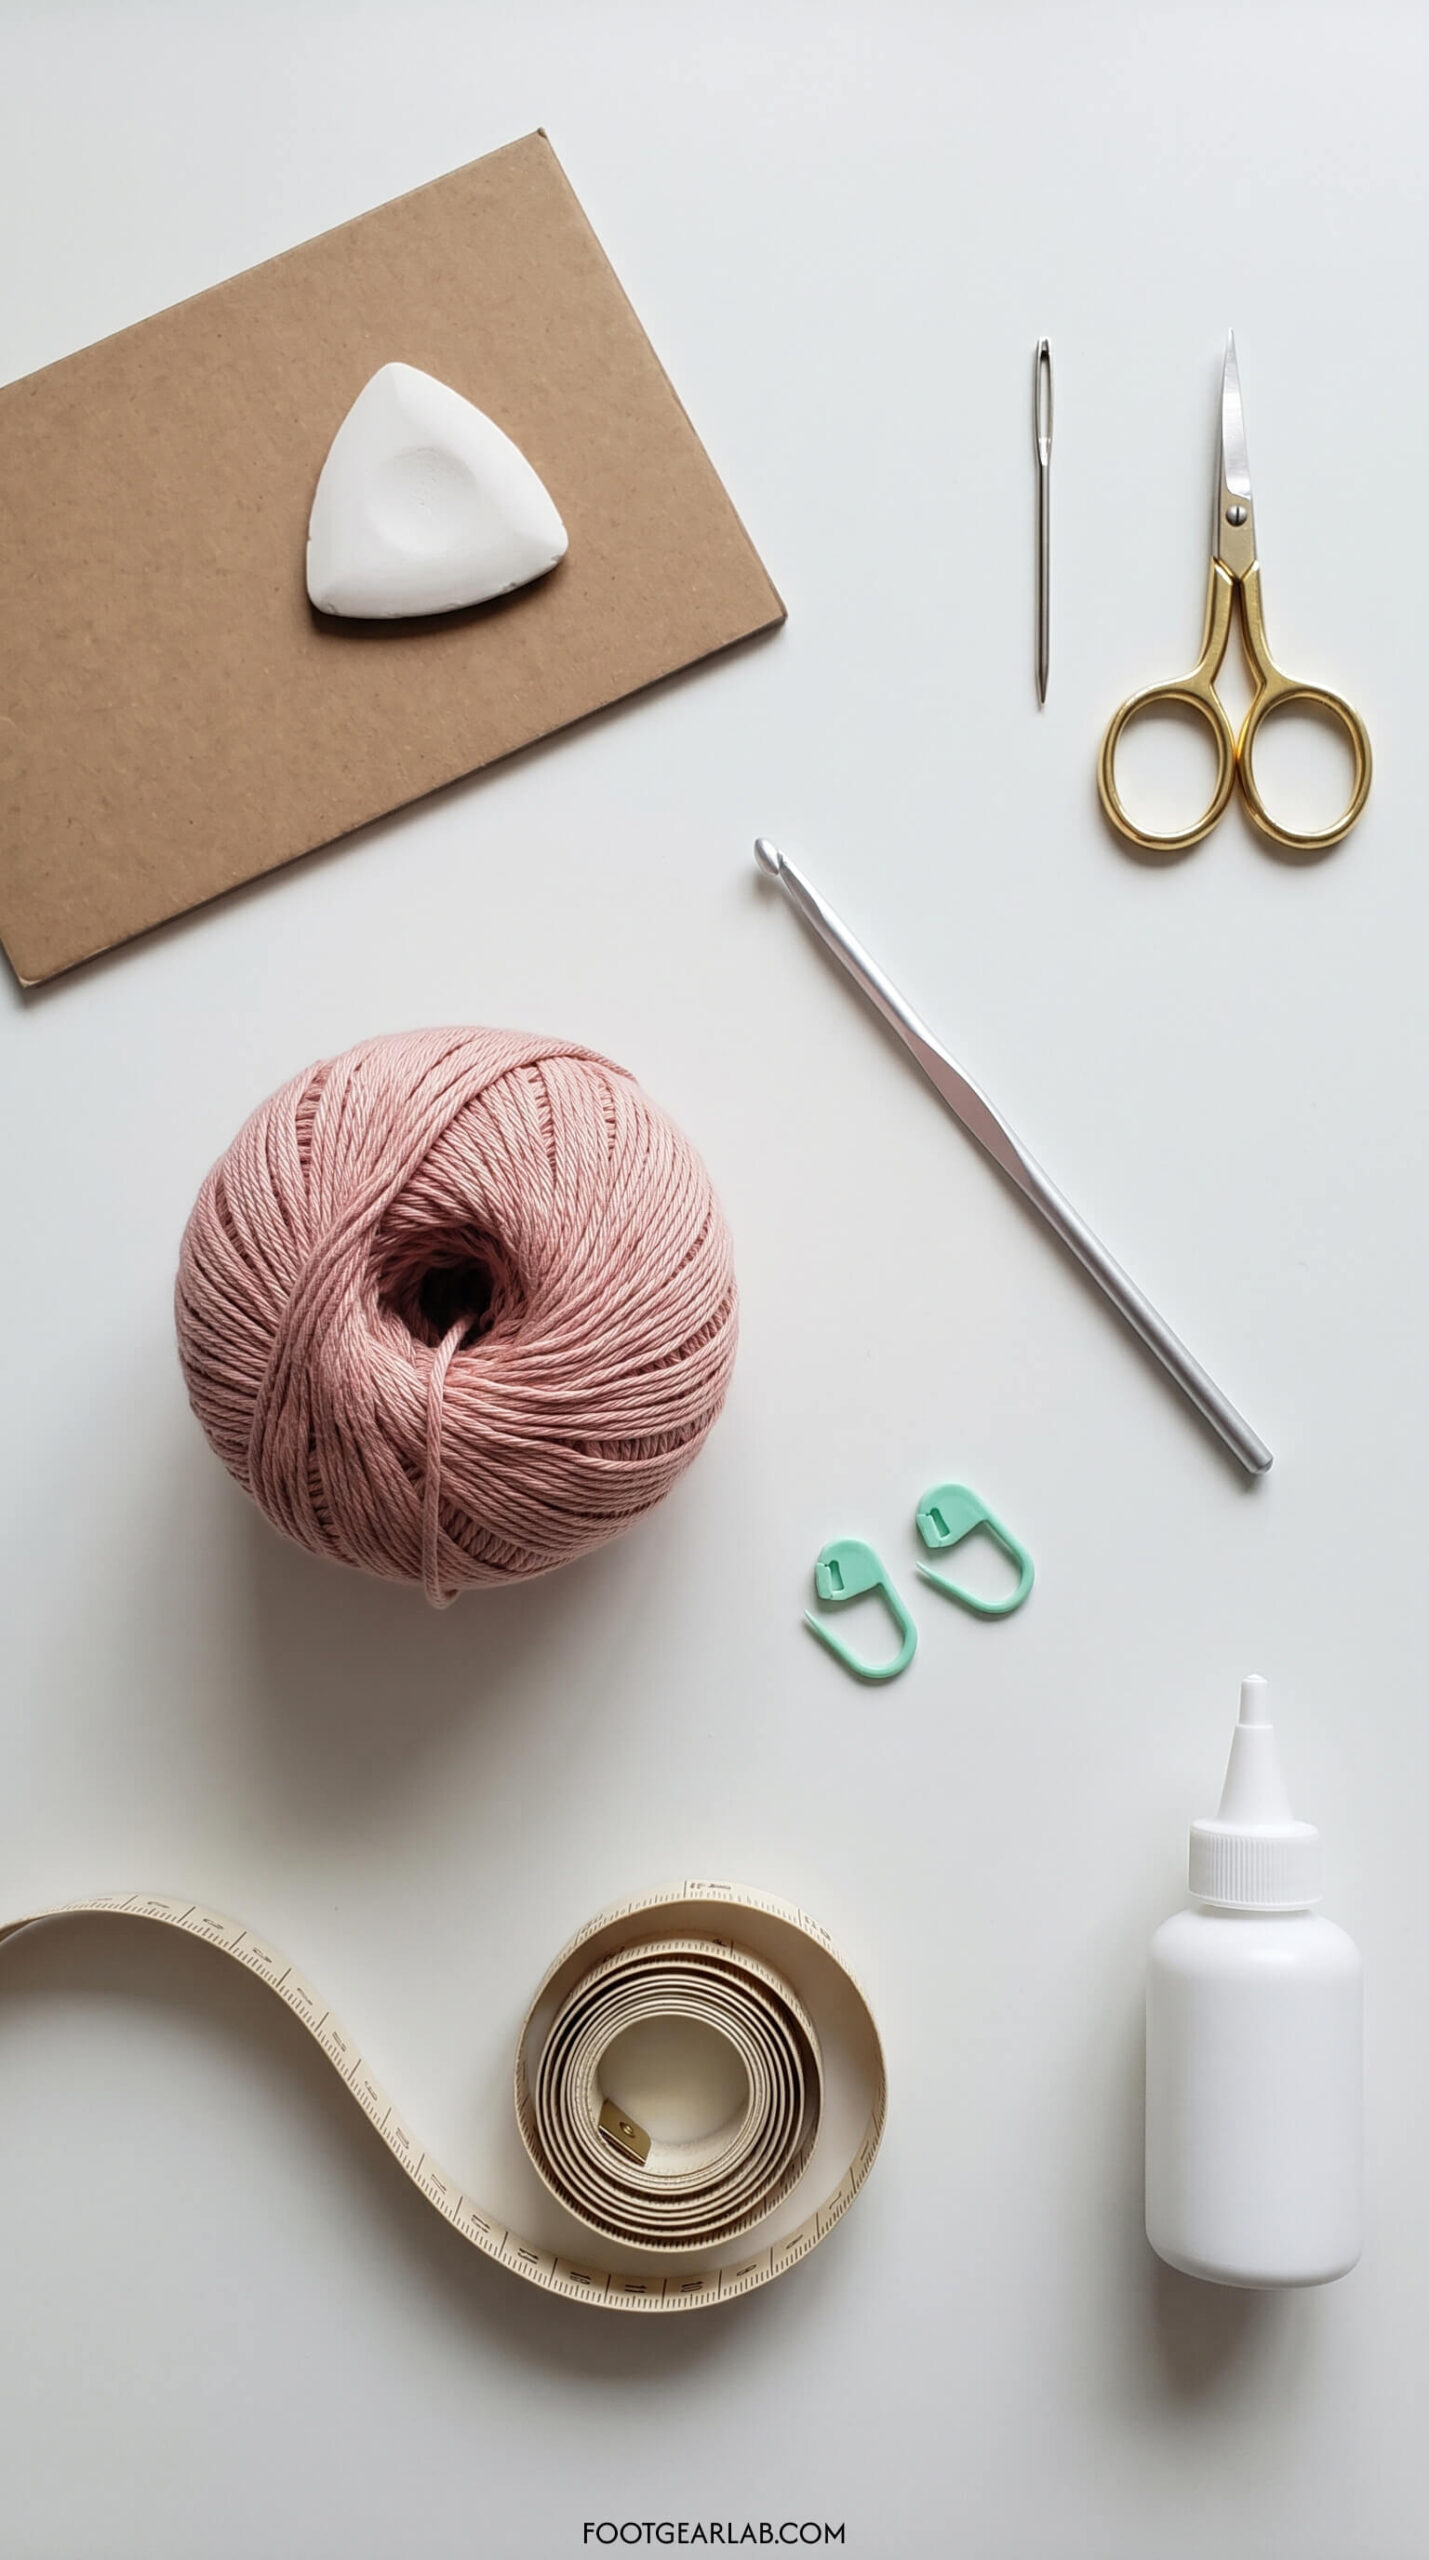
- Yarn: About 100–150 yd (90–140 m) of DK weight (light #3) cotton-blend yarn for one pair. Cotton blended with acrylic, bamboo or a touch of nylon or elastic is ideal, because pure cotton has very little stretch and can sag during class. The sample is a soft dusty blush pink.
- Crochet hook: 3.5 mm (US E-4), or about half a size smaller than your yarn label recommends. Going down a size makes the fabric denser, which helps the grips stick and keeps the sock from stretching out.
- Locking stitch markers (at least 2): One marks the start of each round, and one helps you line up the heel opening. Choose a contrasting color so they’re easy to see.
- Blunt yarn (tapestry) needle: For weaving in ends neatly so they don’t rub against your skin.
- Scissors and a flexible measuring tape: You’ll measure your foot before you start and check your progress as you go.
- Grip material: White (or any color) puffy fabric paint with a fine nozzle is the easiest option. You’ll find a full comparison of grip options in Step 6.
- Thin cardboard: A cereal box works well. You’ll cut an insert to slide into the sock while you apply the grips, so the paint doesn’t glue the sole to the top of the sock.
- Tailor’s chalk or a washable fabric marker: For marking out your dot grid before you paint.
Skill Level and Abbreviations
This pattern is easy / advanced beginner. If you can make single crochet, double crochet and work in the round, you can make these socks. You’ll also use foundation single crochet and front and back post double crochet for the ribbing. Both are easy to learn, and the toe band is a nice small place to practice them.
All terms are US crochet terms.
| Abbreviation | Meaning |
|---|---|
| ch | Chain |
| sl st | Slip stitch |
| sc | Single crochet |
| fsc | Foundation single crochet (a chain and first row of sc made at the same time, for a stretchy starting edge) |
| fpdc | Front post double crochet (worked around the post of the stitch below, from the front) |
| bpdc | Back post double crochet (worked around the post of the stitch below, from the back) |
| sc2tog | Single crochet two together (a one-stitch decrease) |
| st(s) / rnd(s) | Stitch(es) / round(s) |
Step 1: Measure Your Foot and Check Your Gauge
Good yoga socks start with two numbers: the distance around your foot and the number of stitches you get per inch. Taking ten minutes for this step is what keeps the socks from being baggy or too tight.
Measure your foot circumference. Wrap the measuring tape around the widest part of your foot, just behind the toes across the ball of the foot. Keep the tape snug but not tight, and stand while you measure, because your foot spreads slightly under your weight. Write down the number.
Measure the sock length. On the sole of your foot, measure from the base of your toes (where the toe band will sit) to the front edge of your heel, where the rounded heel pad begins. This is roughly how long the foot section needs to be before the heel opening. For most adult feet it’s about 4–5.5 in (10–14 cm).
Make a gauge swatch. Chain 26 and work rows of sc until the swatch is about 4 in (10 cm) square. Measure how many stitches fit across 4 in in the middle of the swatch. The sample gauge is 22 sc and 24 rows = 4 in (10 cm), which is 5.5 stitches per inch. Keep the swatch, because you’ll use it to test your grip paint in Step 6.
Choose your stitch count. If your gauge matches, use the table below. If it doesn’t, use this simple formula: multiply your foot circumference by your stitches per inch, multiply that by 0.9 for negative ease (so the sock hugs your foot), and round to the nearest even number.
| Size | Foot circumference | Stitch count | Half (top of foot / sole) |
|---|---|---|---|
| S | 7.5–8 in (19–20 cm) | 40 sts | 20 sts |
| M | 8.5–9 in (21.5–23 cm) | 44 sts | 22 sts |
| L | 9.5–10 in (24–25.5 cm) | 48 sts | 24 sts |
The instructions below give stitch counts as S (M, L). The stitch count always needs to be even, so the ribbing works out and the heel opening can be placed exactly over half the stitches.
Step 2: Crochet the Ribbed Toe Band
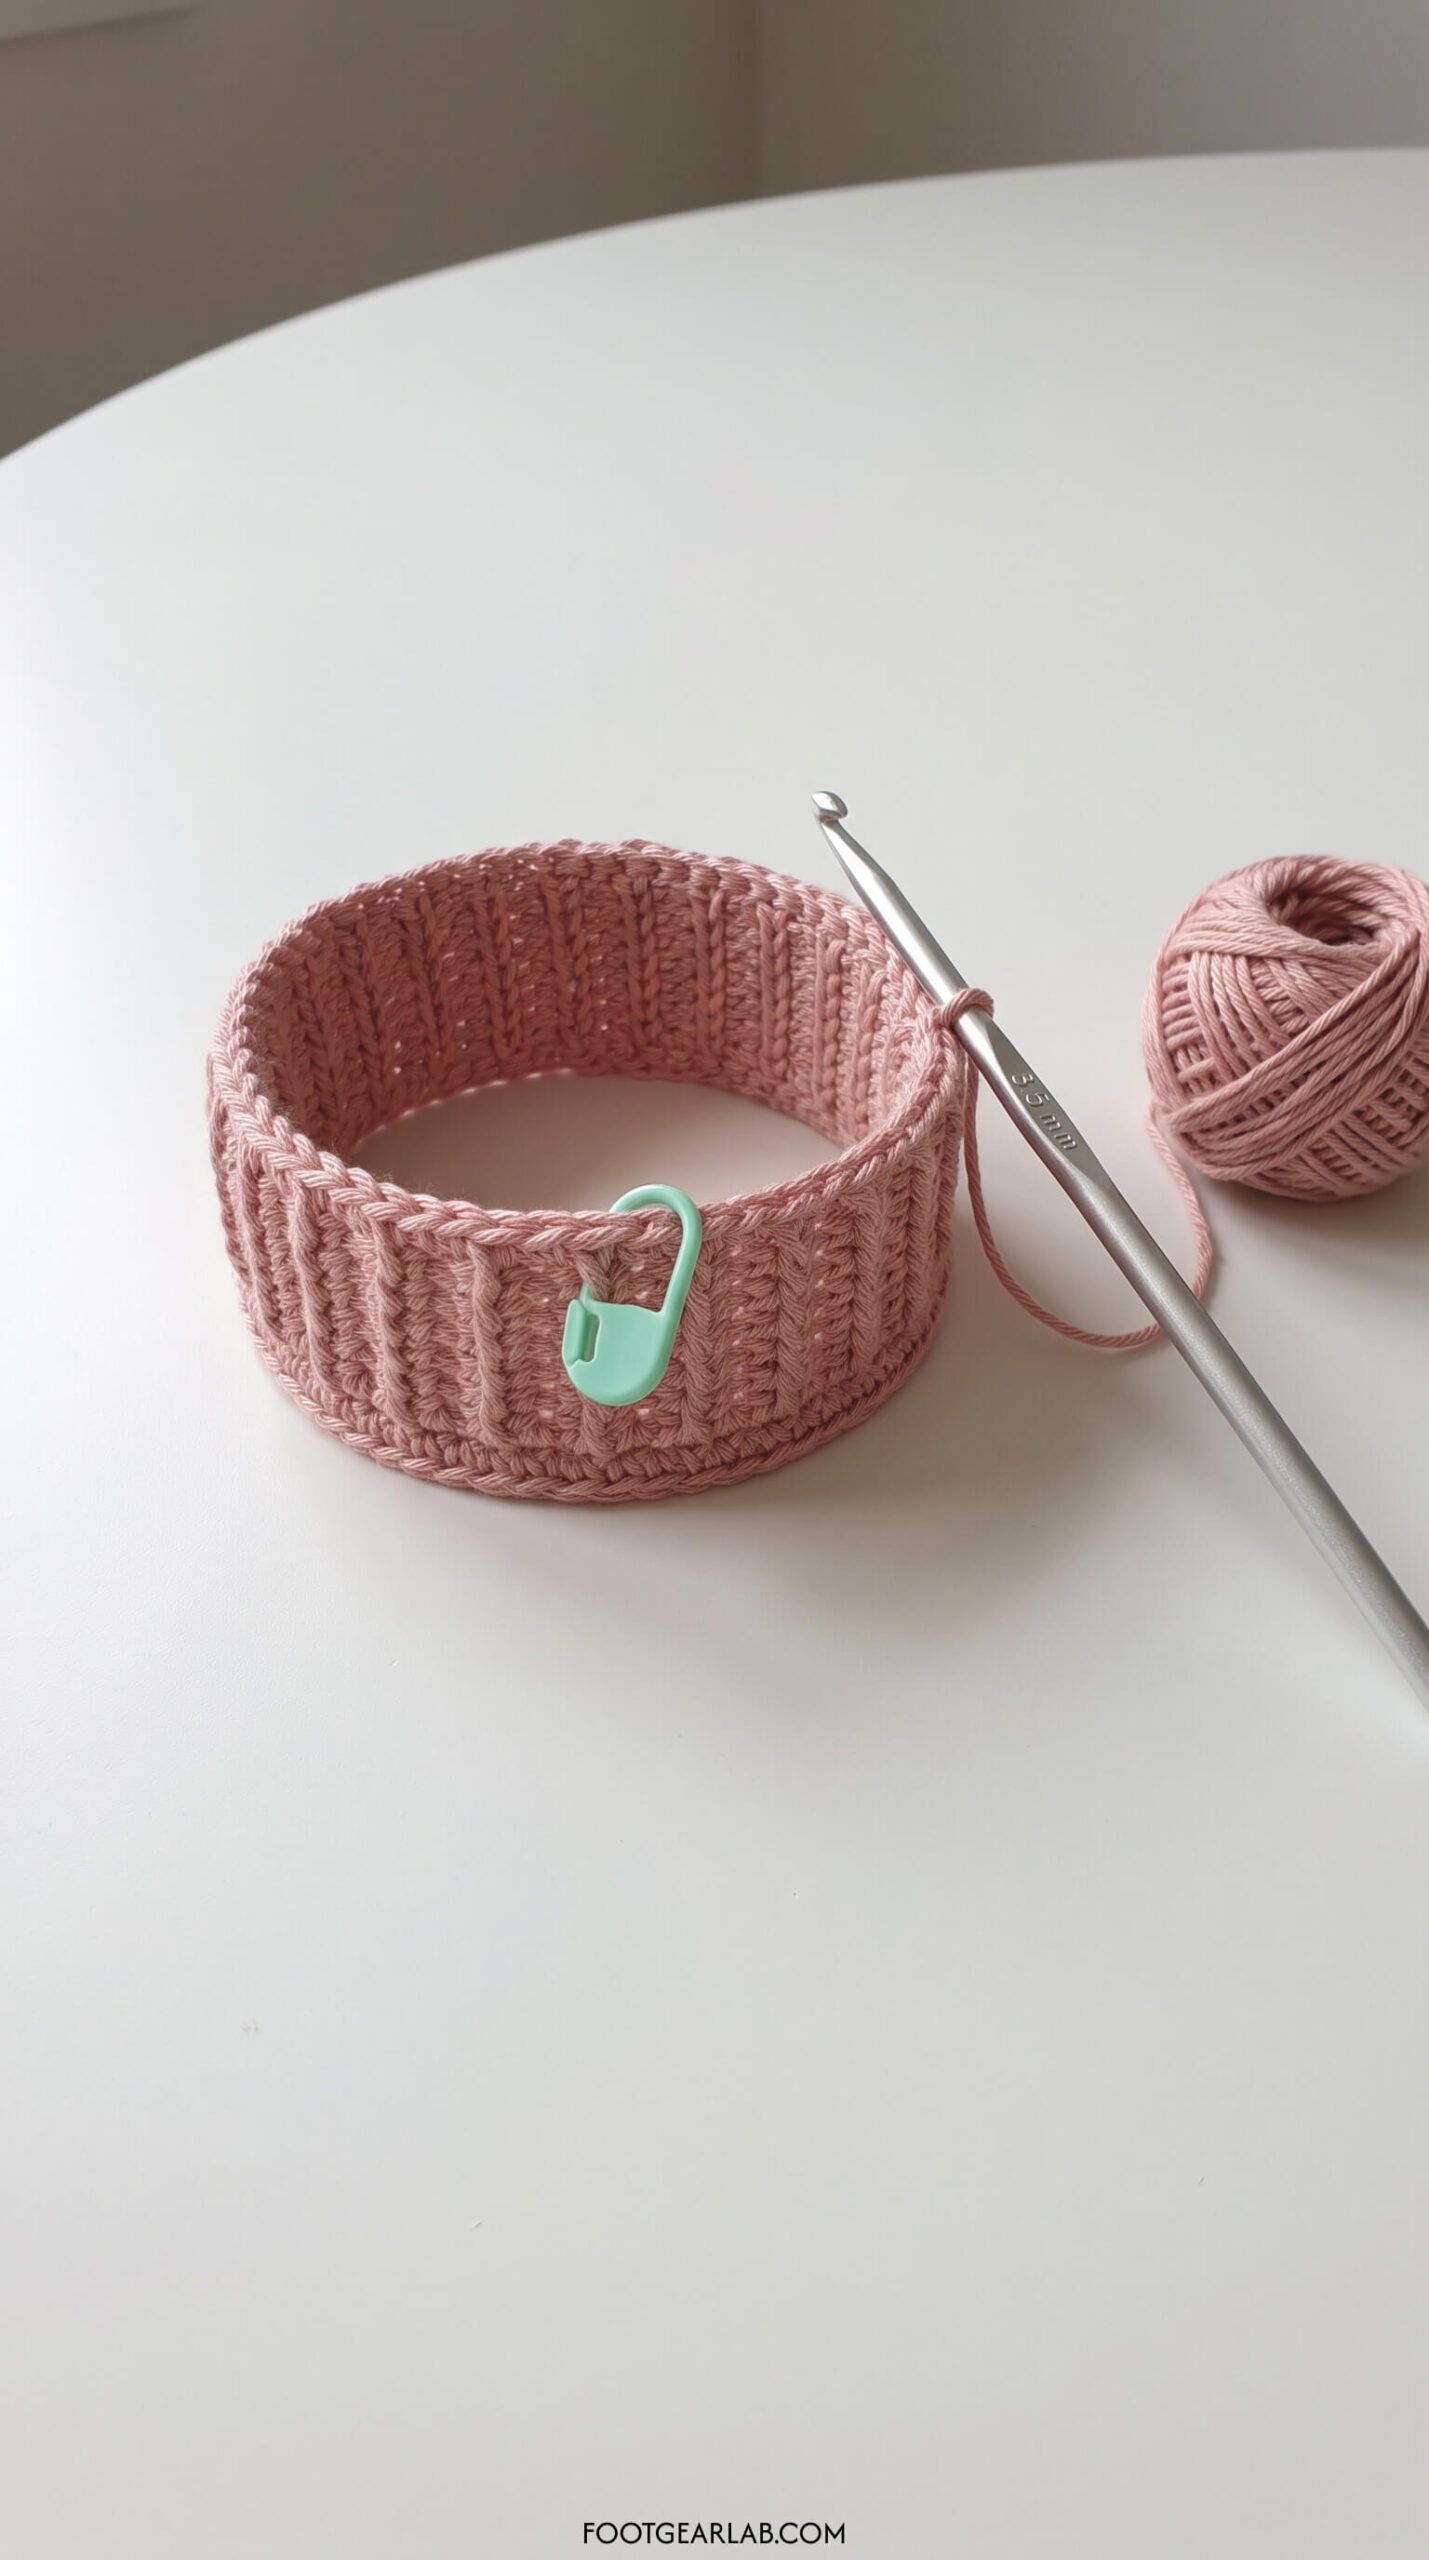
The toe band is the open front of the sock, and it sits across the base of your toes. Starting with foundation single crochet instead of a plain chain gives this edge real stretch, so the band slips over your foot easily and doesn’t dig in.
Rnd 1: Work 40 (44, 48) fsc. Without twisting the strip, bring the ends together and sl st into the first fsc to join into a ring. Check that the ring slips over your toes onto the ball of your foot with a gentle hug. If it’s loose, take it out and work 2 fewer fsc. If it won’t stretch over, add 2 more.
Rnd 2: Ch 2 (does not count as a stitch). Fpdc around the next st, bpdc around the following st. Repeat from * all the way around, then sl st to the top of the first fpdc to join. You’ll have 40 (44, 48) sts, with raised ribs on the outside.
Rnd 3 (optional): Repeat Rnd 2, working fpdc around each fpdc and bpdc around each bpdc. Add this round if you like a wider band that sits a little further down the foot.
Place a marker in the first stitch of the next round so you always know where each round begins. The finished band should be about 3/4–1 in (2–2.5 cm) tall.
Step 3: Work the Foot
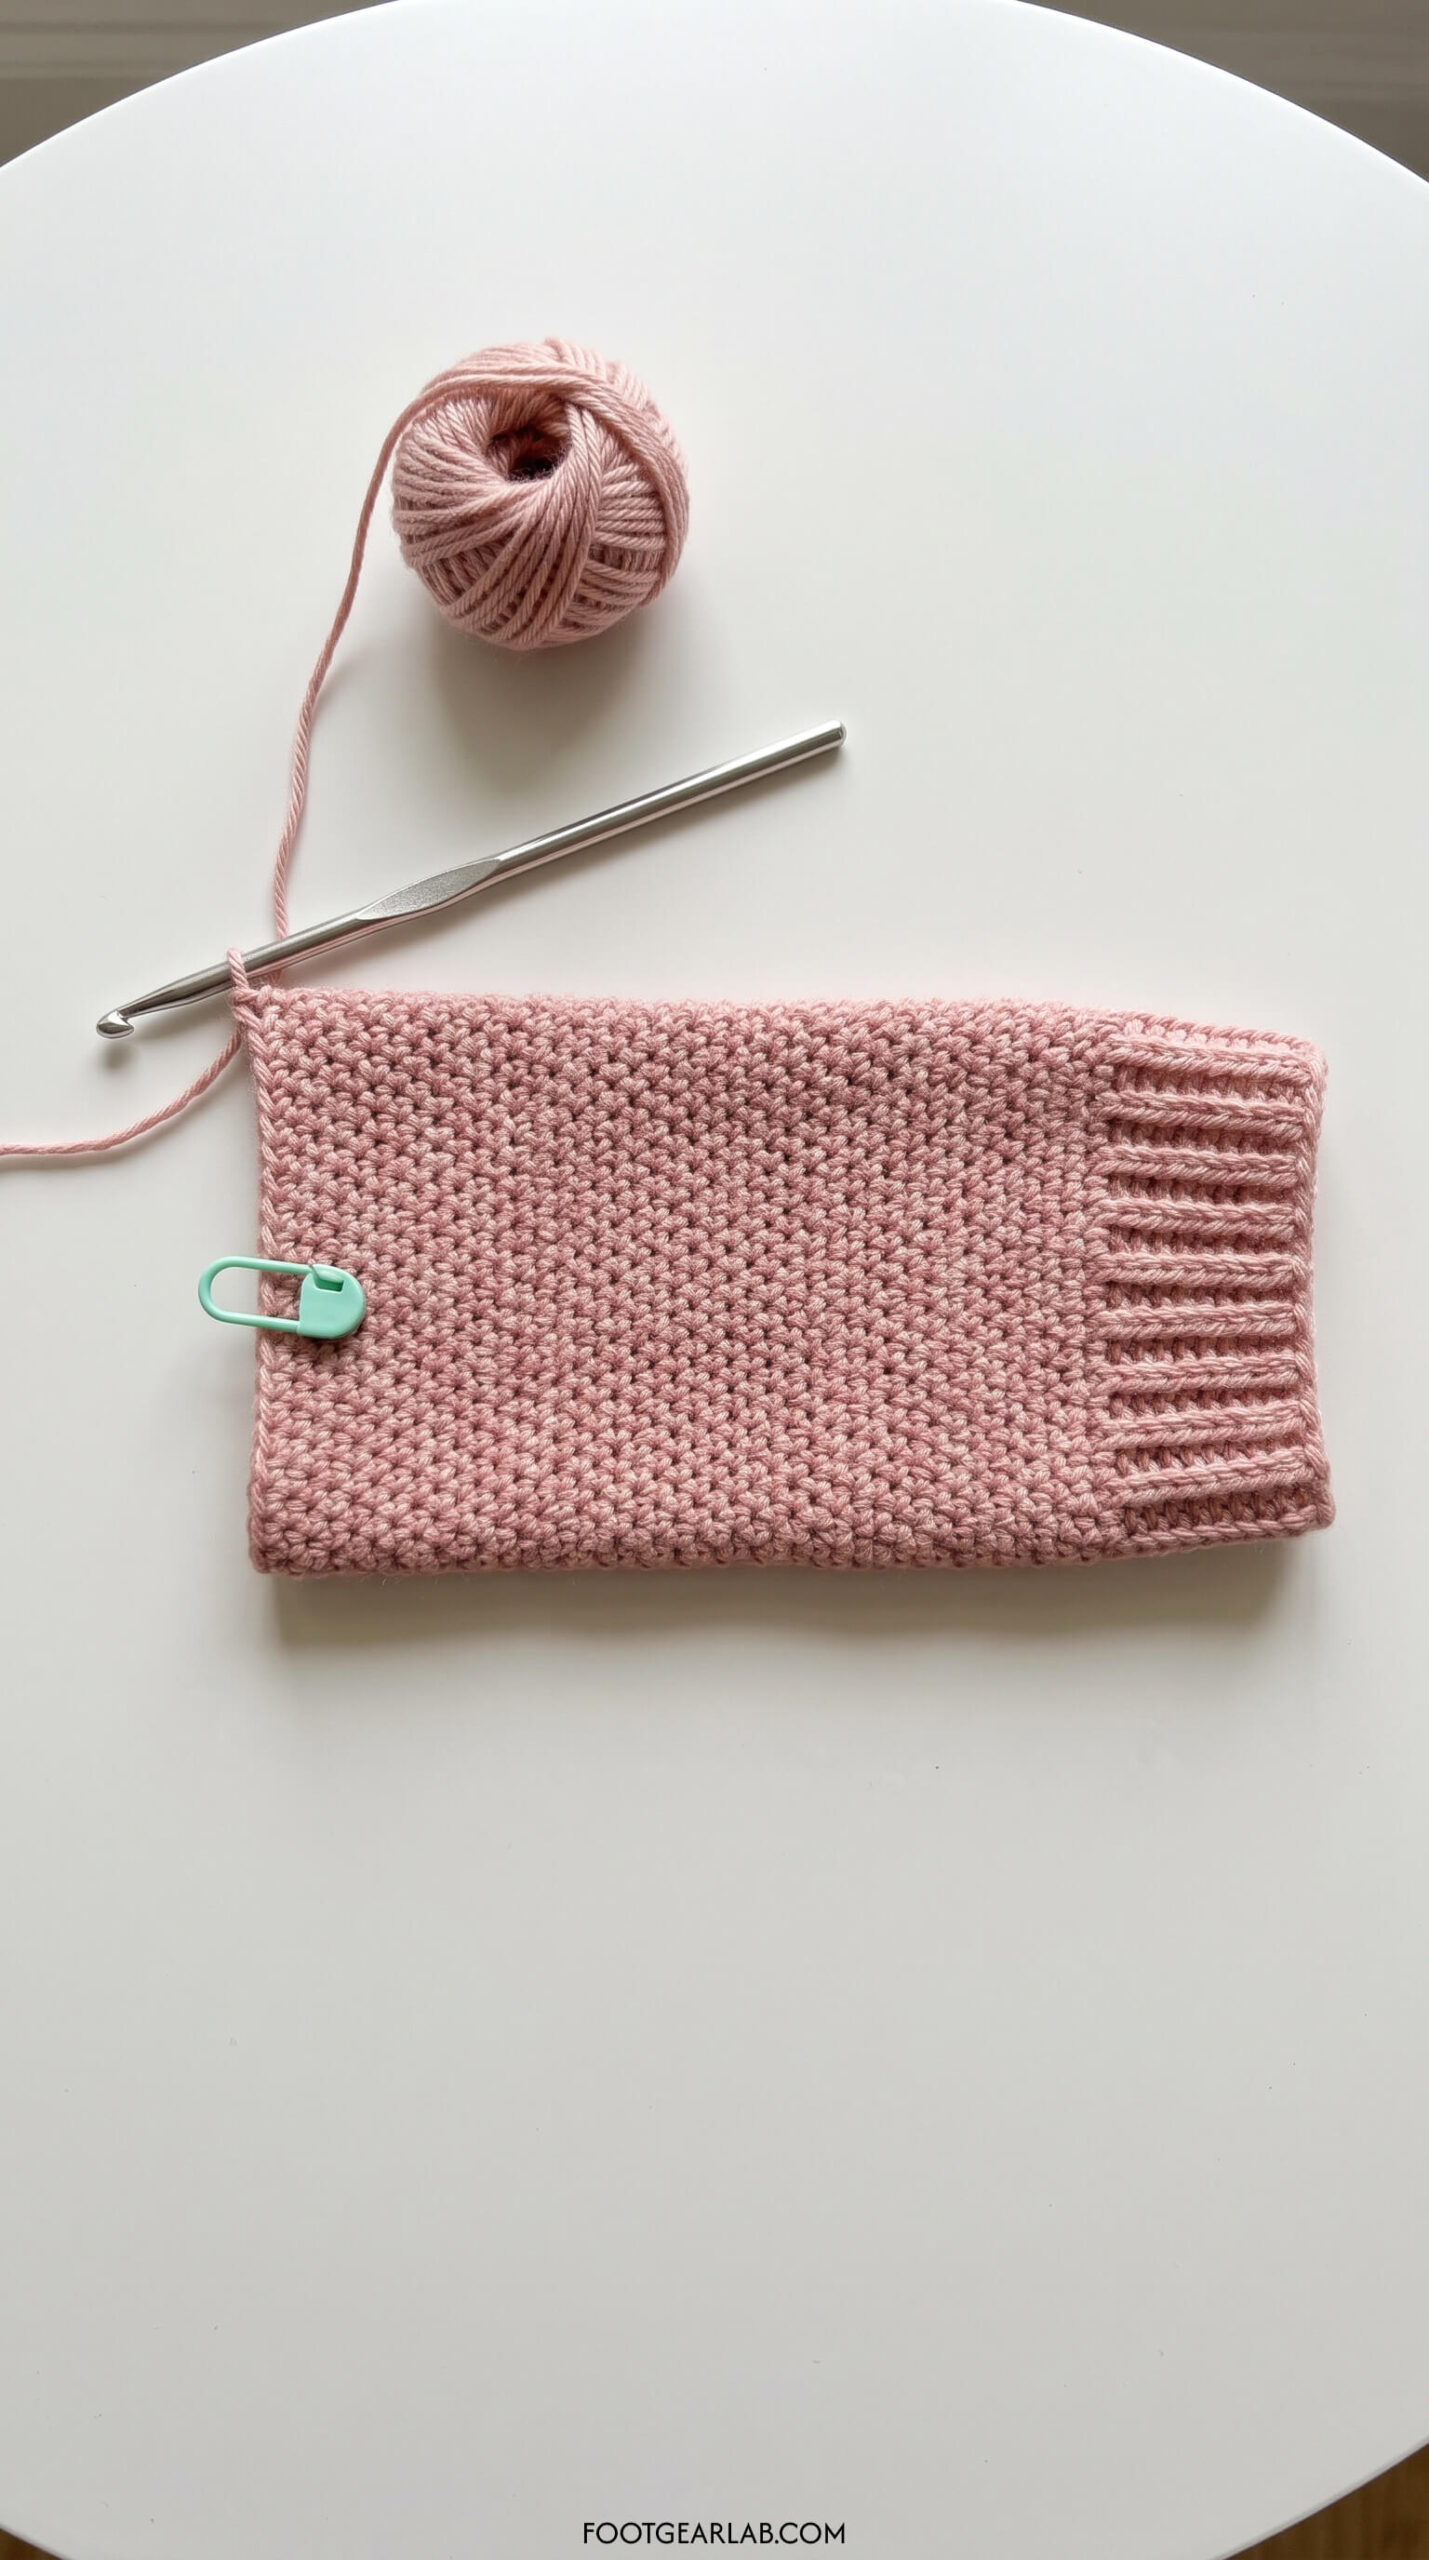
Now you’ll build the main part of the sock, which covers the ball of the foot and the arch. You’ll work in a continuous spiral, which means you don’t join or chain at the end of each round. You just keep going and move your marker up every time you reach it.
Next rnd: Ch 1 (does not count as a stitch). Sc in each st around, working into the tops of the ribbing stitches: 40 (44, 48) sc. Do not join. Move the marker up into the first sc of the next round.
Following rnds: Sc in each st around, moving the marker up at the start of each round. Count your stitches every few rounds to make sure you still have 40 (44, 48).
Try it on as you go. Every few rounds, slip the sock onto your foot with the toe band sitting at the base of your toes. Stop when the bottom edge of the fabric reaches the front of your heel pad, where the rounded part of your heel begins. Write down how many rounds you worked after the toe band, so the second sock matches exactly.
Step 4: Make the Heel Opening
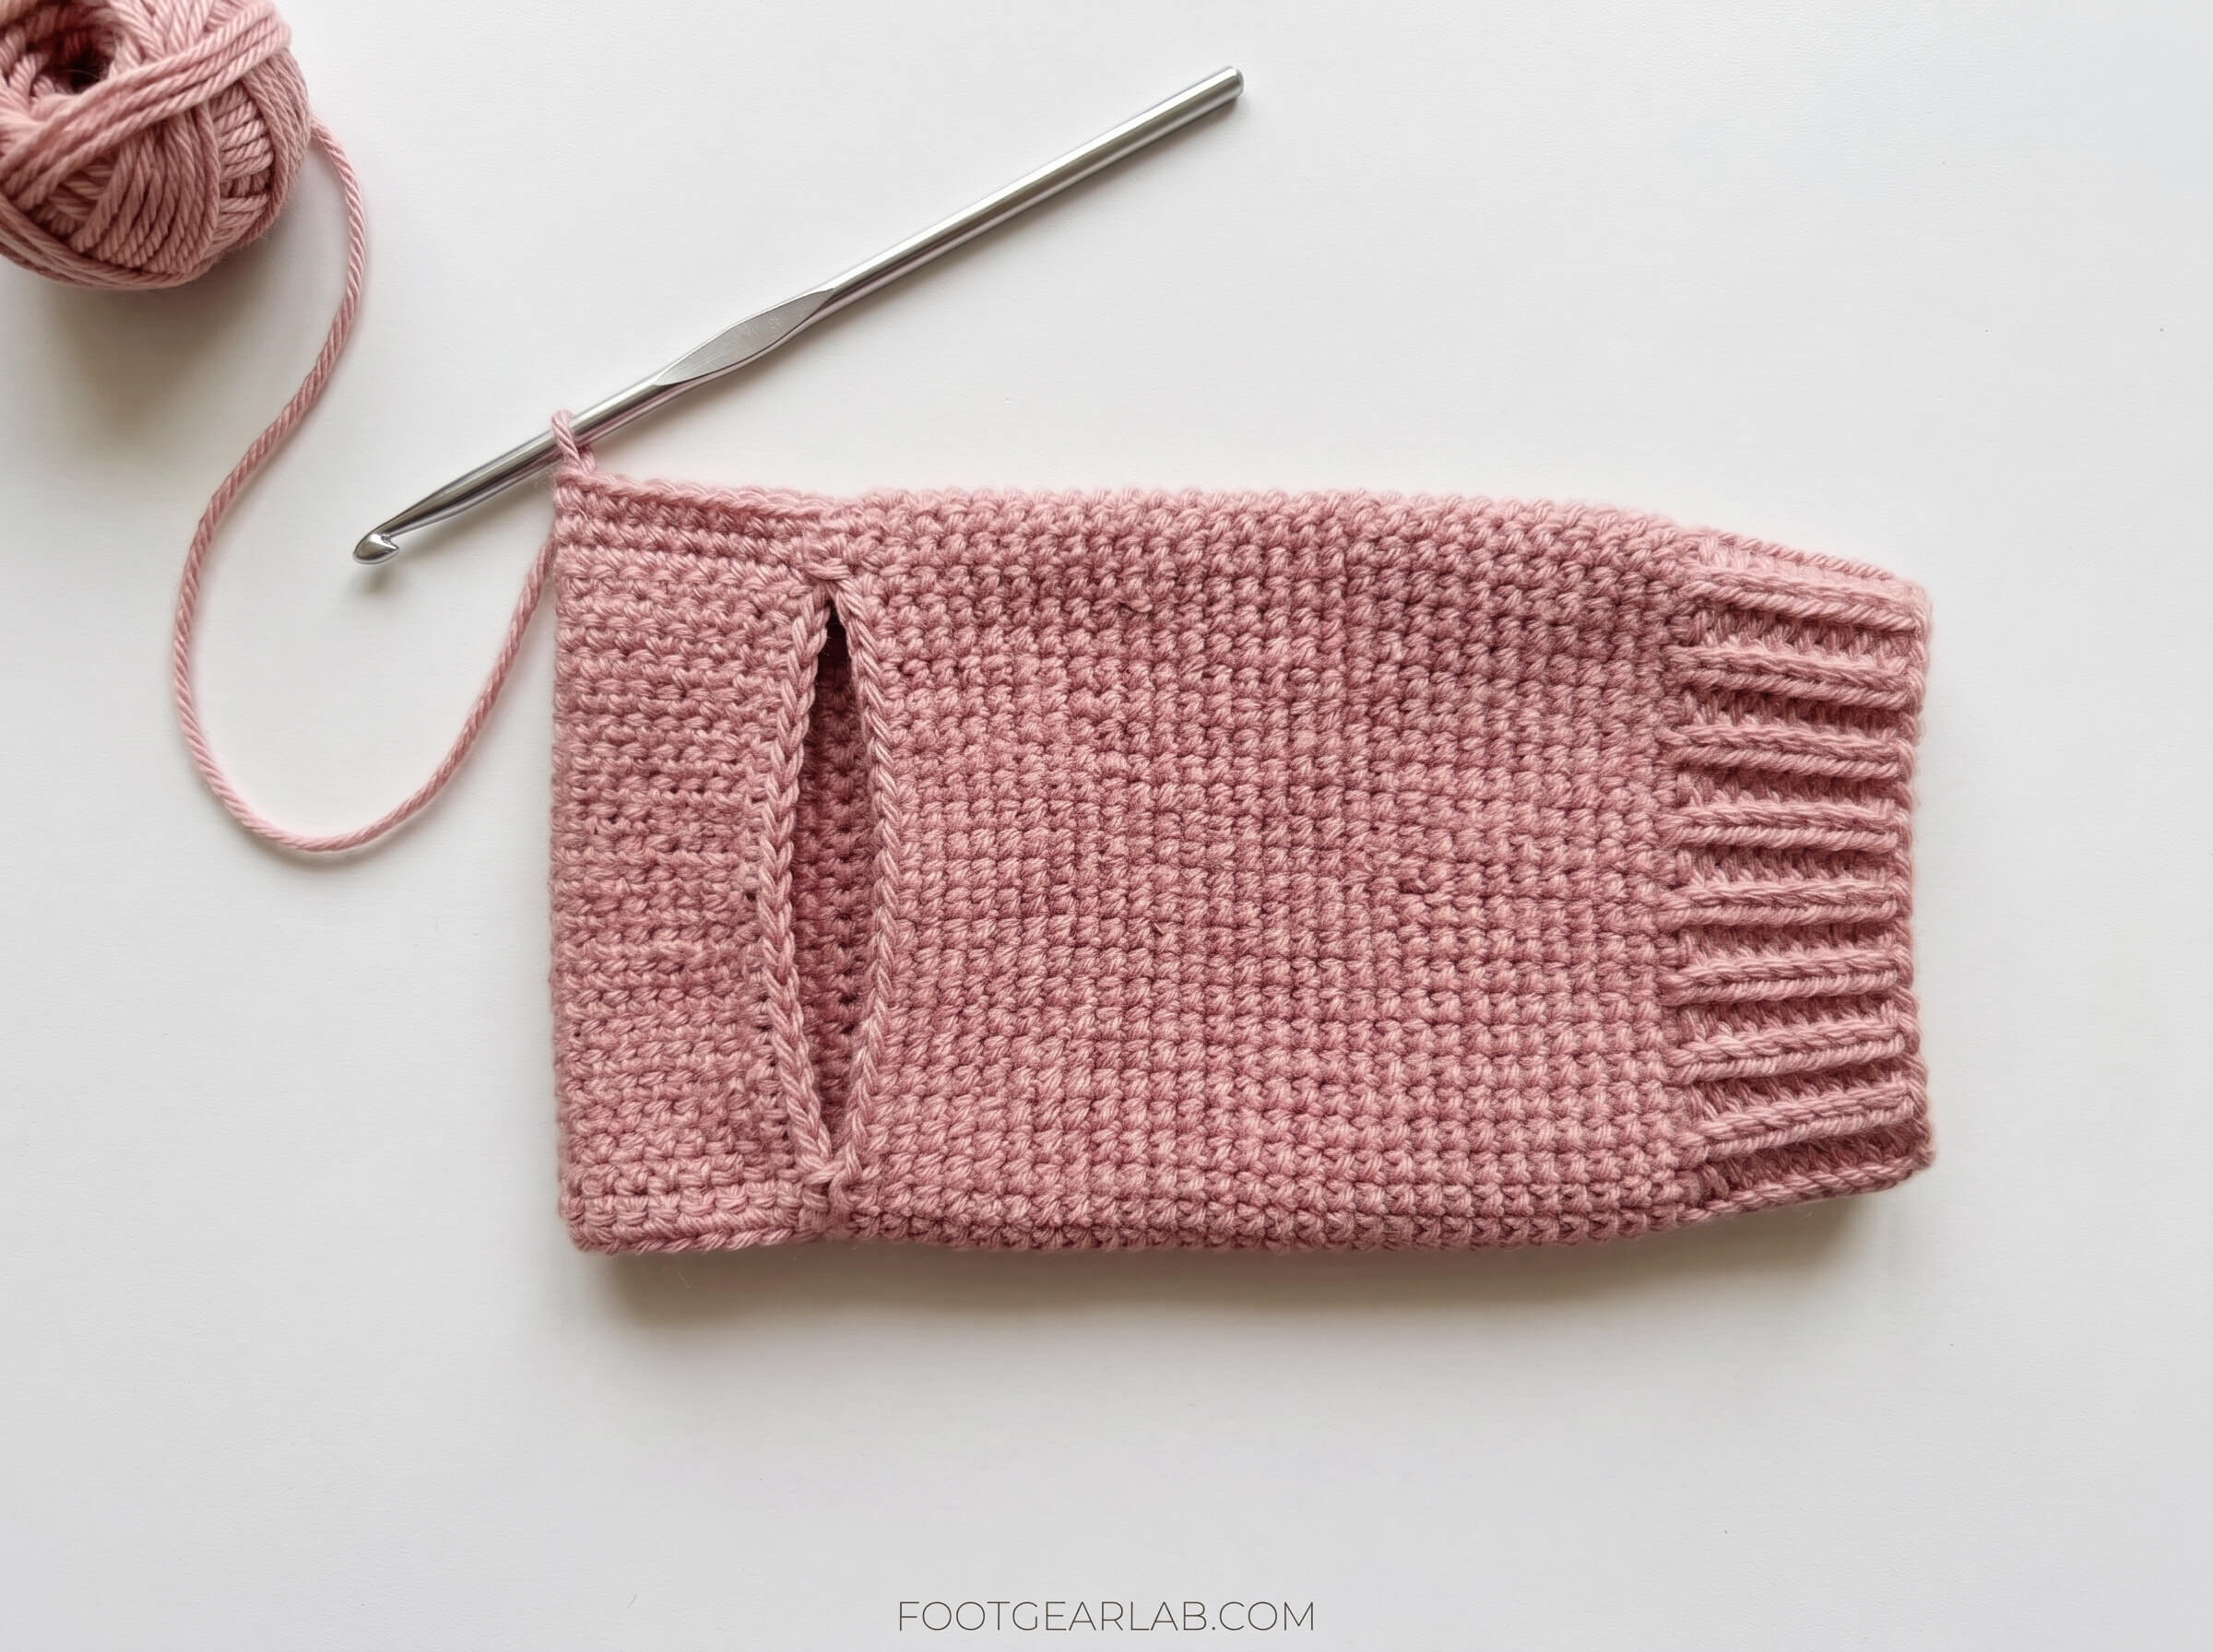
This is the only shaping in the whole sock, and it’s just one round. You’ll skip the stitches across the sole and chain over the gap, which leaves an open hole that your heel slips through.
Line up your round. Lay the sock flat so the top of the foot is on top and the sole is underneath. Your round needs to start at one of the side folds. If your marker isn’t at a side fold because of the spiral, sc a few more stitches until you reach the fold, then move the marker there.
Heel round: Sc in the next 20 (22, 24) sts across the top of the foot. Ch 20 (22, 24), skip the next 20 (22, 24) sts across the sole, and sc in the first st after the gap. This creates a slit across the sole that will become your heel opening.
Next rnd: Sc in each sc across the top. Then sc into each chain across the gap, working into the top loop and back bump of each chain so the edge stays firm: 40 (44, 48) sts.
Check the fit. Slip the sock on, push your heel through the opening and pull the chain edge up behind your heel so it sits around the back of your ankle. The bottom edge of the opening should sit just in front of your heel pad. If the opening feels tight, take out the heel round and chain 2 more stitches than you skip. If it gapes, chain 2 fewer.
Step 5: Crochet the Ankle Cuff and Edge the Heel Opening
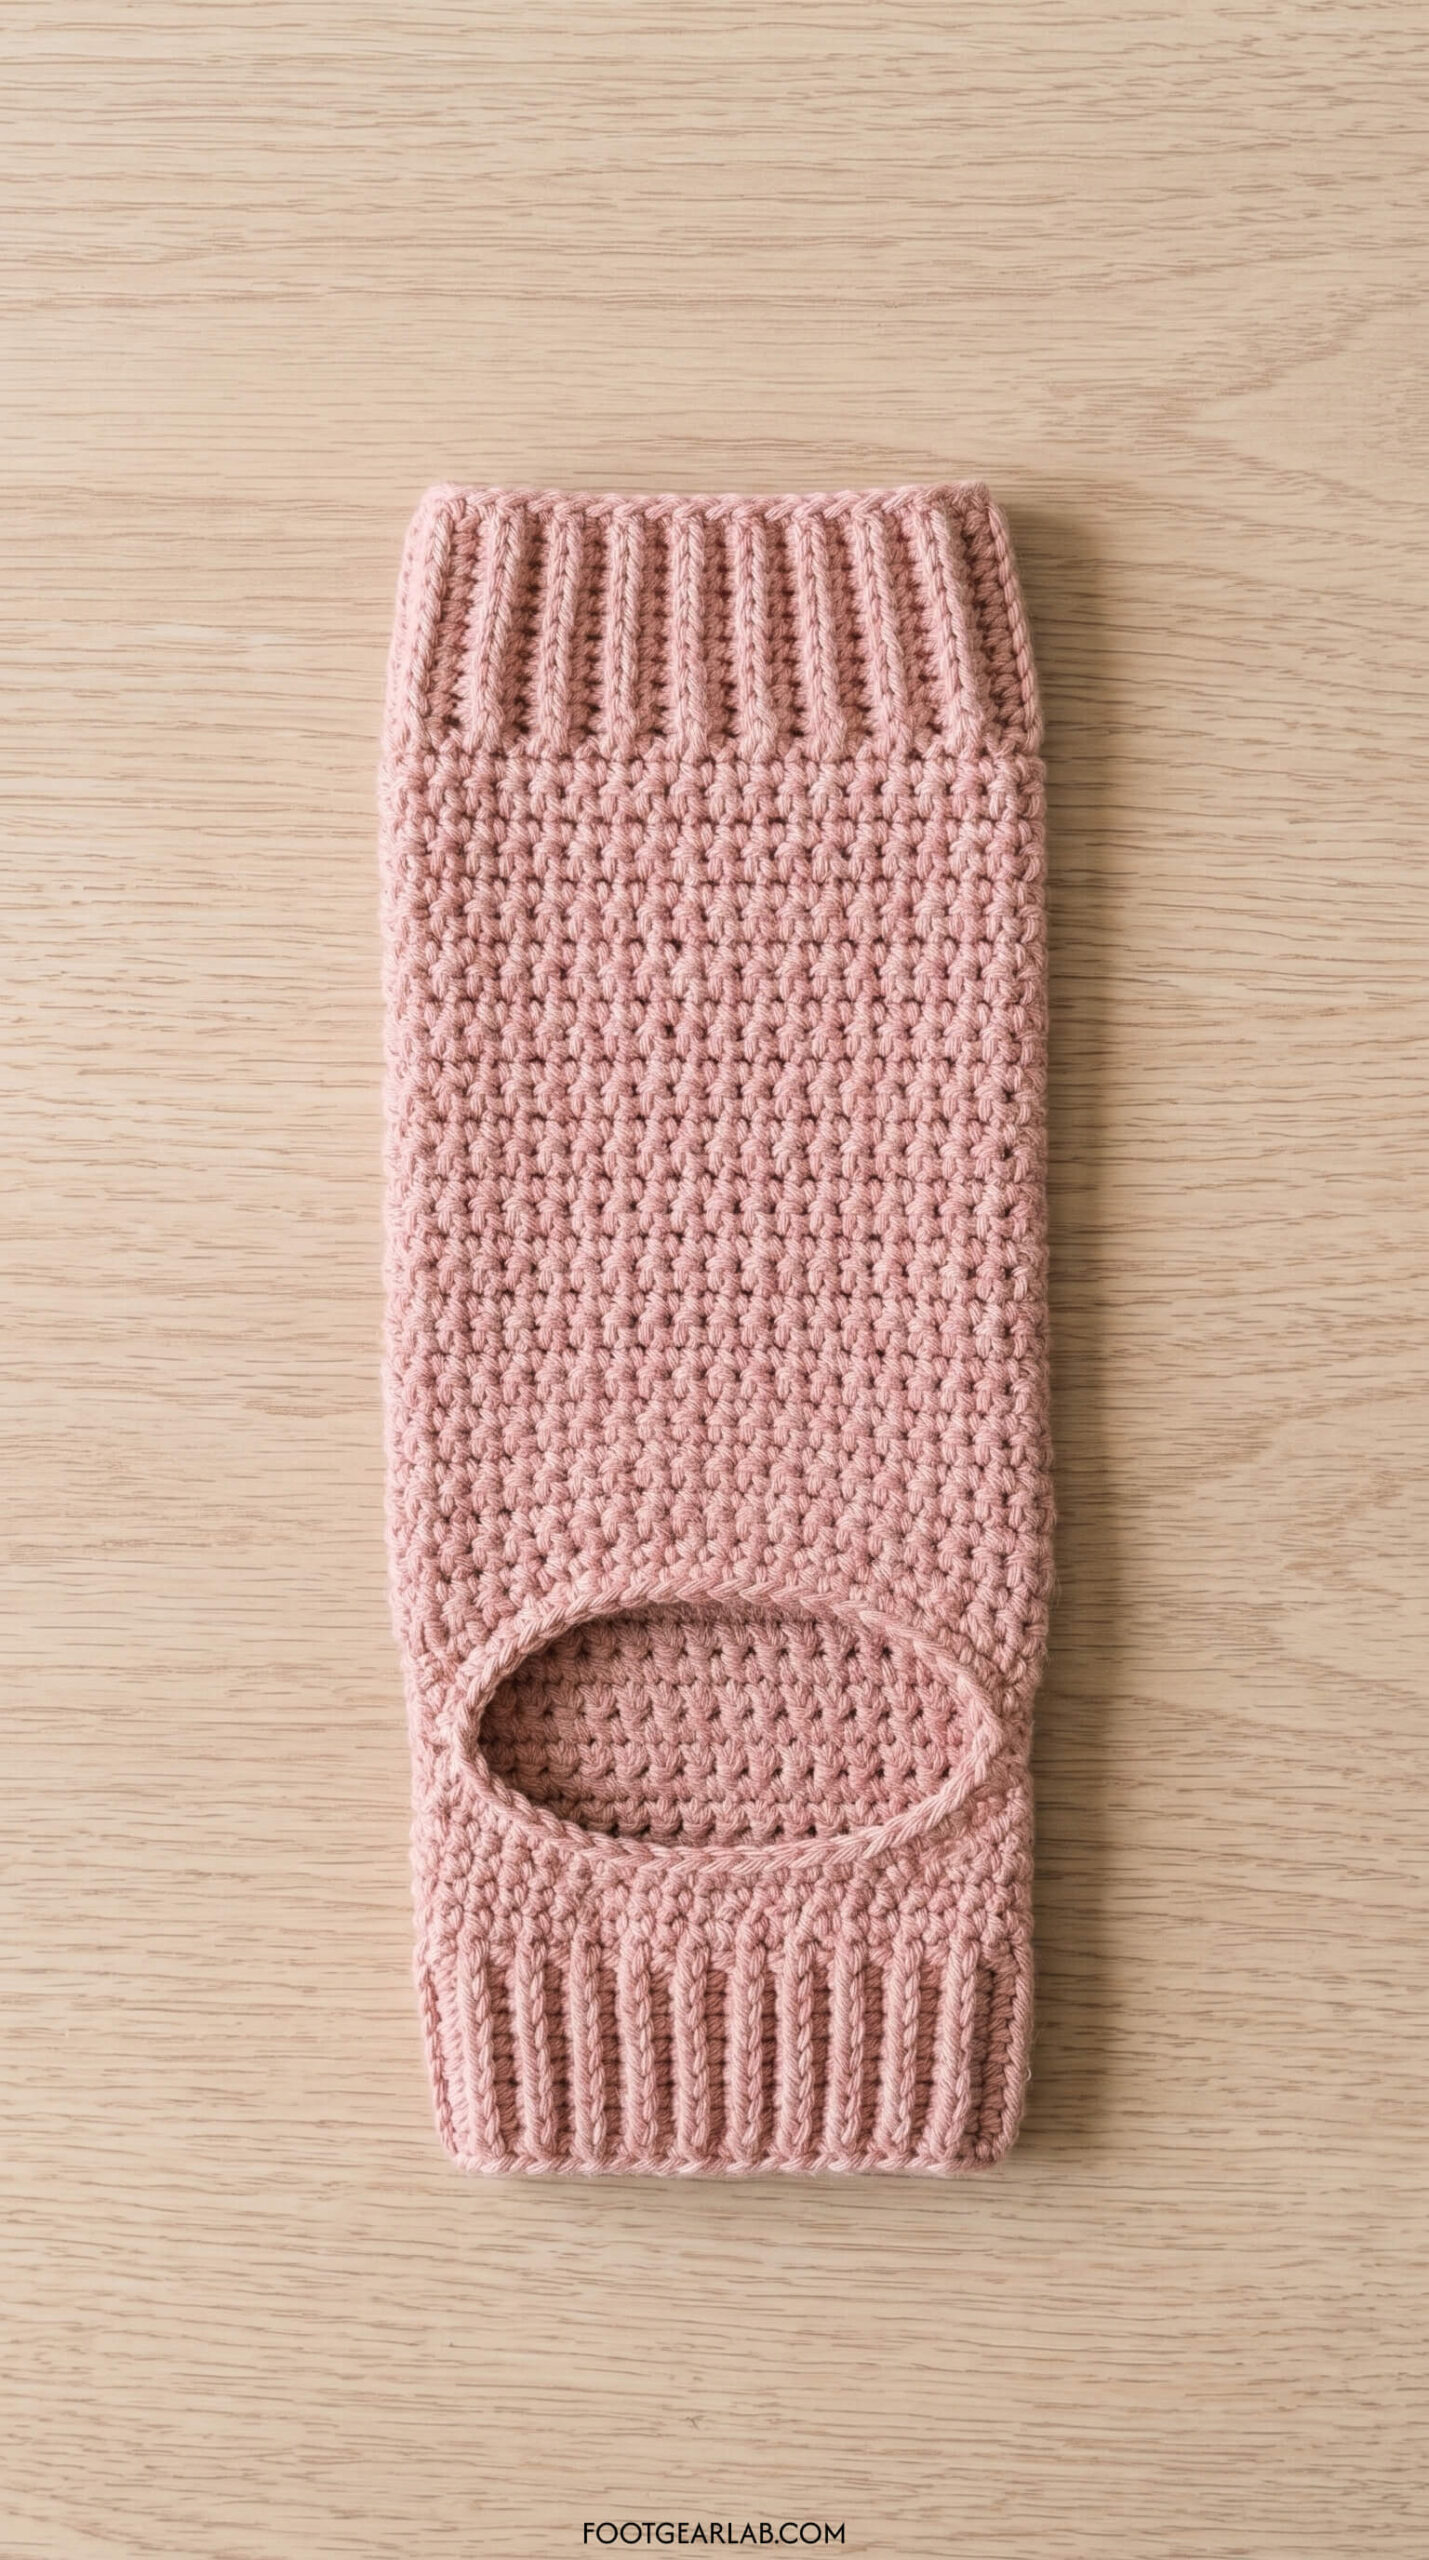
Ankle: Sc 1 more round even, then sl st into the next st to join, so you can switch to joined rounds for the cuff.
Cuff: Ch 2 (does not count as a stitch). Fpdc, bpdc, repeat around, sl st to the first fpdc to join. Repeat this round 2–4 more times for a cuff about 1–1.5 in (2.5–4 cm) tall. It should hug your ankle just above the ankle bone. Fasten off, leaving a 6 in (15 cm) tail.
Edge the heel opening. This round neatens the hole, makes it stronger and stops it from stretching out. Join yarn with a sl st at one corner of the opening. Sc in each skipped sole stitch along one edge, sc2tog across the corner, sc in the underside of each chain along the other edge, and sc2tog across the second corner. Sl st to the first sc to join and fasten off. Working a decrease at each corner keeps the opening snug, so it doesn’t gape at the sides of your heel.
Weave in every end carefully. Thread each tail through the inside of the fabric in two directions for at least 2 in (5 cm), then trim. Ends woven in only one direction can work loose in the wash, and loose bumps on the inside of the sole can rub during class.
Make the second sock. Repeat Steps 2–5 using the round count you wrote down in Step 3. Both socks are made exactly the same way, so there’s no left or right.
Step 6: Add the Non-Slip Grips
This is the step that turns a cozy crochet sock into a real studio sock. Your bare heel and toes already grip well, but crochet fabric under the ball of the foot and arch slides easily on wood floors, rubber mats and reformer carriages. Take your time here, and give the grips a full cure before you wear them.
Choose Your Grip Material
| Grip option | How grippy | Washability | Dry and cure time | Best for |
|---|---|---|---|---|
| Puffy fabric paint | Good, raised dots grip well | Good if fully cured; hand wash cold | Dry to touch in about 4 hours; wait about 72 hours before washing | Beginners, cute shapes like hearts and initials |
| 100% clear silicone sealant | Very strong | Very good, flexible and durable | Usually 24 hours or more (check the label) | Reformer and barre, where you need the most grip |
| Liquid latex anti-slip coating | Strong | Good | Several hours; follow the bottle | Large solid areas; avoid if you or anyone in your home has a latex allergy |
| Sewn-on suede or silicone-dot fabric patch | Moderate to strong | Very good | No waiting | People who’d rather not use paints or sealants |
Hot glue is a popular shortcut, but it’s not a good choice for socks. It’s stiff, it cracks as the fabric stretches, and it tends to peel off in the wash. If you use silicone sealant, work in a well-ventilated room. It has a strong vinegar-like smell while it cures, and it needs to be completely cured before it touches your skin.
Test First on Your Gauge Swatch
Put a few dots of your chosen grip on the gauge swatch you made in Step 1 and let them cure fully. Then stretch the swatch, rub the dots firmly with your thumb, and try them on your mat or floor. This shows you how much paint you need per dot and whether the material soaks through your stitches before you commit to the actual socks.
Prepare the Sock
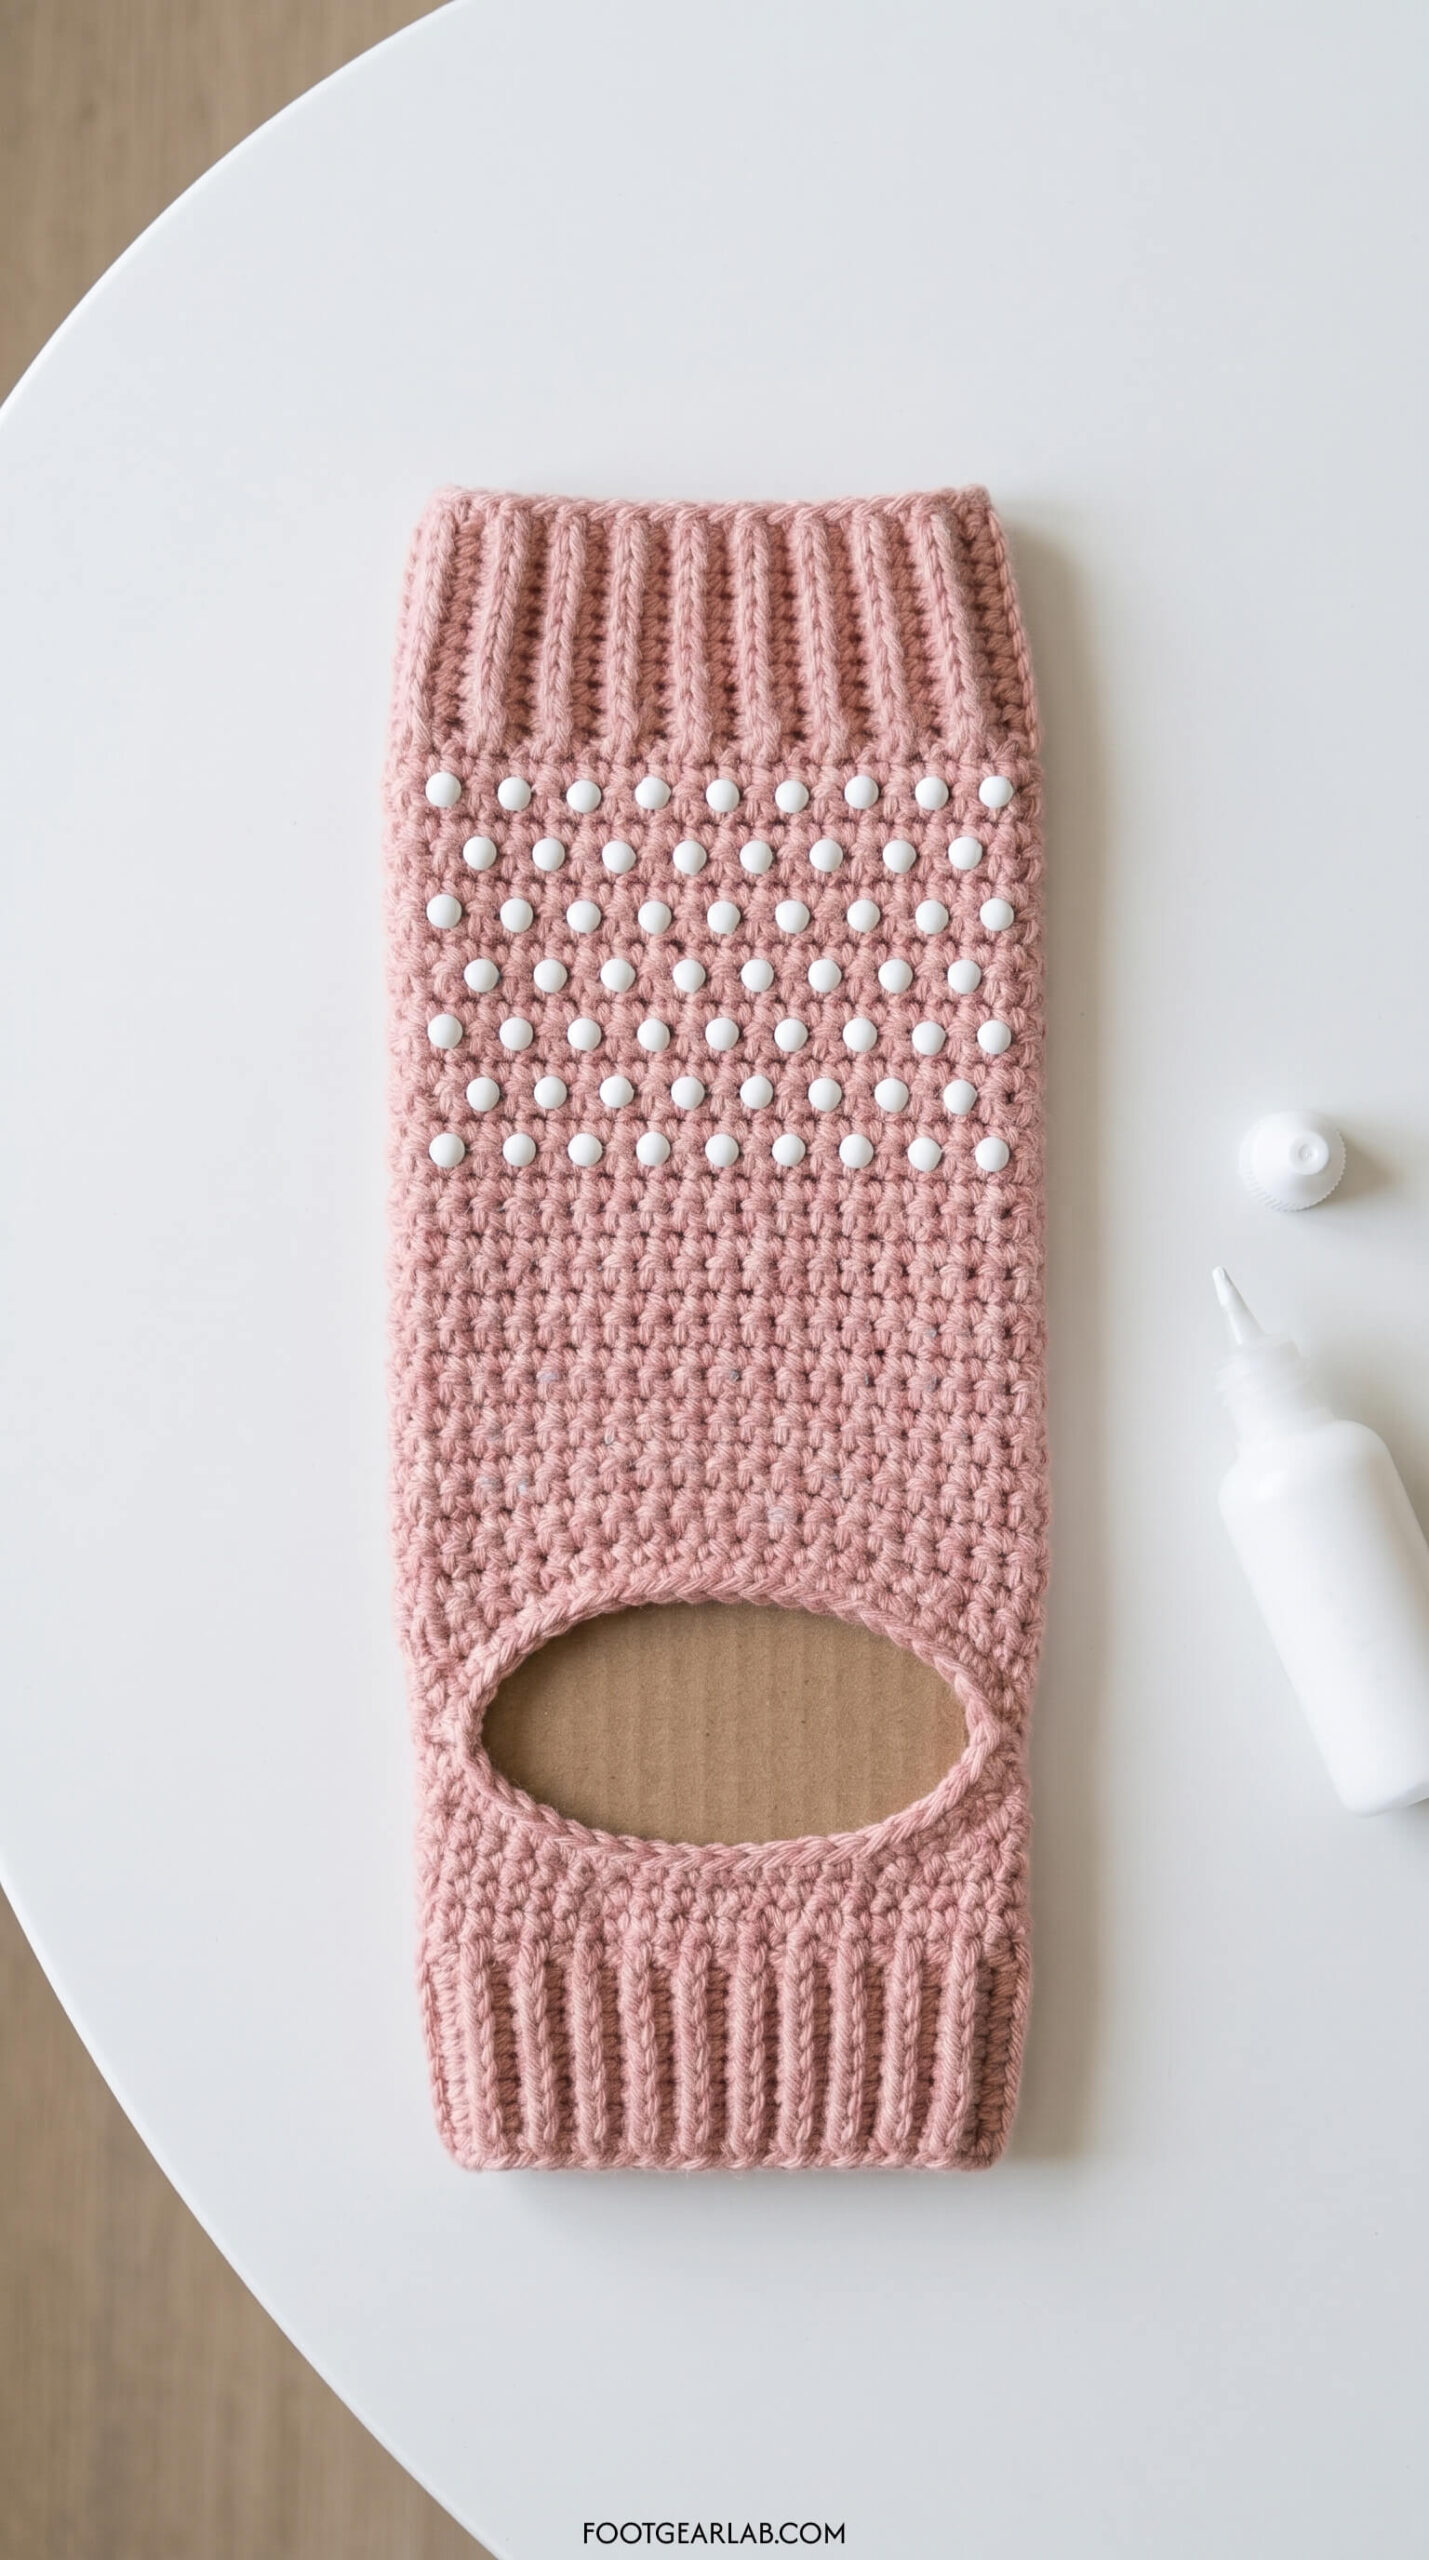
Cut a cardboard insert. Cut a piece of thin cardboard the shape of your sole from the base of your toes to the front of your heel: wide at the ball of the foot and slightly narrower toward the arch, with both ends cut straight across. Make it just wide enough to stretch the sock gently without distorting the stitches. The insert keeps the fabric slightly stretched, which matters: if you paint the sole relaxed, the dots can crack when the sock stretches over your foot. It also stops paint from soaking through and gluing the sole to the top of the sock.
Slide the insert in with the sole facing up, so it fills the area between the toe band and the heel opening. Smooth the fabric so the stitches lie straight.
Mark your grid. Using tailor’s chalk, mark small guide dots about 1/2 in (1.3 cm) apart. Fill the ball of the foot completely, starting just below the toe band, and add a few lighter rows through the arch down toward the heel opening. Keep the dots at least 1/4 in (6 mm) away from the side edges, the ribbing and the heel opening, so they stay on the flat sole fabric.
Apply the Grips
Work from the toe band down. Hold the bottle upright, touch the nozzle to the fabric, squeeze gently, and lift straight up to make a round, domed dot about 1/4 in (6 mm) wide. Press the nozzle slightly into the fabric as you start each dot, so the paint grips the stitches instead of sitting loosely on top.
Let it dry flat. Leave the sock lying flat, with the insert still in place, until the dots are dry to the touch (about 4 hours for puffy paint). Then remove the insert and let the grips cure fully before wearing or washing. Do the second sock the same way, matching the same grid, so both feet get even traction.
Cute Grip Pattern Ideas
Plain dots work perfectly, but the sole is a fun little canvas. As long as you keep the grip concentrated under the ball of the foot, you can play with shapes.
Tiny hearts. Pipe small hearts about 3/8 in (1 cm) wide in place of dots. They grip just as well and look sweet when you’re on your back in a Pilates bridge or tabletop.
Wavy lines. Draw gentle horizontal waves across the ball of the foot, about 1/2 in (1.3 cm) apart. Lines give a bit more surface contact than dots, which some people like for standing barre work.
Initials or a word. Pipe your initials into the arch, with a dot grid on the ball of the foot. It’s a nice touch if you’re making socks as a gift for a Pilates friend or a bridesmaid group.
Two-tone grips. Use white dots on the ball and a soft gold or rose dot through the arch. It’s purely decorative, but it makes your socks easy to spot in a busy studio cubby.
Easy Style Variations
Ballet wrap straps. For a barre-inspired look, chain two strands of about 30 in (75 cm) each and attach them to the cuff at the sides of the ankle. Cross them over the top of the foot and tie them around the ankle like ballet slipper ribbons. Keep the straps snug but not tight, so they don’t press on the top of your foot.
Color-block. Work the toe band and cuff in a contrasting color, such as cream ribbing on a sage, lilac or blush sock. It’s a simple swap that makes the pair look more polished and boutique-made.
Little bows. Sew a small crochet bow, or a ribbon bow, to the center front of the cuff. It’s a sweet detail that photographs beautifully for your feed.
Leg-warmer cuff. Instead of a short ankle cuff, keep working the ribbing for 4–6 in (10–15 cm) to make a slouchy leg-warmer top. It’s cozy for winter classes and stretching at home.
How to Care for Your Yoga Socks
Turn them inside out and hand wash in cool water with a gentle detergent. Friction in a washing machine is the main reason grip dots wear down, and hot water softens many fabric paints.
Roll them in a towel to press out water, then lay them flat to dry. Never put them in the dryer. Heat can make puffy paint and latex soften, crack or peel, and it can shrink cotton yarn.
Refresh the grips when they flatten. After many wears, the dots may look smooth or worn. Simply pipe fresh dots right on top of the old ones, using the same insert method, and let them cure again.
Troubleshooting
| Problem | Likely cause | Fix |
|---|---|---|
| Toe band rolls or slides down | Band is too loose or too narrow | Remake the band with 2 fewer fsc, or add Rnd 3 for a wider band |
| Sock feels baggy around the foot | Gauge is looser than 22 sc per 4 in | Go down one hook size, or use the formula with your real gauge |
| Heel opening sits under the heel pad | Foot section is too long | Remove 1–2 foot rounds before the heel round |
| Fabric covers the arch only partly | Foot section is too short | Add 1–2 foot rounds before the heel round |
| Heel opening gapes at the sides | Too many chains, or corners not decreased | Chain 2 fewer in the heel round and work the sc2tog corners in the edging |
| Sock twists on the foot | Heel opening is off-center | Move your marker to the side fold before the heel round |
| Grip dots cracked | Paint was applied without the insert, so fabric was relaxed | Always paint over a cardboard insert so the fabric is gently stretched |
| Dots peel in the wash | Paint didn’t cure fully, or the socks were machine-dried | Wait the full cure time, hand wash cold and dry flat |
A Quick Safety Note
Test your new socks before you wear them in class. Stand on your mat and on a wood floor, shift your weight forward and back, and try a slow relevé. If the ball of your foot slips at all, add more dots before using them on a reformer, where a slipping foot can be a real problem. It’s also worth checking your studio’s rules. Some studios ask clients to wear grip socks for hygiene, and a few prefer full-coverage socks with grips on the heel too. If you have sensitive skin, a latex allergy or a foot condition, choose your grip material with care and wear the socks for short periods at first.
Frequently Asked Questions
Why don’t yoga socks have heels? Leaving the heel and toes bare lets them grip the mat directly, which helps your balance, and it lets your foot move freely without fabric pulling across the heel. It also makes the sock much easier to crochet and to fit.
Can I use 100% cotton yarn? You can, and it breathes beautifully, but pure cotton has almost no stretch. Your socks may loosen during class and need a wash to bounce back. A cotton blend with a little acrylic, bamboo, nylon or elastic keeps its shape far better.
How long does one pair take? Because there’s no heel or toe to shape, many crocheters finish one sock in about an hour or two once they’re comfortable with the toe band. Add a day or so for the grips to cure before you wear them.
Are crochet yoga socks okay for hot yoga? They work, and the open heel and toes help them stay cooler than full socks. For an even lighter sock, use fingering-weight yarn with a smaller hook and redo the sizing math with your new gauge.
Do I need to make a left and a right sock? No. Both socks are worked exactly the same way, so either sock fits either foot. Matching your round count from Step 3 is all you need.