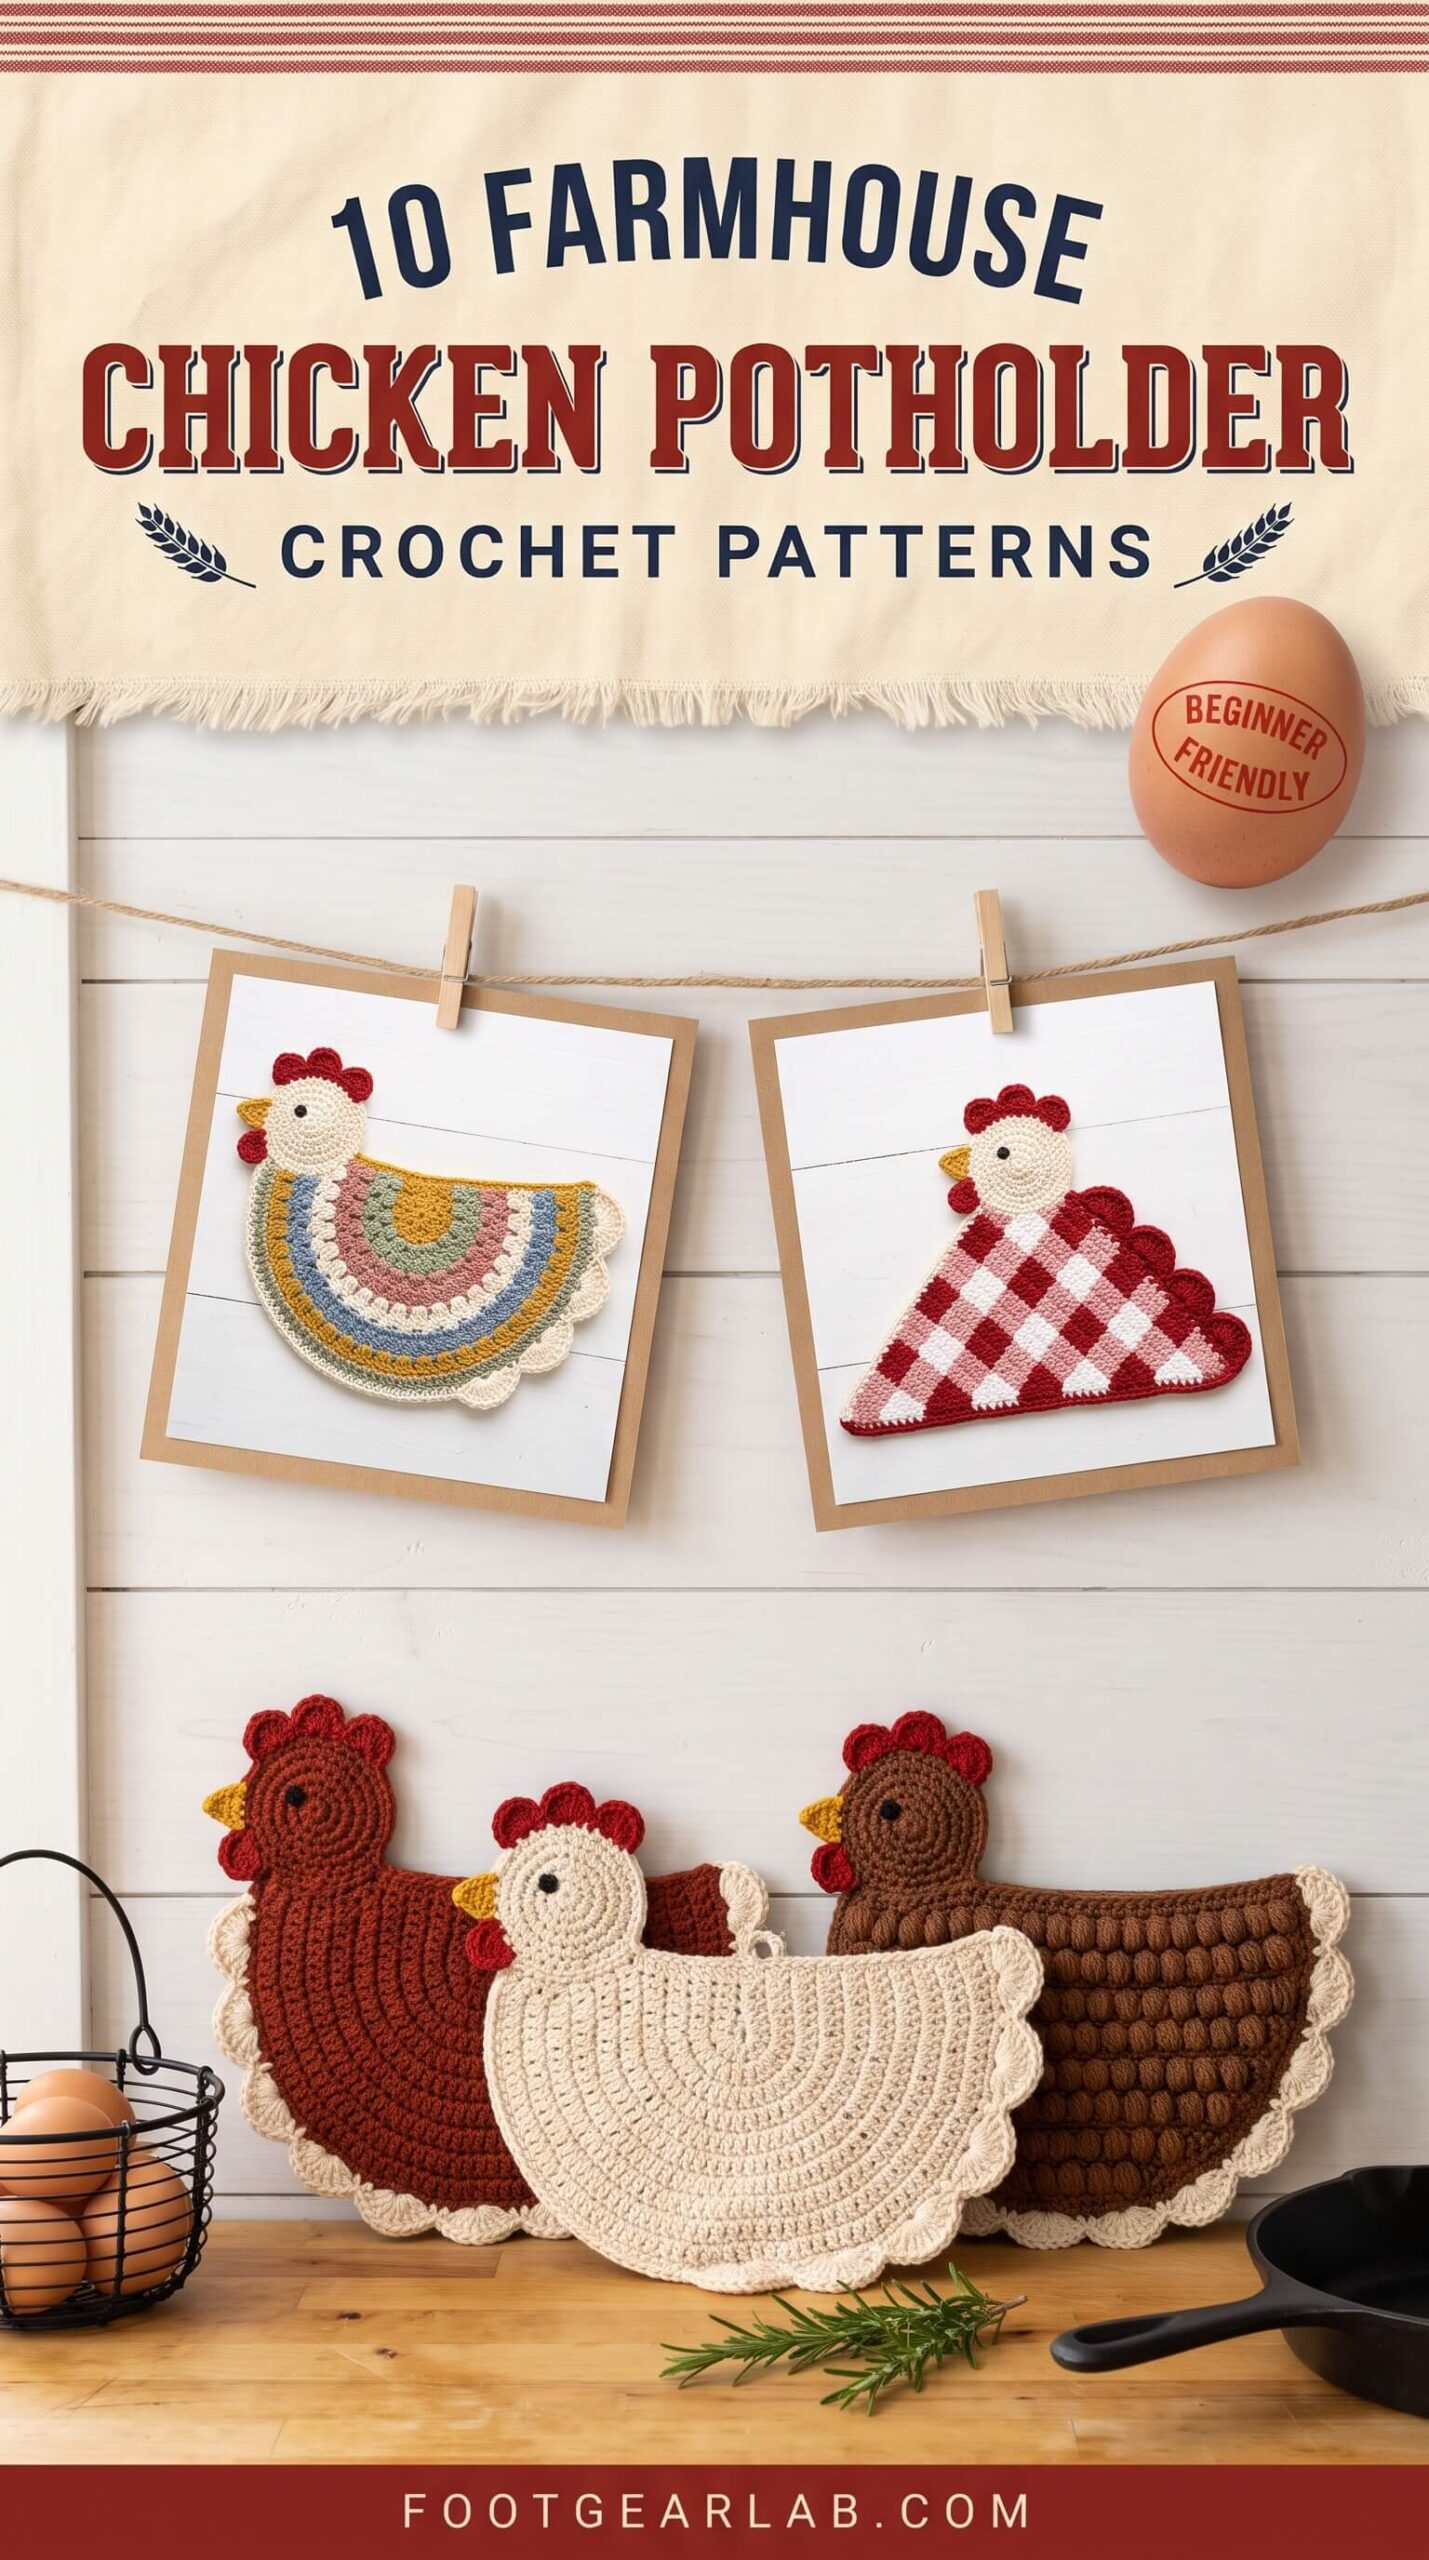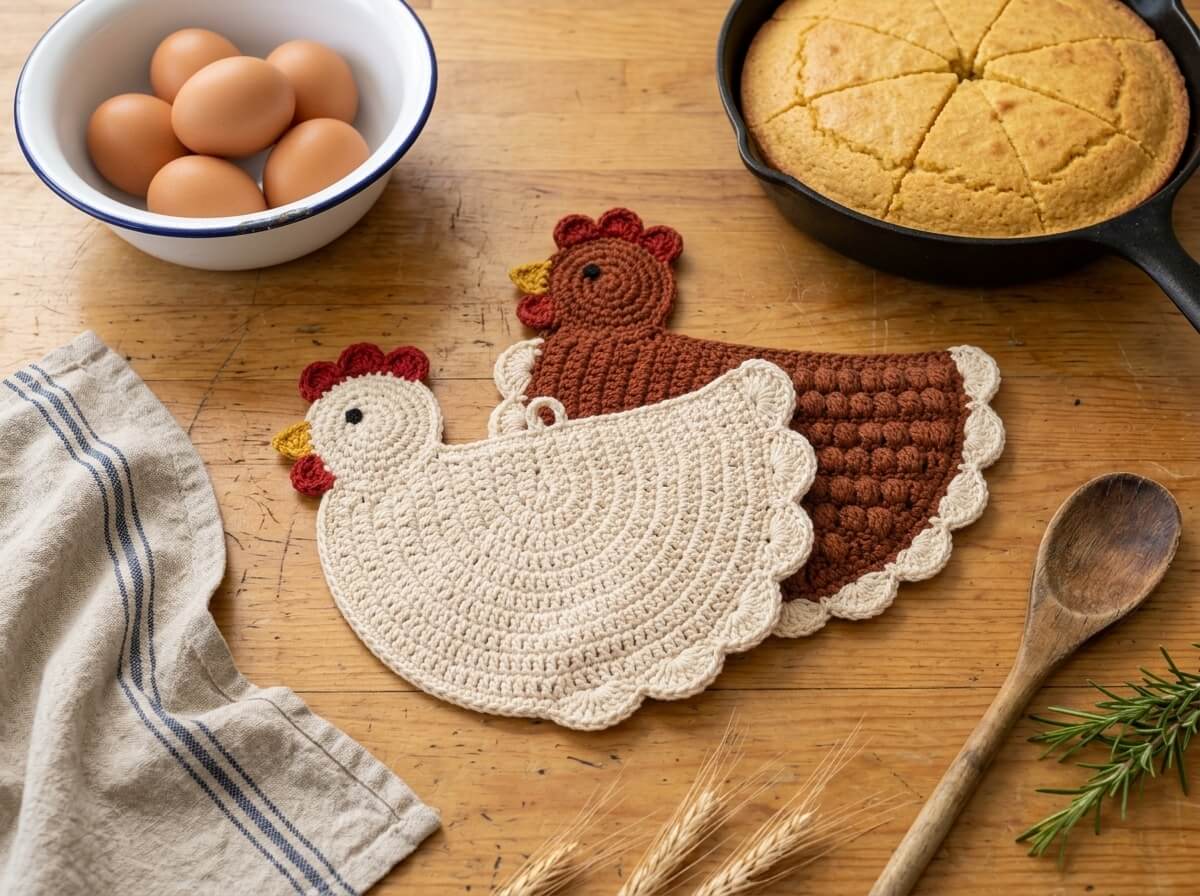
There is something about a little crocheted hen hanging by the stove that instantly makes a kitchen feel warm, lived-in and loved. Chicken potholders have been a country kitchen tradition for generations, and many of us still remember the bright red or cream hens that hung in a grandmother’s kitchen, slightly scorched at the edges from years of Sunday dinners. Today they are having a sweet comeback, especially in farmhouse style homes where handmade textures, vintage charm and cheerful details are the heart of the decor.
The best part is that these potholders are as practical as they are pretty. Made in 100% cotton and worked double thick, a crochet hen protects your hands from hot pan handles and casserole dishes, and when you are not using it, it hangs on a hook as a little piece of folk art. They are also wonderful quick projects: most of them use less than one ball of yarn and can be finished in an afternoon, which makes them perfect for craft fairs, housewarming gifts, Easter baskets and Mother’s Day.
In this guide, you will find everything you need to make your own flock. We start with the right yarn (this matters a lot for safety), the tools and the stitch abbreviations, then walk through a complete beginner-friendly pattern for a classic farmhouse hen, step by step. After that, you will discover ten charming chicken potholder designs, from a rustic red hen with cream scallops to a gingham triangle hen and a proud rooster with a colorful tail, each with clear notes on how to make it. We finish with styling ideas, care tips, a troubleshooting table and answers to the most common questions.
Why Chicken Potholders Belong in Every Farmhouse Kitchen
Chickens are one of the most loved symbols of farmhouse decor because they stand for simple country living, fresh eggs in the morning and the comfort of home cooking. A crocheted hen brings that feeling into your kitchen in a soft, handmade way. Unlike a store-bought silicone mitt, it has personality, and because you choose the colors yourself, it can match your dish towels, your enamelware or the color of your cabinets perfectly.
They are also a smart project for your skills. A chicken potholder teaches you how to work flat circles, how to keep an even stitch count, how to join two layers and how to add small details like shells, appliqués and embroidery. If you are a beginner, it is a fun step up from dishcloths. If you are an experienced crocheter, it is the kind of relaxing, quick make you can finish in front of a movie and give away the next day.
Finally, chicken potholders sell well. At farmers markets and holiday craft fairs, a basket of little hens in different colors almost always draws a crowd, and they are light and flat, so they are easy to ship if you sell online.
Choosing the Right Yarn: Why Cotton Is a Must
This is the most important decision you will make for your potholder, so it is worth taking a moment to understand it. A potholder touches hot metal, glass and cast iron, so the fiber must be able to handle heat without melting. Synthetic fibers like acrylic and polyester can melt when they touch a very hot surface, and melted yarn can stick to your skin and cause a serious burn. For that reason, always choose a natural fiber, and ideally 100% cotton.
Worsted weight (size 4) kitchen cotton is the classic choice. It is thick enough to build a sturdy fabric quickly, it is absorbent, it holds its shape and it goes through the washing machine again and again. Cotton does shrink a little the first time it is washed in warm water, so expect your hen to get slightly smaller and denser after its first wash, which actually makes it even more protective.
| Yarn fiber | Safe for potholders? | What you should know |
|---|---|---|
| 100% cotton | Yes, the best choice | Does not melt, absorbent, sturdy, machine washable, affordable and easy to find in farmhouse colors. Shrinks slightly at first wash. |
| Cotton and linen blend | Yes | Crisp, rustic texture with a lovely matte look. A little stiffer to work with, but very durable and heat safe. |
| 100% wool | Yes, with care | Naturally flame resistant, but it felts and shrinks in a hot wash, so it must be hand washed. Better for decorative hens than everyday kitchen use. |
| Cotton and acrylic blend | Not recommended | The acrylic part can still melt and scorch, even if the label says “mostly cotton.” |
| Acrylic, polyester or chenille | No | These fibers melt with heat and can stick to skin. Save them for decorative projects that never touch hot pans. |
Tip: Always check the yarn label before you buy. If the fiber content does not say 100% cotton (or another natural fiber), choose a different yarn for your potholders.
Tools and Materials
You only need a few simple tools for any of the patterns in this guide, and you probably have most of them in your crochet bag already.
- Worsted weight 100% cotton yarn: For the classic hen, you need about 90 to 100 yards of the main color, so buy a 2.5 oz (about 120 yard) ball rather than a 2 oz one so you do not run short, about 10 yards of scarlet red for the comb and wattle, about 2 yards of mustard yellow for the beak and about 1 yard of black for the eye. Leftover cotton from dishcloth projects works beautifully for the small details.
- Crochet hook, 4.5 mm (US 7): This is slightly smaller than the size usually recommended for worsted cotton, and that is on purpose. A smaller hook makes a denser fabric with smaller gaps, which keeps heat away from your hand. If you crochet loosely, try a 4.0 mm (US G-6) hook instead.
- Tapestry needle: A blunt yarn needle with a large eye is used to sew on the head, beak and wattle, embroider the eye and weave in all the yarn ends neatly.
- Locking stitch markers: You need at least two to hold the folded body in place, and they are also helpful for marking the first stitch of each round so you never lose count.
- Small sharp scissors and a tape measure: Use the tape measure to check the size of your circle as you go, so your hen comes out the right size and both halves line up perfectly.
- Optional blocking mat and pins: Gently blocking your finished hen makes the shells fan out evenly and helps the potholder lie flat and neat.
Stitch Abbreviations (US Terms)
All patterns in this guide are written in US crochet terms. If you usually crochet in UK terms, remember that a US single crochet is a UK double crochet, and a US double crochet is a UK treble.
| Abbreviation | Stitch | How it is used in these patterns |
|---|---|---|
| MR | Magic ring | An adjustable loop you crochet into and then pull tight, so the center of your circle closes with no hole. |
| ch | Chain | Used for turning height, the hanging loop and the beak. |
| sl st | Slip stitch | Joins each round and attaches new colors. |
| sc | Single crochet | The short, firm stitch used to join the two layers of the potholder together. |
| hdc | Half double crochet | A medium-height stitch used to shape the little beak. |
| dc | Double crochet | The main stitch of the classic hen’s body and head. |
| tr | Treble crochet | A tall stitch used for the rooster’s comb and tail. |
| puff st | Puff stitch | (Yarn over, insert hook, pull up a loop) 3 or 4 times in the same stitch, then yarn over and pull through all loops on the hook. Creates a soft, feathery bump. |
| sk | Skip | Skip the stitch(es) indicated without working into them. |
| st(s) | Stitch(es) | Stitch counts are given in parentheses at the end of each round. |
| FO | Fasten off | Cut the yarn and pull the end through the last loop to secure it. |
The 10 Patterns at a Glance
Before we start crocheting, here is a quick overview of all ten designs so you can choose the one that suits your skill level and your kitchen best. Pattern 1 is written out in full below, and most of the other designs build on the same simple folded-circle method, so once you make your first hen, the rest will feel easy.
| # | Pattern | Skill level | Colors | How it is made | Best for |
|---|---|---|---|---|---|
| 1 | Classic Cream Farmhouse Hen | Beginner | Cream, scarlet, mustard | Folded double crochet circle | Your very first hen |
| 2 | Rhode Island Red Hen with Cream Shells | Beginner | Rust red, cream, scarlet | Folded circle with a full shell border | A cozy, traditional look |
| 3 | Vintage Granny Circle Hen | Beginner | Scrappy pastels and cream | Folded granny circle | Using up leftover cotton |
| 4 | Rustic Brown Puff Stitch Hen | Intermediate | Chestnut brown, oatmeal | Two shaped pieces in rows | Beautiful feather texture |
| 5 | Speckled Hen in Single Crochet | Beginner | Salt-and-pepper, charcoal | Folded single crochet circle | Maximum heat protection |
| 6 | Red Gingham Triangle Hen | Intermediate | Red, rose, white | Corner-to-corner square folded into a triangle | Picnic-style country charm |
| 7 | Proud Farmhouse Rooster | Intermediate | Cream, teal, rust, mustard | Folded circle with a layered tail | A bold statement piece |
| 8 | Mama Hen and Baby Chick Set | Beginner | Cream, butter yellow | Two folded circles in two sizes | Gifts and Easter baskets |
| 9 | Sunflower Wing Hen | Beginner | Sage green, gold, brown | Folded circle with a sunflower appliqué | Summer and harvest decor |
| 10 | Ticking Stripe Hen | Intermediate | Cream and navy | Two striped pieces in rows | Classic farmhouse textiles |
Step-by-Step Pattern: The Classic Farmhouse Hen
This is the foundation pattern for the whole flock. The body is one double crochet circle folded in half, which gives you a double-thick potholder with no lining needed. The fold becomes the hen’s flat bottom, the rounded edge becomes her back, and a small round head with a comb, beak and wattle is added on the left. Three fan-shaped shells on the right side of her back become her tail feathers.
Finished size: about 10 inches wide and 6 inches tall, including the head, comb and tail shells.
Time: about 2 to 3 hours for a beginner, and around 1½ hours once you have made one before.
Pattern notes: The beginning ch 3 of each round counts as the first double crochet. Join every round with a slip stitch into the top of the beginning ch 3, and do not turn your work between rounds. After Round 3, your circle should measure about 3¼ inches across, and after Round 8 about 8 to 8½ inches. If your circle is smaller, go up half a hook size; if it is larger, go down half a size. The edge is worked from right to left for right-handed crocheters. If you are left-handed, simply start the joining round at the left corner instead, and your hen will face right rather than left, which is just as cute.
Step 1: Crochet the Body Circle
Using the cream yarn, you will work eight rounds of double crochet, adding twelve stitches in every round. Adding exactly twelve stitches each time is what keeps the circle flat, so count carefully at the end of each round and place a stitch marker in the top of the beginning ch 3 if it helps you keep track.
- Round 1: Make a magic ring, ch 3 (counts as the first dc), then work 11 dc into the ring. Pull the ring closed tightly and sl st into the top of the beginning ch 3. (12 sts)
- Round 2: Ch 3, work 1 dc in the same stitch, then 2 dc in every stitch around. Sl st to join. (24 sts)
- Round 3: Ch 3, 1 dc in the same stitch, dc in the next stitch, then repeat 2 dc in the next stitch, dc in the next stitch around. Sl st to join. (36 sts)
- Round 4: Ch 3, 1 dc in the same stitch, dc in the next 2 stitches, then repeat 2 dc in the next stitch, dc in the next 2 stitches around. Sl st to join. (48 sts)
- Round 5: Ch 3, 1 dc in the same stitch, dc in the next 3 stitches, then repeat 2 dc in the next stitch, dc in the next 3 stitches around. Sl st to join. (60 sts)
- Round 6: Ch 3, 1 dc in the same stitch, dc in the next 4 stitches, then repeat 2 dc in the next stitch, dc in the next 4 stitches around. Sl st to join. (72 sts)
- Round 7: Ch 3, 1 dc in the same stitch, dc in the next 5 stitches, then repeat 2 dc in the next stitch, dc in the next 5 stitches around. Sl st to join. (84 sts)
- Round 8: Ch 3, 1 dc in the same stitch, dc in the next 6 stitches, then repeat 2 dc in the next stitch, dc in the next 6 stitches around. Sl st to join. (96 sts) Fasten off and weave in the ends.
If your circle starts to look like a 12-sided shape instead of a round one, that is because the increases stack on top of each other. On the next even round, move the increase to the middle of each repeat (for example, in Round 6 work dc in the next 2 stitches, 2 dc in the next stitch, dc in the next 2 stitches around) and the outline will stay round.
Lay your circle on the table and check that it lies completely flat. A little waviness usually relaxes after blocking, but if it ruffles strongly or curls up like a bowl, see the troubleshooting table near the end of this guide before moving on.
Step 2: Fold the Circle and Mark the Corners
Fold the circle exactly in half with the right side (the side that was facing you while you crocheted) on the outside. Line up the edges so that each stitch on the front layer sits directly on top of a stitch on the back layer. You should have 48 matching pairs of stitches along the curved edge. Lay it down so the straight folded edge is at the bottom, because this fold becomes your hen’s flat bottom.
Clip one locking stitch marker through both layers right on the folded edge, about ½ inch in from each end. These two markers keep the layers from shifting while you join them, so your hen stays nicely shaped.
Step 3: Join the Two Layers
With the front facing you and the fold at the bottom, join the cream yarn with a slip stitch through both layers in the first pair of stitches at the right corner. Ch 1 and work 1 sc in the same stitch, then work 1 sc through both layers in each matching pair of stitches all the way along the curved edge to the left corner, inserting your hook through the front stitch and the back stitch together each time. You will have 48 sc. Fasten off and weave in the ends.
To make the next steps easy, count the stitches of this joining round from the right: stitch 1 is at the right corner (the tail end), and stitch 48 is at the left corner (the head end). You can now remove the two stitch markers.
Step 4: Add the Tail Feathers
With the front still facing you, join the cream yarn with a slip stitch in stitch 1 at the right corner. Ch 1 and work 1 sc in the same stitch. Then repeat skip 2 stitches, work 7 dc in the next stitch, skip 2 stitches, work 1 sc in the next stitch three times. Your last sc should land in stitch 19. Fasten off and weave in the ends.
You now have three pretty fan-shaped shells climbing up the right side of the hen’s back. These are her tail feathers, and they also add an extra layer of thickness along the edge you are most likely to grab.
Step 5: Make the Hanging Loop
Join the cream yarn with a slip stitch in stitch 25, which sits at the top center of the hen’s back. Ch 12, then slip stitch into the same stitch to form a loop. Fasten off and weave in the ends securely, because this loop will carry the weight of the potholder every time it hangs on a hook.
Step 6: Crochet the Head
The head is made of two small circles joined together, so it is double thick just like the body.
- Round 1: With cream yarn, make a magic ring, ch 3 (counts as the first dc), then work 11 dc into the ring. Pull closed and sl st to join. (12 sts)
- Round 2: Ch 3, 1 dc in the same stitch, then 2 dc in every stitch around. Sl st to join. (24 sts)
- Round 3: Ch 3, 1 dc in the same stitch, dc in the next stitch, then repeat 2 dc in the next stitch, dc in the next stitch around. Sl st to join. (36 sts)
Make the first circle and fasten off. Make the second circle but do not fasten off. Hold the two circles together with their wrong sides touching and the stitches lined up, ch 1, and work 1 sc through both layers in each stitch around (36 sc). Sl st to join and fasten off. Your head should measure about 3¼ to 3½ inches across.
Step 7: Add the Comb
Hold the head with the front facing you and imagine it as a clock face. Find the stitch at the very top of the head (12 o’clock), count 6 stitches to the right of it, which brings you to about 2 o’clock, and join the scarlet yarn there with a slip stitch. Then repeat skip 1 stitch, work 5 dc in the next stitch, skip 1 stitch, slip stitch in the next stitch three times. You will have three plump rounded bumps that run across the top of the head from about 2 o’clock to 10 o’clock. Fasten off and weave in the ends.
Step 8: Make the Beak and Wattle
For the beak, use mustard yarn and ch 4. Work 1 sc in the second chain from the hook, 1 hdc in the next chain and 1 dc in the last chain. Fasten off, leaving an 8-inch tail for sewing. You now have a tiny triangle that is tall at the dc end and pointed at the sc end.
For the wattle, use scarlet yarn and make a magic ring. Ch 2 and work 6 dc into the ring, then pull the ring tightly closed. Fasten off, leaving an 8-inch tail. This makes a small teardrop-shaped fan.
Step 9: Assemble the Face
Using the beak tail and your tapestry needle, sew the wide (dc) end of the beak to the edge of the head at the 9 o’clock position, so the point sticks out to the left. Sew the narrow ring end of the wattle just below the beak, at about 8 o’clock, so the little fan hangs downward along the edge of the head.
For the eye, thread a length of black cotton and make a French knot (wrap the yarn around the needle two or three times) at about 10 o’clock, roughly ¾ inch in from the edge, just above and slightly to the right of the beak. An embroidered eye is the safest choice for a potholder, because plastic safety eyes can soften and get very hot when they touch a warm pan.
Step 10: Attach the Head to the Body
Place the body with the front facing you, fold at the bottom and tail on the right. Position the head on the upper-left part of the body so that its center sits about 1¼ inches in from the body’s left end and about 3½ inches above the folded bottom edge. The lower right part of the head will overlap the body, the top of the head and the comb will rise above the hen’s back, and the left edge of the head will stick out about ½ inch past the body’s left end.
Using cream yarn, whipstitch around the edge of the head wherever it overlaps the body, sewing through the head and the front layer of the body. Then turn the potholder over and add a few tacking stitches where the body’s top edge crosses the back of the head, so the head cannot flop forward. Weave in all the ends.
Step 11: Block and Finish
Lightly spray your hen with water or dampen it, lay it on a towel or blocking mat and gently shape it with your hands. Fan each tail shell open so the stitches spread evenly, smooth the comb bumps upward and make sure the bottom fold is straight. Let it dry completely flat. Your classic farmhouse hen is ready to work in the kitchen.
10 Farmhouse Chicken Potholder Crochet Patterns
1. Classic Cream Farmhouse Hen
This is the hen you just learned to make, and she is the one every farmhouse kitchen needs first. Her natural cream body has the soft, matte look of an old flour sack, and the bright scarlet comb and mustard beak give her just enough color to pop against white cabinets, butcher-block counters or a shiplap wall. Because she is neutral, she goes with every kitchen palette, from black-and-white modern farmhouse to warm cottage style.
She is the perfect beginner project because the body is just eight simple rounds of double crochet, and folding the circle in half makes her double thick without needing a second piece or a lining. Once you have made her, you will understand the basic construction of almost every other hen in this list, so it is worth making her first even if you plan to try fancier designs later.
Make it yours: Swap the cream for oatmeal, soft gray or white to match your dish towels, or add a tiny cream bow to her hanging loop for a sweet gift. If you make several, try giving each one a slightly different comb color, such as scarlet, coral and deep berry, for a cheerful little flock.
2. Rhode Island Red Hen with Cream Shells
Inspired by the much-loved Rhode Island Red breed, this hen has a deep rust red-brown body that feels warm, earthy and very traditional. The real star of this design is the row of cream shells that runs along her entire back, like a scalloped feather trim. The cream edging frames her beautifully and gives her that vintage, handmade look you see in old country kitchens.
To make her, crochet the body circle, head, comb, beak and wattle exactly as in the classic pattern, but use rust brown for the body and head. For the shell border, join cream yarn in stitch 1 at the right corner after the joining round, ch 1 and sc in the same stitch, then repeat skip 2 stitches, 7 dc in the next stitch, skip 2 stitches, sc in the next stitch five times. Your last sc lands in stitch 31, which is just where the head starts to overlap the body, so no shell ends up squashed underneath the head. Make the hanging loop in cream in stitch 25, which is one of the single crochets between the shells.
Make it yours: For extra contrast, work the joining round in cream as well, so a thin cream line outlines the whole body. You can also use the same method with black and white for a striking Australorp-style hen.
3. Vintage Granny Circle Hen
If you love the cheerful look of 1970s granny squares, this hen is for you. Instead of solid double crochet, the body circle is made of granny clusters (groups of three double crochets with small spaces between them), and each round is worked in a different color. When you fold the circle in half, something magical happens: the colorful rounds turn into soft rainbow arcs radiating out from the middle of the hen’s bottom edge.
This is a wonderful scrap-buster for all those half-used balls of cotton from dishcloth projects. Mustard, sage, dusty rose, cream and soft denim blue look especially charming together in a farmhouse kitchen. Join each new color with a slip stitch in a space between two clusters. A granny circle has no corners, so it stays flat only if you add extra clusters as it grows; follow a granny circle chart or tutorial you trust, and lay the circle down after every round to check that it is not ruffling or cupping. Finish with one solid round of cream double crochet and make sure the final stitch count is an even number, so the two halves match exactly when you fold it. Then fold and join as in the classic pattern.
Safety tip: The little gaps in granny clusters can let heat through, especially if the holes on the front and back layers line up. Use a smaller hook (4.0 mm) to tighten the fabric, and use this hen for warm dishes rather than very hot cast iron, or keep her as a decorative piece on a hook.
4. Rustic Brown Puff Stitch Hen
This cozy brown hen has the most beautiful texture in the whole flock. Rows of soft puff stitches look just like fluffy feathers, and an oatmeal cream scalloped border around her back makes her look like she just stepped out of a country farmhouse. She is the perfect choice if you want a hen that feels a little more special and handmade.
Unlike the folded-circle hens, she is made from two matching pieces worked flat in rows. Start each piece with a chain about 8 inches long for the flat bottom, work rows of puff stitches separated by rows of single crochet, and shape the rounded back gradually: work even for about 1 inch, decrease one stitch at each end of every other row for the next inch or so, then decrease at each end of every row until the top is about 3 inches wide. Decreasing slowly at first and faster at the top is what gives a soft, rounded dome; decreasing on every row from the start makes a flat-topped trapezoid instead. Make the back piece in plain single crochet rows so the side you grip with is smooth and firm. Hold both pieces wrong sides together, single crochet all the way around through both layers, then add oatmeal cream shells along the curved top edge and finish with the same head, comb, beak and wattle as the classic hen in chestnut brown.
Make it yours: Try a golden buff color for a Buff Orpington look, or alternate two shades of brown on the puff rows for a speckled, feathery effect.
5. Speckled Hen in Single Crochet
If heat protection is your top priority, this is the hen to make. She is worked entirely in single crochet, which is the densest basic stitch, so her fabric is thick, firm and almost gap-free. Made in a speckled salt-and-pepper cotton, she looks like a sweet Plymouth Rock or speckled Sussex hen, and the speckles hide everyday kitchen marks beautifully.
The method is the same folded circle, but with single crochet instead of double. Start with 6 sc in a magic ring, then increase by 6 stitches in every round (12, 18, 24 and so on), and continue for about 17 rounds, until the circle measures 8½ inches across (about 102 stitches). To keep the circle round rather than hexagon-shaped, shift where you place the increases in every other round. Fold, join with 51 sc through both layers, and add three charcoal tail shells, a speckled head, scarlet comb, mustard beak and scarlet wattle.
Make it yours: If you cannot find speckled cotton, hold one strand of thin cream cotton and one strand of thin black cotton together for a natural tweed effect, and size up your hook slightly.
6. Red Gingham Triangle Hen
Nothing says farmhouse picnic quite like red gingham, and this hen captures that feeling perfectly. Her body is a square folded diagonally into a triangle, which gives her a fun, stylized shape: the long folded edge is her flat bottom, the top point is her back, and the two sloping sides are joined with single crochet.
The gingham checks are made with the corner-to-corner (C2C) technique, where the square is built from small diagonal tiles. Use three colors to create real gingham: white, soft rose and barn red. Follow a simple checkerboard chart where rows of white and rose squares alternate with rows of rose and red squares, until your square measures about 7 inches on each side. The checks in a C2C square line up with its sides, so when you fold the square on the diagonal, they turn on their points and look like little diamonds. This diamond (harlequin) gingham is very pretty on a hen and gives her a playful, vintage quilt feel. Add three barn red shells along the right slope for the tail and a cream head with a scarlet comb on the upper left.
Make it yours: Try navy and white gingham for a coastal farmhouse look, or sage and cream for a soft spring kitchen.
7. Proud Farmhouse Rooster
Every flock needs a rooster, and this one is a real showstopper. He has the same cream folded-circle body as the classic hen, but his comb is taller, his wattle is longer and his tail is a magnificent layered fan of deep teal, rust and mustard feathers that rises proudly above his back.
For his tall comb, count 5 stitches to the right of the top center stitch of the head, join scarlet there and repeat 5 tr in the next stitch, sl st in the next stitch five times. This uses 10 stitches, so the five tall rounded points sit centered on top of his head. Make two wattles instead of one and sew them side by side under the beak. For the tail, work three rows of shells on the right side of his back, each in a new color. The first row is teal shells of treble crochet, and each following row (rust, then mustard) places its shells into the single crochets between the shells of the row before, so the feathers stack and rise like a real rooster’s tail.
Make it yours: Hang a hen and a rooster side by side on matching hooks for a sweet pair, or make him in black with a teal and green tail for a dramatic modern farmhouse look. Keep the tail compact so it never hangs near a stove burner.
8. Mama Hen and Baby Chick Set
This adorable set is one of the most popular gifts you can make, especially for Easter, Mother’s Day or a new home. Mama is the classic cream hen, and her baby is a tiny butter yellow chick made with the same folded-circle method at a smaller size. The chick makes a perfect mug rug, a mini trivet for a teapot or a sweet spoon rest.
For the chick, crochet only four rounds of the body circle (48 stitches, about 4½ inches across), fold it and join with 24 sc through both layers. Make the head with just two rounds (24 stitches) in two layers, joined together, and skip the comb and wattle. Add a tiny orange beak, a black French knot eye and, if you like, a small fan of five double crochets on her body as a wing. Make her loop shorter, with just 8 chains.
Make it yours: Tie the pair together with a strip of gingham ribbon and tuck them into a basket with a wooden spoon and a jar of homemade jam for a heartfelt farmhouse gift.
9. Sunflower Wing Hen
This sage green hen brings a fresh, sunny touch to the farmhouse kitchen. Her wing is a little crocheted sunflower with a chocolate brown center and golden petals, which makes her perfect for summer and harvest season. Sage green and gold is a soft, natural color pairing that looks lovely with wood, white dishes and woven baskets.
Make the body and head as in the classic pattern in sage green, with cream tail shells. For the sunflower, use brown to make a magic ring with 8 sc, then work 2 sc in each stitch (16 stitches). Join gold and repeat (hdc, dc, hdc) in the next stitch, sl st in the next stitch eight times for eight rounded petals. Your sunflower will be about 2 inches across. Sew it onto the center of the hen’s front. Use the smooth back of the potholder as your gripping side so the appliqué stays pretty.
Make it yours: Change the wing to suit the season: a red apple for autumn, a holly leaf for Christmas or a little pink daisy for spring.
10. Ticking Stripe Hen
Ticking stripe fabric is a farmhouse classic, seen on old mattresses, pillows and grain sacks, and this hen brings that timeless look to your kitchen. She is cream with thin navy stripes, which feels clean, simple and a little bit French country.
Like the puff stitch hen, she is made from two matching pieces worked flat in rows of single crochet. Work four rows in cream, then two rows in navy, and repeat this stripe pattern as you shape the dome. Using an even number of rows for each stripe means both colors always end up on the same side, so you can carry the unused color up the side instead of cutting it every time. Start with a chain about 8 inches long, work even for about 1 inch, decrease one stitch at each end of every other row for the next inch or so, then decrease at each end of every row until the top is about 3 inches wide. Join the two pieces with single crochet around the edge, add three navy tail shells and finish with a cream head, scarlet comb, mustard beak and scarlet wattle.
Make it yours: Try a red and cream stripe for a classic grain sack look, or use a soft charcoal stripe for a more modern farmhouse kitchen.
Heat Safety Tips for Crochet Potholders
A crocheted hen is meant to be used, so it is worth making sure she protects your hands properly. First, always use 100% cotton or another natural fiber, as explained in the yarn section above. Second, keep your stitches dense. Use a slightly smaller hook than usual, and if you notice light shining through the fabric when you hold it up to a window, that means heat can come through too, so go down a hook size or choose the single crochet version.
Always keep your potholder dry when you handle hot pans. A damp or wet potholder conducts heat very quickly and can cause a steam burn in seconds, so never grab a hot pan with a potholder you just used to wipe a spill. Avoid using crochet potholders near open flames, such as gas burners or the broiler, because any fabric can catch fire. For extremely hot cast iron straight from a 450°F oven, consider using two hens together or making the single crochet version, and test each new potholder on a warm pan before trusting it with a very hot one.
Styling Ideas for a Cozy Farmhouse Kitchen
Your little hens deserve to be seen, so think of them as part of your kitchen decor rather than something hidden in a drawer. Hang one or two from black wrought-iron hooks on a shiplap wall near the stove, where they are always within reach and add a pop of color. A short wooden peg rail with a hen, a gingham tea towel and a small wire egg basket creates a charming country vignette in just a few minutes.
You can also tuck a hen into the handle of a cast iron skillet that lives on your stovetop, or lay one beside a cake stand on your open shelves. For a cohesive look, make your flock in two or three colors that already appear in your kitchen, such as cream, barn red and sage. During spring, add the baby chick, a few painted wooden eggs and a sprig of blossoms to a tray on your counter for a sweet seasonal display.
Gift and Craft Fair Ideas
Chicken potholders make thoughtful, budget-friendly gifts because they are handmade, useful and full of personality. For a housewarming, pair a hen with a wooden spoon, a jar of local honey and a hand-written recipe card. For Easter, place the mama hen and baby chick set in a small basket with a few chocolate eggs. For Mother’s Day or a grandmother’s birthday, a hen in her favorite color is a sweet reminder of the kitchens we grew up in.
If you sell at craft fairs, display your hens hanging on a small rustic ladder or clipped to a length of jute twine with wooden clothespins, just like a little clothesline. Offer them individually and in pairs (hen and rooster, or hen and chick), and include a small care card explaining that they are 100% cotton and machine washable. Shoppers love knowing a handmade item is both safe and practical.
Care and Washing
Cotton potholders are easy to care for. Machine wash them on a warm or cold gentle cycle with similar colors, and dry them flat or tumble dry on low. Red cotton can sometimes release a little dye in the first wash, so wash a red hen separately the first time, or use a color-catcher sheet, to keep cream shells and combs bright.
After washing, gently reshape your hen while she is still damp: fan out the tail shells, smooth the comb upward and straighten the bottom fold, then let her dry flat. Remember that cotton shrinks a little in the first wash, so a freshly washed hen may be slightly smaller and denser than when you finished her, which is completely normal.
Troubleshooting Common Problems
| Problem | Why it happens | How to fix it |
|---|---|---|
| The circle ruffles or waves | There are too many stitches in a round, or your stitches are loose. | Recount each round (Round 8 should have 96 stitches). If the count is right, go down half a hook size. |
| The circle curls up like a bowl | There are too few increases, or your tension is very tight. | Check that you added 12 stitches in each round. If the count is right, go up half a hook size or relax your grip. |
| The edges do not line up when folded | The stitch count of the last round is off, so the halves do not match. | Count the stitches of the last round and fix it before folding; each half must have exactly 48 stitches. |
| Heat comes through the potholder | The fabric is too open, so heat passes through the gaps. | Use a smaller hook, choose the single crochet version, or use two hens together for very hot pans. |
| The head flops forward | The head is only attached on the front. | Turn the hen over and add a few tacking stitches where the top of the body crosses the back of the head. |
| The comb bumps look flat or twisted | The 5 dc were spread across more than one stitch, or the bumps were not blocked. | Work all 5 dc into the same stitch, then dampen the comb and shape the bumps upward while it dries. |
| The potholder shrank after washing | Cotton shrinks slightly in its first warm wash. | This is normal. If you need a bigger hen, add one more round to the body circle before folding. |
Frequently Asked Questions
Can I use acrylic yarn for a chicken potholder? No, acrylic is not safe for potholders because it can melt when it touches a hot pan, and melted yarn can stick to your skin. Always use 100% cotton or another natural fiber. You can use acrylic only if the hen is purely decorative and will never touch hot cookware.
How long does it take to crochet a chicken potholder? A beginner can usually finish the classic hen in 2 to 3 hours, including the small pieces and sewing. Once you know the pattern, it often takes around 1½ hours. Textured designs like the puff stitch hen or the rooster’s layered tail take a little longer.
Are crochet potholders thick enough to protect my hands? Yes, when they are made from cotton in dense stitches and are double thick, as all the hens in this guide are. The folded body gives you two layers, and the edges have even more thickness. For very hot cast iron, use the single crochet version or two potholders together, and always keep them dry.
Which hook size should I use? For worsted weight cotton, a 4.5 mm (US 7) hook works well for most people. If you crochet loosely or want a denser fabric, use a 4.0 mm (US G-6) hook. What matters most is that the fabric feels firm and you cannot see light through it easily.
Can I use safety eyes on a potholder? It is better to embroider the eye with a French knot. Plastic safety eyes can get very hot or soften when they touch a warm pan, and they make the potholder bumpy to hold. An embroidered eye is safe, flat and looks charmingly vintage.
Can I sell the chicken potholders I make? Chicken potholders are a popular craft fair and online shop item because they are inexpensive to make and easy to ship. If you are following a pattern by another designer, always check their terms first, since many designers allow you to sell finished items but ask that you credit them.
Conclusion
Farmhouse chicken potholders are proof that the simplest handmade things often bring the most joy. With just a ball of cotton, a hook and an afternoon, you can create a useful kitchen helper that also adds warmth, color and a little bit of country charm to your home. Whether you start with the classic cream hen, make a cozy Rhode Island Red with cream scallops, use up your scraps in a vintage granny hen or go all out with a proud rooster, each one will carry a little piece of your creativity.
Start with the step-by-step pattern, choose a good 100% cotton yarn, count your stitches in each round and do not worry if your first hen is a little wonky, because she will still be loved, and every hen after her will be neater. Before long, you will have a whole flock hanging in your kitchen, a basket of handmade gifts ready for friends and family, and a new favorite project to reach for whenever you want something cozy and quick on your hook.