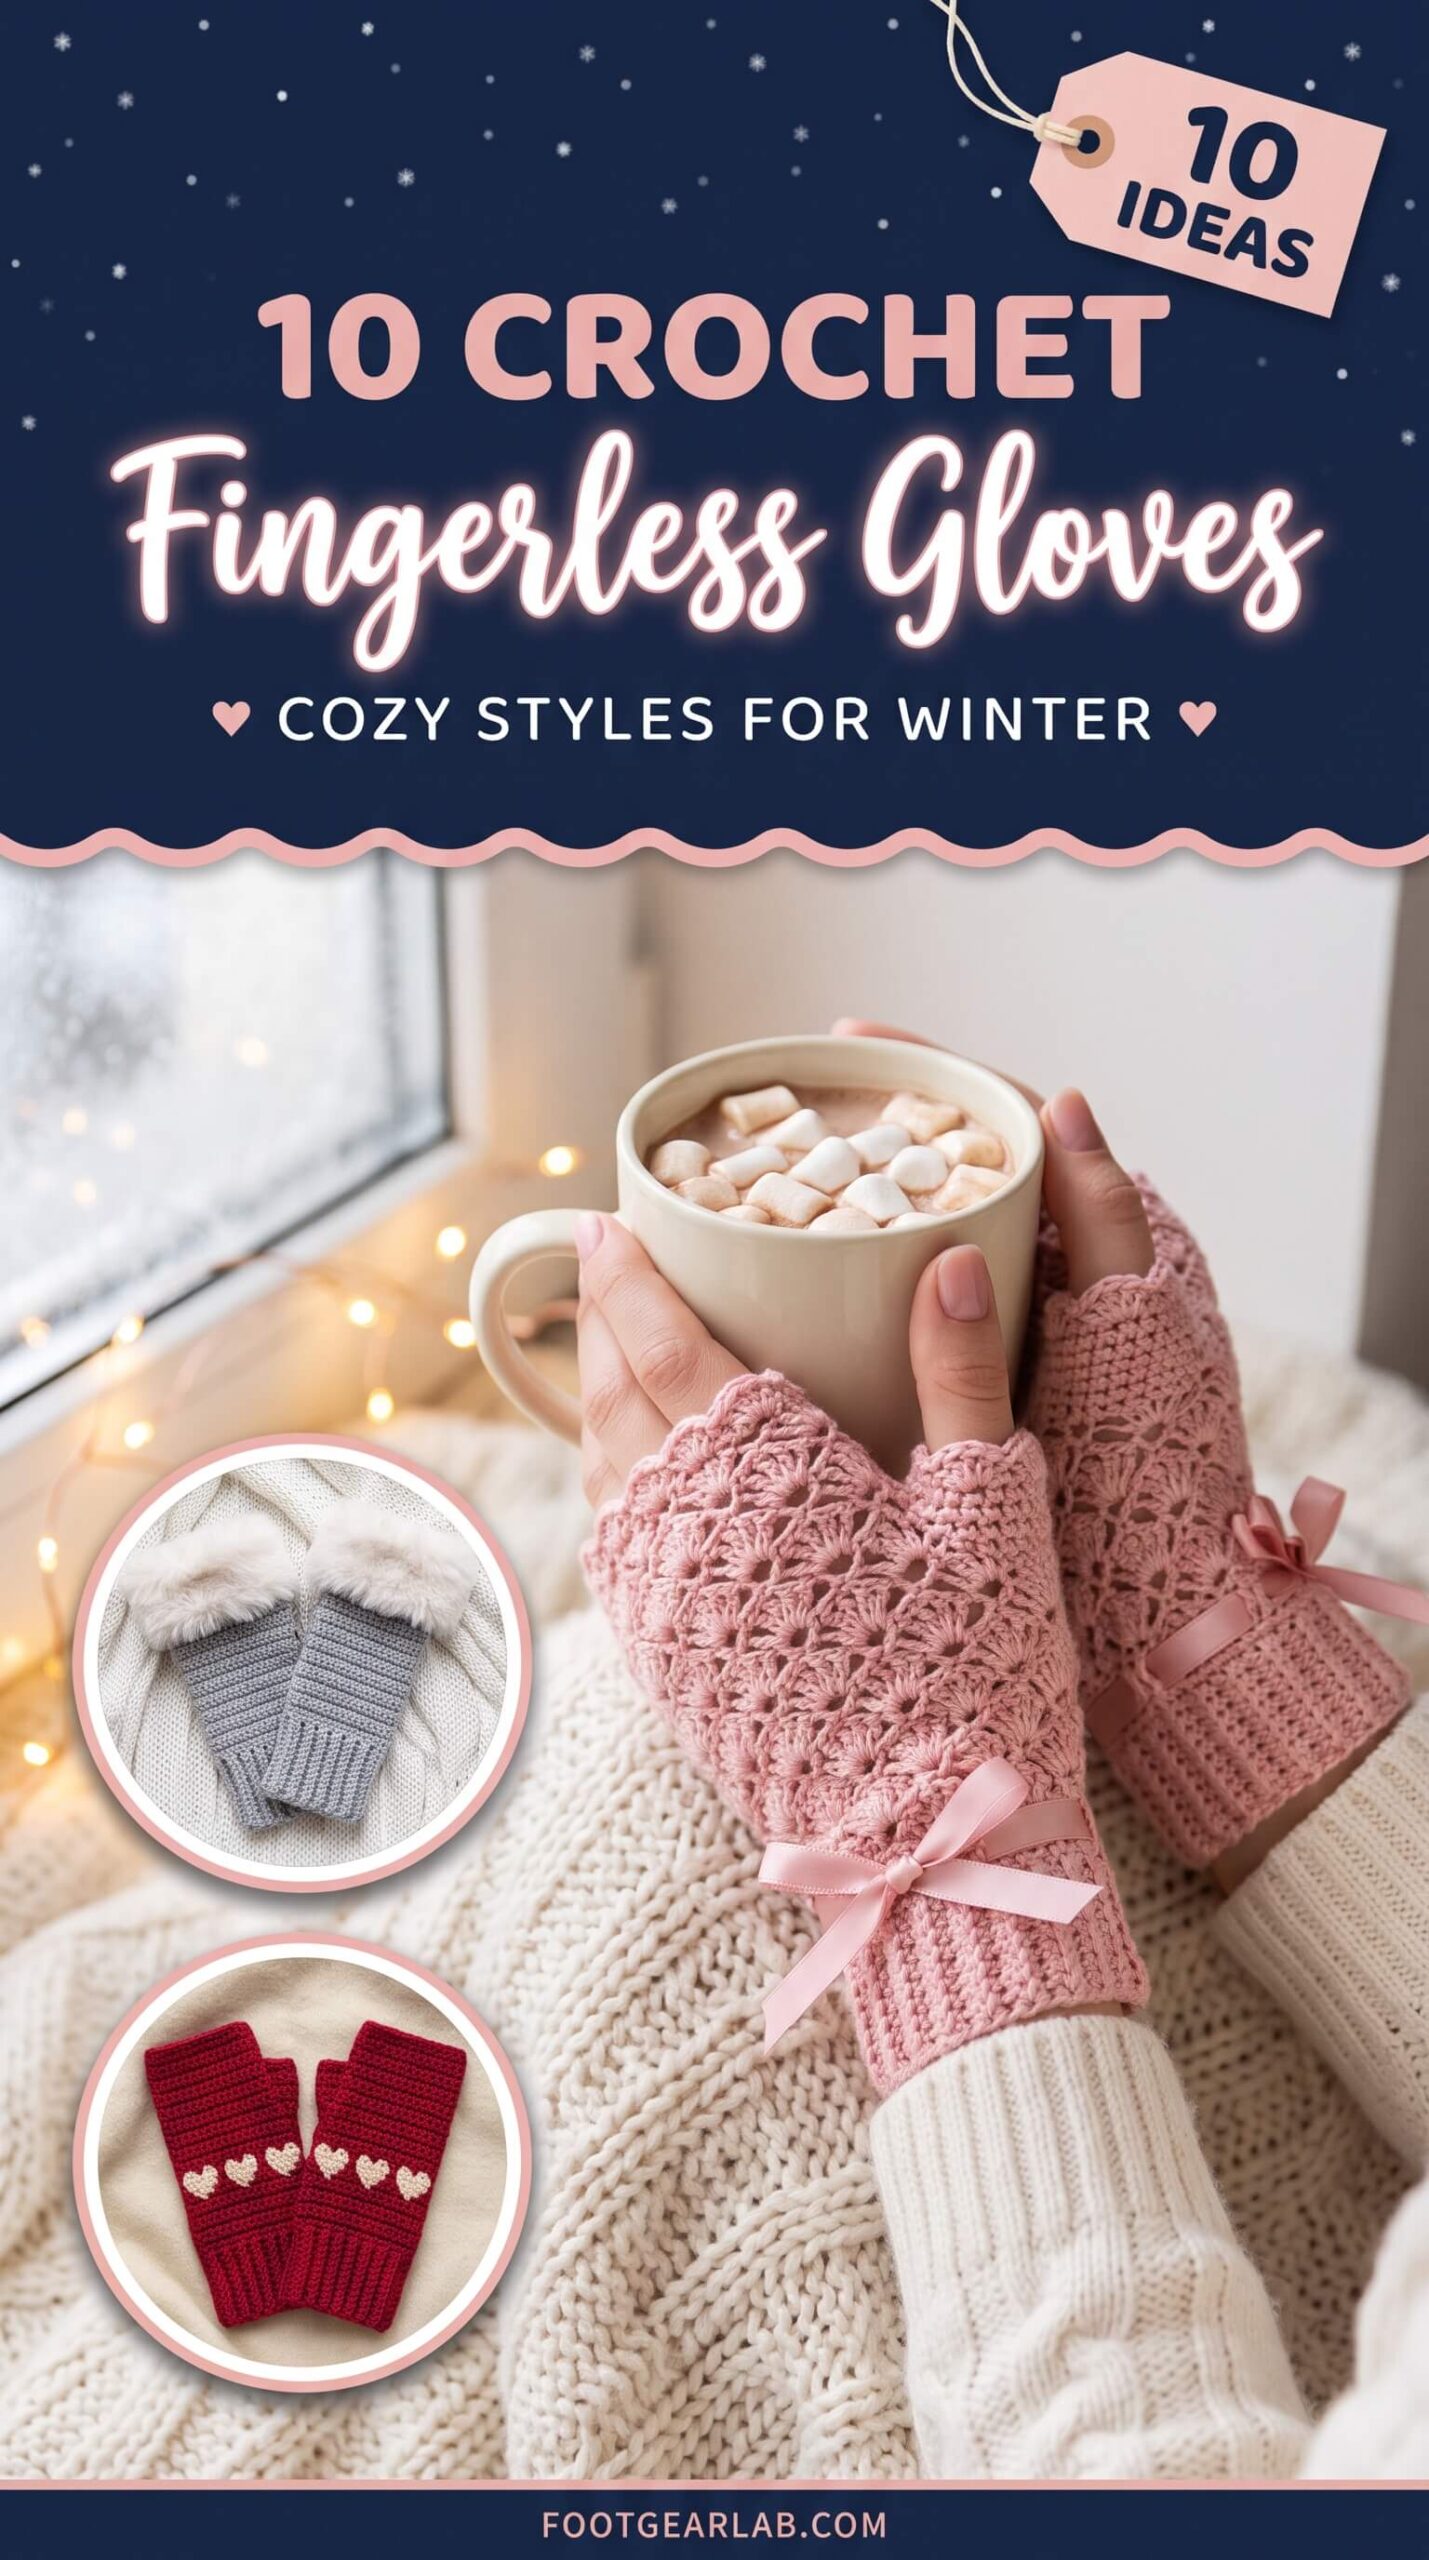
There is something special about pulling on a pair of handmade fingerless gloves on a chilly morning. They keep your hands and wrists wonderfully warm while leaving your fingers free to scroll your phone, sip your coffee, type at your desk, or turn the pages of a book. They are the perfect middle ground between bare hands and bulky winter gloves, and they look effortlessly chic with everything from chunky sweaters to wool coats.
They are also one of the most rewarding things you can make with a crochet hook. A basic pair takes only one skein of yarn and can be finished in an evening or two, which makes them a perfect project for beginners, a quick gift for friends, and a lovely way to use up leftover yarn from bigger projects. Once you know the simple basic shape, you can play with cables, lace, colorwork, bobbles, faux fur and more to create a pair for every mood and every outfit.
In this guide, you will find ten beautiful styles of crochet fingerless gloves, the best yarns and tools to use, a simple beginner-friendly method to make your first pair, fit tips, care advice and styling ideas to help you wear them all winter long.
Why Every Woman Needs a Pair of Crochet Fingerless Gloves
Fingerless gloves are one of the most practical winter accessories you can own. Much of the cold you feel in your hands comes from the back of the hand and the wrist, where the skin is thin and blood vessels sit close to the surface. By covering that area while leaving your fingertips free, fingerless gloves keep you comfortable without taking away your grip, your touch, or your ability to use a touchscreen.
They are ideal for so many everyday moments: working in a cold office or at home on a laptop, walking the dog on a frosty morning, holding a warm drink at a winter market, driving before the car heats up, or taking photos outdoors. Many women who suffer from cold hands also wear them indoors around the house, especially in the evenings, because they add warmth without getting in the way of cooking, reading or knitting.
Crocheted versions add an extra layer of charm. Crochet stitches create a thick, textured fabric that traps warm air, and because you choose the yarn, the color and the fit, your gloves can be as soft, as warm and as stylish as you like. They also make a thoughtful handmade gift for birthdays, Christmas, teachers, coworkers and anyone who always seems to have cold hands.
What You Will Need
Before you start, gather a few simple supplies. The good news is that fingerless gloves need very little yarn and only basic tools, so they are one of the most budget-friendly crochet projects you can make.
Yarn. For your first pair, choose a smooth worsted weight yarn (weight #4) in a light or medium color, so you can see your stitches clearly. Worsted weight gives you a warm glove that is not too bulky to wear under a coat sleeve. DK weight (#3) creates a thinner, more delicate glove that works well for lace styles, while bulky yarn (#5) makes extra-cozy chunky gloves that work up very fast. One standard skein of about 200 yards (180 m) of worsted yarn is usually enough for a pair of wrist-to-knuckle gloves.
Fiber. Merino wool and wool blends are the warmest choice and still breathe well, so your hands will not feel sweaty. Alpaca blends are incredibly soft and cozy but can shed a little. Acrylic is affordable, easy to wash and a great option if you are allergic to wool. For spring or for women with sensitive skin, a cotton or bamboo blend feels light and smooth, though it is less stretchy and not as warm.
Crochet hook. A 5 mm (H-8) hook is a good match for most worsted weight yarns. If you crochet loosely, go down half a size or one size for a denser, warmer fabric. Always check the hook size on your yarn label and adjust to your tension.
Other tools. You will also need a pair of small scissors, a tapestry (yarn) needle for seaming and weaving in ends, a soft measuring tape, and two locking stitch markers to mark your thumb opening.
How to Measure for the Perfect Fit
Fingerless gloves should fit snugly, so they stay in place and keep warm air close to your skin, but they should never feel tight or leave marks. Taking two quick measurements before you start makes all the difference.
Palm circumference. Wrap a soft measuring tape around the widest part of your hand, just below the knuckles, without including your thumb. Most adult women measure between 7 and 8 inches (18 to 20 cm). Crochet ribbing stretches, so you will make your glove about half an inch (1 to 1.5 cm) smaller than this measurement. This is called negative ease, and it is the secret to gloves that hug your hands instead of slipping down.
Glove length. Measure from where you want the glove to start on your wrist (or arm) up to the base of your fingers, just below the knuckles. A classic wrist-to-knuckle glove is usually about 7 to 8 inches (18 to 20 cm) long. For a longer cuff that tucks into your coat sleeve, add 2 to 3 inches (5 to 8 cm). For arm warmers, measure all the way up to just below your elbow.
Thumb position. Finally, note the distance from your wrist starting point to where your thumb begins. This tells you where to leave the thumb opening when you seam your glove, and it is usually about 4 to 5 inches (10 to 13 cm) up from the bottom edge on a standard glove.
How to Crochet a Basic Pair (Beginner-Friendly Method)
The easiest way to make fingerless gloves is to crochet a flat ribbed rectangle, fold it in half and seam the side, leaving a gap for your thumb. There is no shaping, no working in the round and no complicated thumb gusset, which makes it perfect for beginners. The same rectangle works for both the left and the right hand, so you simply make two identical pieces.
In this method, the stitch used is the half double crochet worked in the back loop only. Working in the back loop creates raised ridges that look like knitted ribbing, and because you work the rows sideways, those ridges run up and down the glove when you wear it, giving a stretchy, close fit.
Step 1: Chain and Start the Ribbing
Make a chain that equals the length of your glove. For an 8-inch (20 cm) glove in worsted weight yarn with a 5 mm hook, this is usually about 28 to 30 chains, but always measure your own chain against your glove length, since everyone’s tension is different. Add one extra chain for turning.
Work one half double crochet into the third chain from the hook and in every chain across. Chain one and turn. From the second row onward, work one half double crochet into the back loop only of each stitch across, chaining one and turning at the end of every row. After a few rows, you will see the ridges begin to appear along the length of your piece. Count your stitches at the end of each row in the beginning to make sure the edges stay straight.
Step 2: Work Until the Rectangle Fits Your Palm
Keep working rows of half double crochet in the back loop only. Every few rows, gently wrap the piece around your palm (with the ridges running from your wrist toward your fingers) to check the width. Stop when the short edges meet comfortably around the widest part of your hand without stretching too much, which is roughly half an inch smaller than your palm measurement. For most women’s hands in worsted weight, this is usually around 18 to 22 rows.
When you are happy with the size, fasten off and leave a long tail of about 15 to 20 inches (40 to 50 cm). You will use this tail to sew the side seam, which saves you from adding a new strand of yarn and leaves fewer ends to weave in.
Step 3: Fold, Seam and Leave a Thumb Opening
Fold the rectangle in half so that the first row and the last row meet along one long edge. The ridges should now run vertically from the bottom (wrist) to the top (knuckles). Place one stitch marker about 4.5 inches (11 cm) up from the bottom edge and a second one about 2 inches (5 cm) above it. The space between the two markers is your thumb opening.
Thread the long tail onto your tapestry needle and sew the edges together with a neat whipstitch or mattress stitch, starting from the bottom and working up to the first marker. Secure the yarn, skip the gap between the markers, then sew the remaining section from the second marker to the top edge. Slip the glove on to check that your thumb comes out comfortably before weaving in all the ends.
Step 4: Make the Second Glove and Finish
Make a second rectangle with the same number of chains and rows, and seam it the same way. Because the rectangle is symmetrical, you can simply flip it so the thumb opening faces the other side for your other hand. Weave in all the ends on the inside of the gloves.
For a more polished look, you can add a round of single crochet or slip stitches around the top edge and the thumb opening. This tightens the edges, stops them from stretching out over time and gives your gloves a clean, professional finish. Once you have mastered this basic version, every style below is simply a creative variation on the same idea.
10 Crochet Fingerless Glove Styles to Try
1. Classic Ribbed Fingerless Gloves
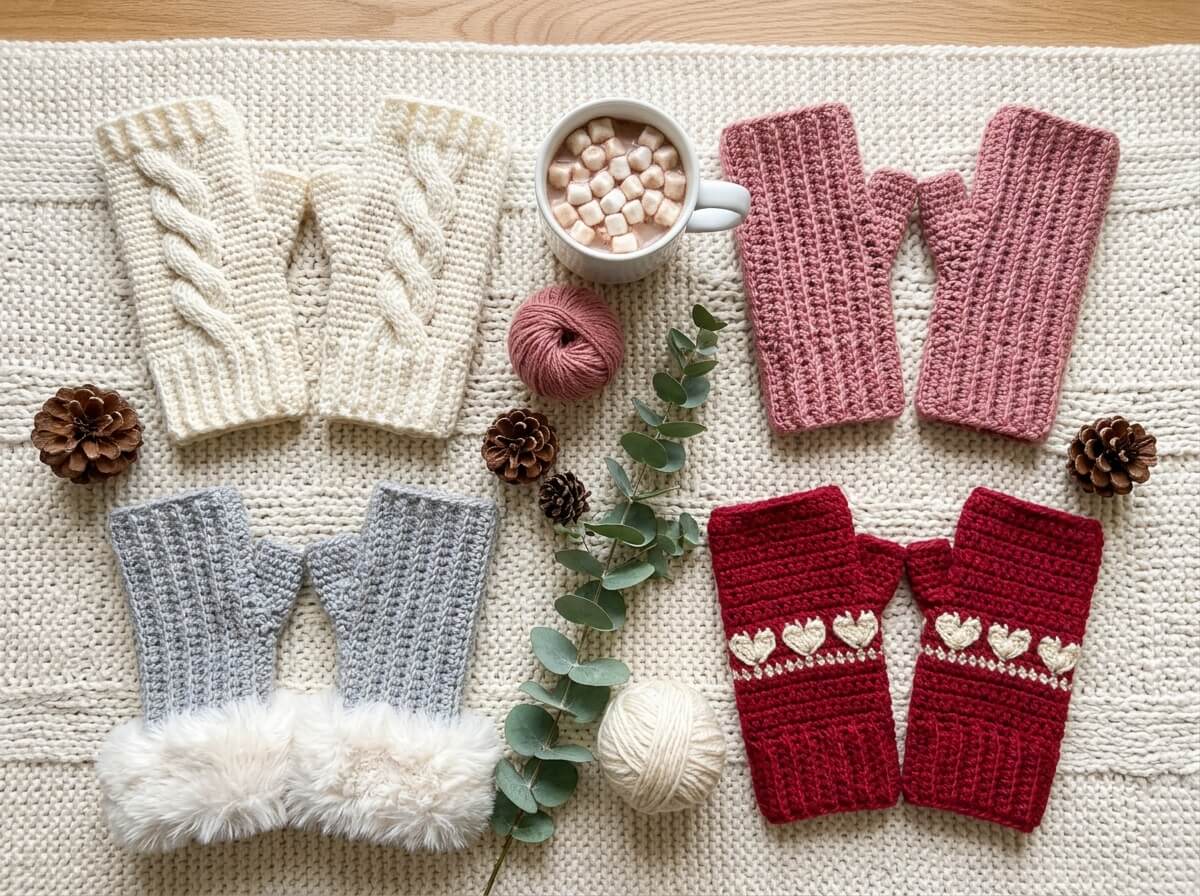
The classic ribbed glove is the style you just learned, and it is a true wardrobe essential. The vertical ribbing gives it a clean, knitted look, a stretchy fit and a timeless feel that goes with everything from casual jeans to a tailored wool coat. Because the pattern is simple and repetitive, it is also the perfect project to make while watching a movie or chatting with friends.
Choose solid, soft colors to keep this style elegant: dusty rose, camel, oatmeal, charcoal, navy and classic black all look beautiful. You can personalize them with a small wooden button sewn at the wrist, a contrasting color for the top edge, or simple stripes made by changing colors every few rows. Making several pairs in different neutral shades is a great way to build a cozy winter collection.
Difficulty: Beginner. Best yarn: worsted weight merino or wool blend.
2. Chunky Cable Fingerless Gloves
If you love the look of a cable-knit sweater, these gloves will instantly become your favorite. Crochet cables are made with front post stitches that cross over each other, creating raised twisted columns that stand out from the fabric. A single cable running up the back of the hand looks elegant and is a great introduction to post stitches, while a wider panel of two or three cables gives a richer, more dramatic texture.
Because cables stack layers of yarn on top of each other, they also make the gloves extra thick and warm. Light, solid colors show the texture best, so ivory, cream, heather grey and soft oatmeal are always lovely choices. Pair this style with a matching cable beanie or scarf for a coordinated winter set that looks straight out of a cozy cabin catalogue.
Difficulty: Intermediate. Best yarn: bulky or chunky wool blend in a light, solid color.
3. Lacy Shell Stitch Fingerless Gloves
For a softer, more romantic look, lacy shell stitch gloves are absolutely charming. The shell stitch groups several double crochets into one stitch, forming little fan shapes that create an open, airy fabric and a pretty scalloped edge. They are lighter than other styles, which makes them perfect for autumn, early spring, weddings, garden parties and evening outfits.
Work this style in a DK weight cotton or bamboo blend for crisp, defined stitches, and finish the top with a row of small scallops for a feminine touch. Pastel shades such as sage green, blush pink, lavender and soft ivory look especially delicate. For a vintage feel, you can thread a thin satin ribbon through the stitches at the wrist and tie it in a small bow.
Difficulty: Advanced beginner. Best yarn: DK weight cotton, bamboo or cotton-blend yarn.
4. Granny Stripe Fingerless Gloves
Granny stitches are having a huge comeback, and granny stripe fingerless gloves are a fun, retro way to join the trend. This style uses classic clusters of three double crochets worked in rows, with a new color every one or two rows to create bright, cheerful stripes. Since each stripe uses only a small amount of yarn, it is a wonderful scrap-buster project for all those leftover mini balls in your stash.
For a modern boho look, try a warm earthy palette such as mustard, terracotta, sage and cream. For a playful vibe, go with bright rainbow stripes or candy pastels. Finish the cuff and the top edge in a single solid color so the stripes look framed and intentional, and add a solid ribbed cuff at the wrist for a snug fit.
Difficulty: Beginner. Best yarn: worsted weight acrylic or wool blend scraps.
5. Long Arm Warmers
Long fingerless gloves, often called arm warmers, cover your hands and continue up the forearm, sometimes all the way to the elbow. They feel incredibly cozy, keep the gap between your coat sleeve and your hand completely covered, and add a stylish layered look to short-sleeve tops, sleeveless dresses and cropped coats.
The basic ribbed method works perfectly here: you simply make the chain longer to match your full arm length. Because the forearm gets wider as it moves toward the elbow, many makers either use a slightly larger hook for the top half or add a few extra stitches so the warmer does not feel tight. Slouchy arm warmers in a soft, drapey yarn look relaxed and effortless, while fitted ones in a smooth wool look sleek and elegant.
Difficulty: Beginner. Best yarn: worsted weight merino or alpaca blend.
6. Faux Fur Cuff Fingerless Gloves
Add a touch of luxury to a simple pair of gloves with a fluffy faux fur cuff. The body of the glove is worked in a smooth ribbing, and a few rounds of faux fur yarn are added at the wrist, or a ready-made faux fur trim is sewn on after the glove is finished. The result is soft, glamorous and so warm, with a feel that is very similar to high-end boutique gloves.
Faux fur yarn can be tricky to crochet because the long fibers hide your stitches, so it is best to use it only for the cuff and to work simple single crochet stitches by feel. Soft grey with cream-white fur, camel with chocolate brown fur, and black with black fur are all chic combinations. These gloves make an especially beautiful holiday gift, wrapped in tissue paper with a matching faux fur headband.
Difficulty: Advanced beginner. Best yarn: worsted weight wool blend for the body, plus faux fur yarn or trim for the cuff.
7. Bobble Stitch Fingerless Gloves
Bobble stitch gloves are playful, tactile and irresistibly cute. Bobbles are made by working several unfinished double crochets into the same stitch and closing them together, creating small raised bumps on the fabric. A simple column of bobbles running up the back of the hand adds texture without making the gloves too busy, while scattered bobbles all over give a fun, whimsical look.
Since bobbles pop out on the front of the work, they are worked on wrong-side rows when you crochet flat, or on every row when working in the round. Pastel colors like lavender, baby blue, mint and blush pink make this style sweet and youthful, while deeper shades like plum or emerald look more grown-up. Bobbles also add an extra layer of warmth right where your hands feel the cold the most.
Difficulty: Intermediate. Best yarn: worsted weight wool blend or soft acrylic.
8. Heart Colorwork Fingerless Gloves
These gloves are pure joy to wear in February and throughout the cold season. Using tapestry crochet, you carry a second color inside your stitches and switch between colors to build a pattern, in this case a band of little hearts around the hand. Since two strands of yarn sit inside every stitch, the fabric becomes extra dense and warm.
The easiest way to start is with a simple heart chart drawn on graph paper or in a free charting app, and to keep the colorwork in a single band around the middle of the glove. Cranberry red with cream hearts is a classic choice for Valentine’s Day, while blush pink with white or navy with soft pink feel fresh and modern. Keep your tension even so the carried strand does not pucker the fabric, and change colors on the last step of the stitch before the new color begins.
Difficulty: Intermediate. Best yarn: worsted weight wool or acrylic in two contrasting solid colors.
9. Waffle Stitch Fingerless Gloves
The waffle stitch creates a deeply textured grid of little squares that looks exactly like a breakfast waffle, and it is one of the warmest crochet stitches you can choose. It alternates regular double crochets with front post stitches, building raised edges around small pockets that trap warm air. The fabric is thick, squishy and holds its shape beautifully.
Waffle stitch uses more yarn than plain stitches, so plan for a little extra, and use a slightly larger hook to keep the fabric from becoming too stiff. Rich, cozy colors like forest green, rust, mustard and chocolate brown look gorgeous with this style. These gloves are especially good for outdoor activities on very cold days, like winter walks, ice skating or watching outdoor events.
Difficulty: Intermediate. Best yarn: worsted weight wool blend; plan about 25% more yarn than for a ribbed pair.
10. Convertible Mitten Flap Gloves
Convertible gloves give you the best of both worlds: fingerless gloves when you need your fingers free and cozy mittens when the cold really bites. A separate mitten flap is crocheted and attached across the back of the hand, just below the knuckles. You can flip it over your fingers to keep them warm, or fold it back and fasten it with a button when you need to use your phone or unlock the door.
This style takes a little more planning, but it is incredibly practical for commuters, dog walkers, parents waiting at the school gate and anyone who spends a lot of time outdoors. Choose a sturdy wool blend so the flap keeps its shape, and use a large wooden button and a crochet loop to hold the flap back neatly. Heathered mustard, oatmeal and denim blue all look great with this style.
Difficulty: Intermediate to advanced. Best yarn: worsted weight wool blend, plus two wooden buttons.
Tips for the Best Results
Make a gauge swatch. It may be tempting to skip it, but crocheting a small 4-inch (10 cm) square in your chosen stitch tells you how many stitches and rows you need for your size. This takes only a few minutes and saves you from gloves that are too loose or too tight.
Use a smaller hook for warmth. Crochet naturally creates small gaps between stitches. Using a hook half a size or one size smaller than the yarn label suggests makes a denser fabric that blocks the wind and keeps your hands much warmer.
Keep both gloves identical. Write down your chain count, row count and seam measurements while you make the first glove. It sounds simple, but it is the easiest way to make sure your second glove matches perfectly instead of being slightly longer or wider.
Reinforce the thumb opening. The thumb gap is where gloves get the most stretching. Adding a round of single crochet or a few extra stitches at the top and bottom of the opening makes it stronger and helps it keep its shape over many winters.
Try them on often. Every hand is different. Trying your glove on as you go lets you adjust the width, length or thumb position before you finish, so the final pair fits you like a custom-made accessory.
How to Care for Your Crochet Gloves
Hand-washing is the safest way to keep your crochet gloves soft and in shape. Fill a basin with cool or lukewarm water and add a small amount of gentle wool wash or mild baby shampoo. Let the gloves soak for about 10 to 15 minutes, gently squeeze the water through the fibers, then rinse in clean water of the same temperature. Avoid rubbing or twisting, especially with wool, because this can cause felting and shrinking.
To dry, press the water out by rolling the gloves inside a clean towel, then reshape them with your hands and lay them flat on a dry towel or drying rack away from direct heat or sunlight. Never hang wet crochet gloves, as the weight of the water can stretch them out. If you used superwash wool or acrylic, you can usually machine wash them on a gentle cold cycle inside a mesh laundry bag, but always check the yarn label first.
Between seasons, store your gloves clean and dry in a breathable cotton bag or drawer. Adding a cedar block or a small lavender sachet helps protect wool from moths and keeps your gloves smelling fresh for next winter.
How to Style Your Fingerless Gloves
Fingerless gloves are surprisingly versatile and can be part of many different looks. For a cozy weekend outfit, pair chunky cable or waffle gloves with an oversized knit sweater, straight-leg jeans and ankle boots. For a polished city look, choose sleek ribbed gloves in camel, black or charcoal to wear with a long wool coat, a cashmere scarf and loafers.
Lacy shell stitch gloves look delicate and romantic with a floral midi dress, a cropped cardigan and ballet flats, while long arm warmers add a fun, layered touch to short-sleeve knit tops and pinafore dresses. Faux fur cuff gloves feel instantly festive with a velvet dress or a puffer coat at holiday parties.
Matching sets are always a good idea. Crochet a beanie, ear warmer or infinity scarf in the same yarn and stitch to create a coordinated winter set that looks thoughtful and pulled together. To keep the look modern, choose one textured piece (like cable gloves) and keep the rest of your outfit simple.
Frequently Asked Questions
Are crochet fingerless gloves good for beginners? Yes, they are one of the best beginner projects. The basic ribbed version uses only two stitches, half double crochet and chain, plus a simple seam. It is small enough to finish quickly, which keeps you motivated, and it teaches you useful skills like working in the back loop and measuring for fit.
How long does it take to crochet a pair? A simple ribbed pair in worsted weight yarn usually takes about 3 to 5 hours in total, so many makers finish both gloves in a weekend or a couple of evenings. Chunky yarn is even faster, while detailed styles with cables, colorwork or convertible flaps can take a few days longer.
How much yarn do I need? Most wrist-to-knuckle gloves in worsted weight need about 150 to 200 yards (135 to 180 m) for the pair. Long arm warmers, waffle stitch and colorwork styles need more, so buy an extra skein from the same dye lot if you are not sure.
Can I use my phone while wearing them? Absolutely. Since your fingertips are completely free, you can use touchscreens, type and write without taking the gloves off. If you want even more freedom, make the top edge sit a little lower on your hand, just below the knuckles.
What is the warmest yarn for fingerless gloves? Wool and alpaca blends are the warmest because the natural fibers trap heat and stay warm even when slightly damp. Pair a warm fiber with a dense stitch such as waffle stitch, cables or tapestry crochet, and use a slightly smaller hook for the best protection against cold and wind.
How do I stop my gloves from stretching out? Choose a yarn with good elasticity like merino wool, make your gloves with a little negative ease, and finish the top edge and thumb opening with a round of single crochet. Washing them and drying them flat, then reshaping them while damp, also helps them bounce back.
Conclusion
Crochet fingerless gloves are proof that small projects can make a big difference to your winter comfort. They keep your hands warm while letting your fingers stay busy, they work with almost every outfit, and they are quick and satisfying to make. Whether you start with a classic ribbed pair, fall in love with chunky cables, try a romantic lace style or experiment with heart colorwork, each pair you make becomes a cozy little piece of handmade style.
Begin with the simple rectangle method, measure carefully for a snug fit, and choose a soft, warm yarn you love to touch. Once you have made your first pair, you will likely want to make another in a new color, then one for your best friend, your mom or your coworker. Grab your hook, pick your favorite style, and enjoy warm hands all season long.