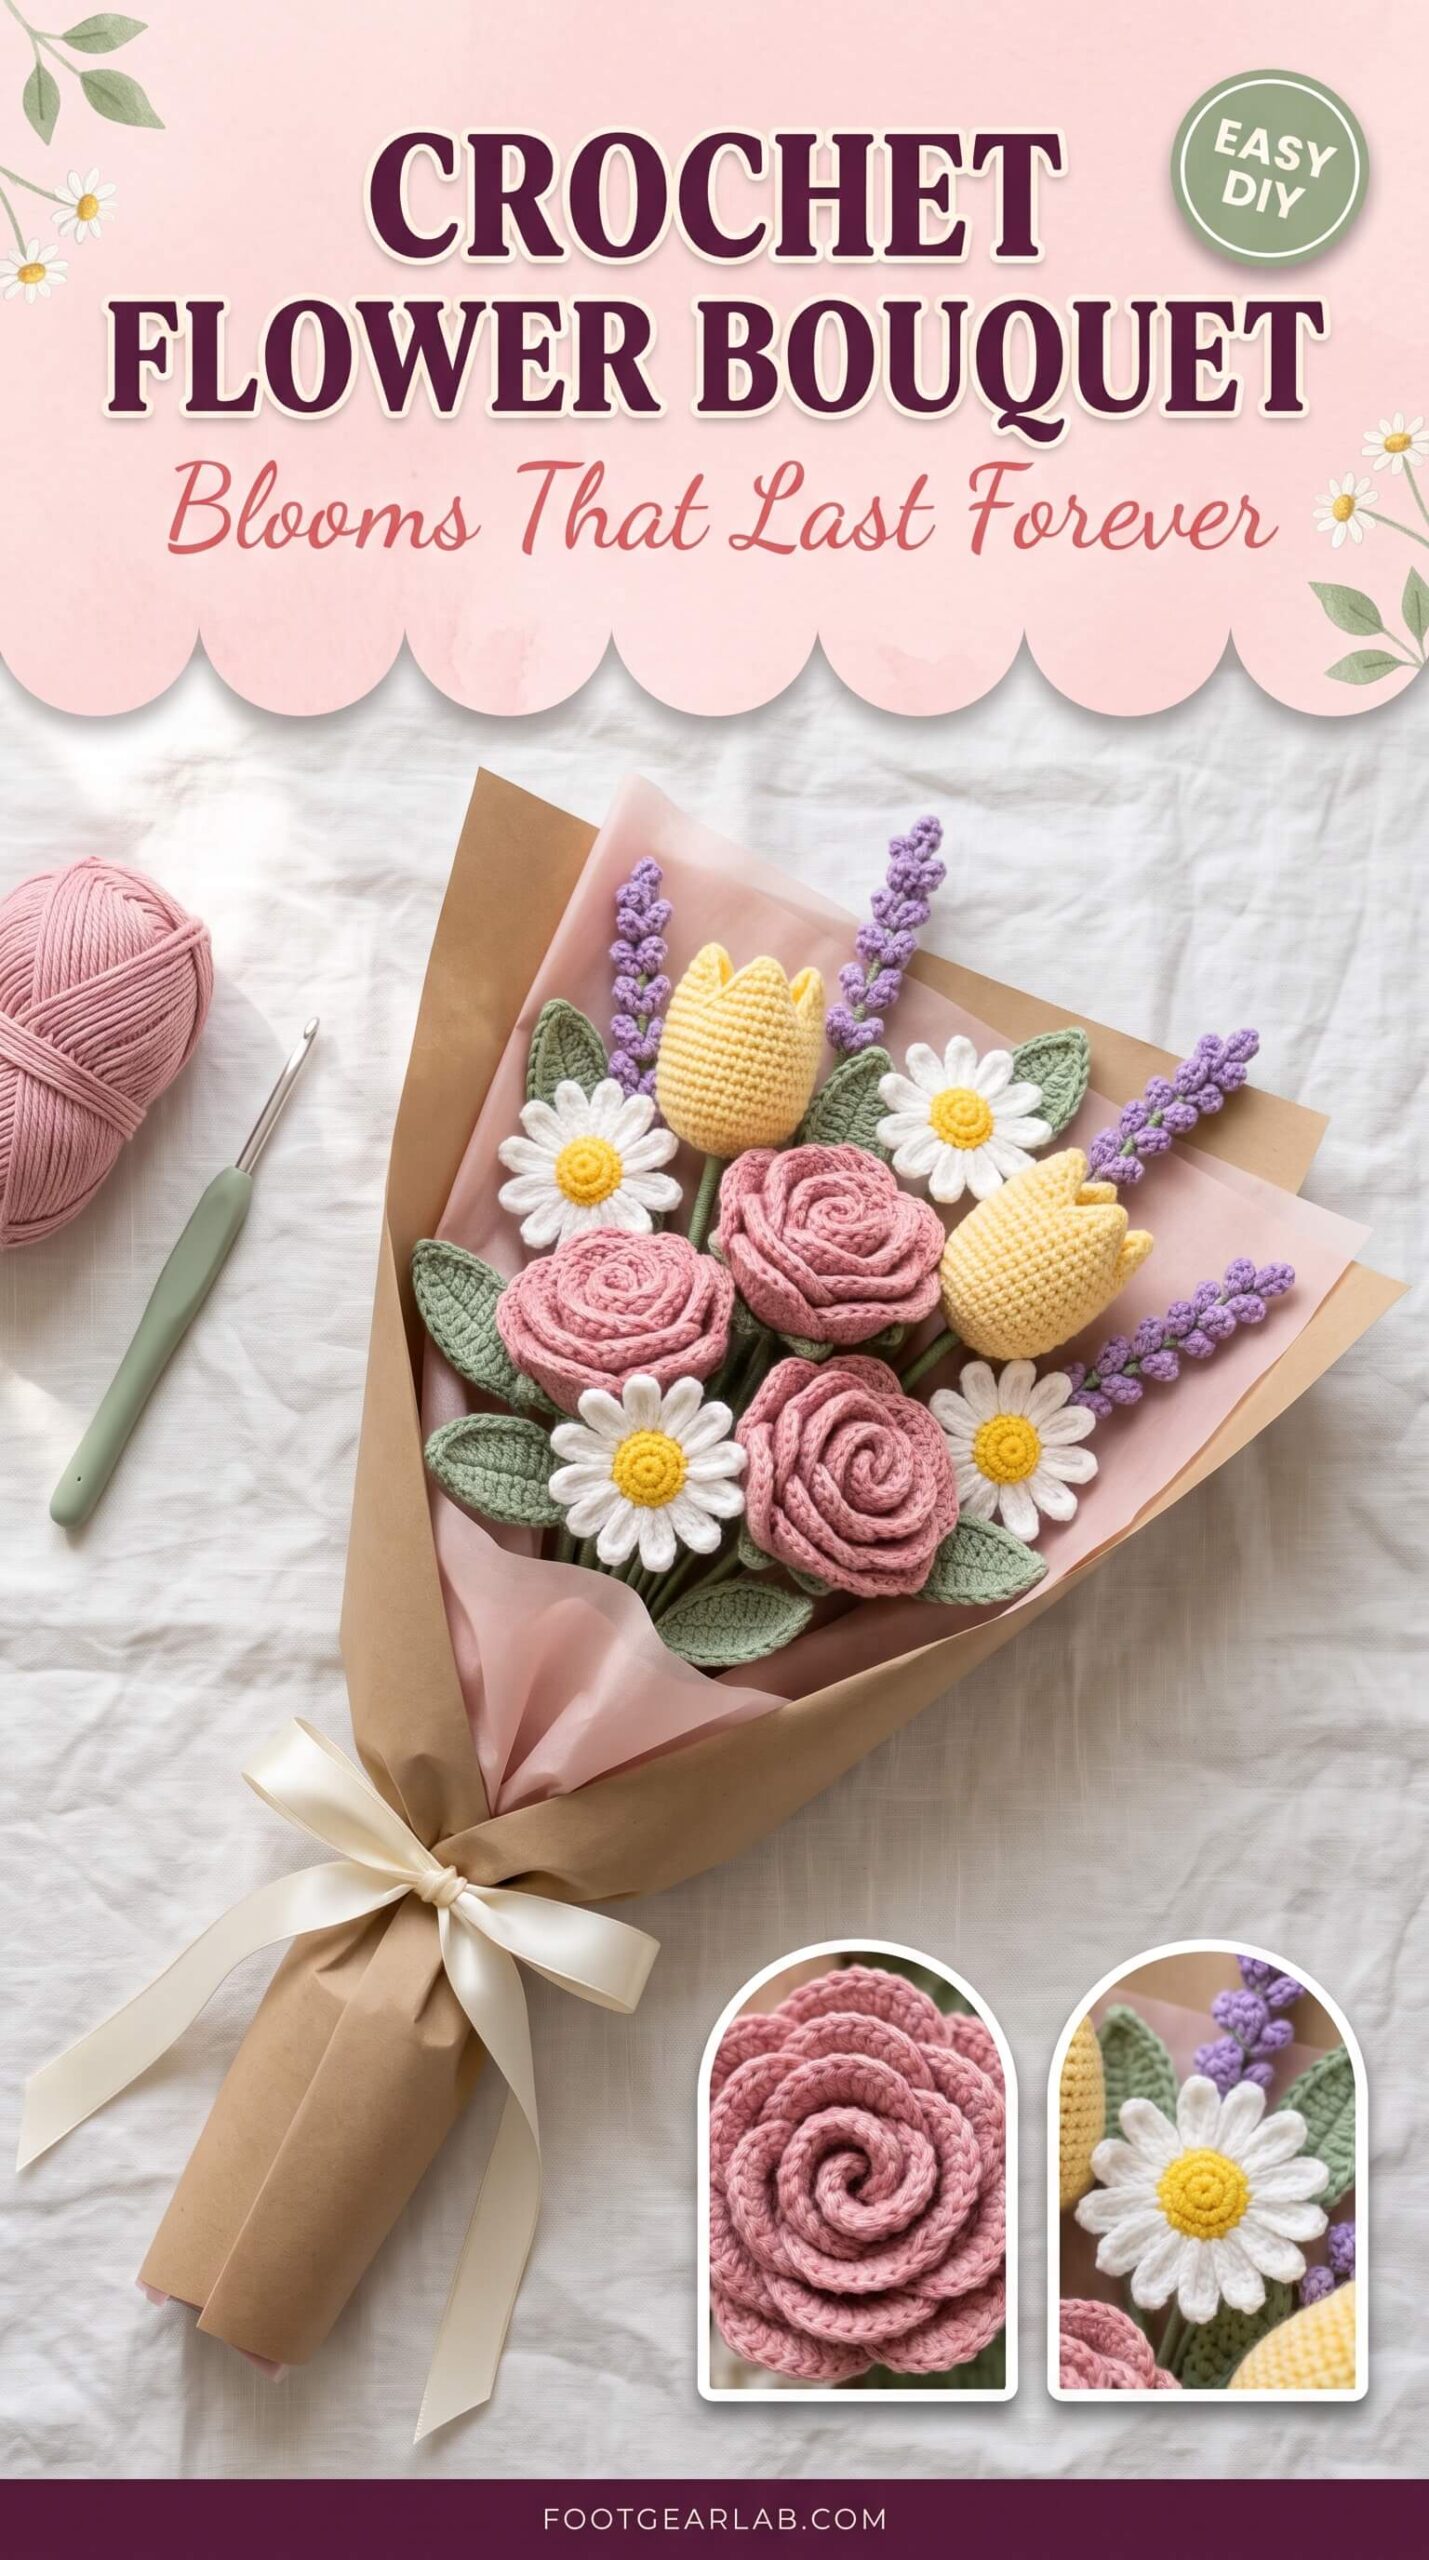
There is something magical about receiving flowers, but there is also something a little sad about watching them droop and fade just a few days later. A crochet flower bouquet solves that problem beautifully. Every rose, tulip and daisy is made stitch by stitch with your own hands, and instead of wilting on the windowsill, your bouquet stays bright, soft and charming for years.
Crochet bouquets have become one of the most loved handmade trends on Pinterest, and it is easy to see why. They make heartfelt gifts for birthdays, Mother’s Day and Valentine’s Day, they are a stunning keepsake alternative for brides, and they add a cozy, cottage-style touch to any room in your home. Best of all, many of the most popular flowers are surprisingly simple, so you do not need years of crochet experience to make something you are proud of.
In this guide, you will find everything you need to make your own crochet flower bouquet: the best supplies, the most popular flowers to crochet, three easy beginner patterns, a step-by-step assembly and wrapping tutorial, bouquet ideas for every occasion, and expert tips to make your blooms look like they came from a florist.
Why Crochet Flower Bouquets Are So Popular
- They last forever. Fresh flowers last about a week, while a well-made crochet bouquet can stay beautiful for years. That makes it a meaningful keepsake for weddings, anniversaries and special milestones, because the person who receives it can keep it as a reminder of the day.
- They are allergy-friendly. Crochet flowers have no pollen and no scent unless you add one, so they are a thoughtful choice for anyone with hay fever, for hospital visits where fresh flowers are often not allowed, and for homes with curious pets that might nibble on real plants.
- They are budget-friendly. One or two small balls of cotton yarn can make several flowers, and the rest of the supplies (floral wire, floral tape and wrapping paper) are inexpensive and reusable. A handmade bouquet often costs much less than a florist bouquet of the same size.
- They are completely personal. You choose the flowers, the colors, the size and the wrapping, so you can match a wedding palette, someone’s favorite color, or the decor of your living room. No two handmade bouquets are ever exactly the same.
- They are relaxing to make. Small flowers work up quickly, which gives you a satisfying sense of progress. Many crocheters say that making one or two flowers in the evening is one of their favorite ways to unwind after a busy day.
What You Need to Make a Crochet Flower Bouquet
Before you begin, gather your supplies in one place. Most of these items can be found in craft stores or online, and many of them will last for several bouquets.
- Cotton yarn in your flower colors. Mercerized cotton or a cotton blend (often sold as “milk cotton”) in a light DK, sport or fingering weight is ideal. Cotton holds its shape, shows every stitch clearly, and does not get fuzzy over time, which keeps your petals crisp and defined.
- Green yarn for leaves and stems. Choose one or two shades of green, such as sage and a deeper olive, to make your leaves look more natural. Having two greens also adds depth when the leaves sit next to each other in the bouquet.
- A small crochet hook. A 2.5 mm to 3.5 mm hook works well with most cotton yarns. Many makers go half a size smaller than the yarn label suggests to get a tighter fabric, so the stuffing or wire inside never shows through the stitches.
- Floral wire. Use 18-gauge wire for the main stems of roses, tulips and sunflowers, because it is strong enough to hold a heavier bloom upright. Thinner 22- or 24-gauge wire is better for delicate flowers like lavender and lily of the valley.
- Green floral tape. This paper tape becomes slightly sticky when you stretch it, and it wraps around the wire to create a smooth, natural-looking stem. It also helps you attach leaves securely.
- Wire cutters and small pliers. Cutters trim the wire cleanly, and round-nose or flat pliers help you bend a small loop at the top of each stem, so the wire grips the flower and does not poke through.
- A hot glue gun or strong craft glue. A small dab of glue holds each flower firmly on its stem. A mini glue gun with low-temperature sticks is the easiest to control on small pieces.
- Fiberfill stuffing. Only a small amount is needed to give tulips, rosebuds and flower centers a soft, rounded shape.
- A tapestry needle, scissors and stitch markers. You will need the needle to sew roses together and weave in ends, and stitch markers help you keep track of rounds in flowers worked in a spiral.
- Wrapping paper and ribbon (for the final bouquet). Kraft paper, tissue paper or florist wrapping film in two coordinating colors, plus a satin ribbon or twine, will give your bouquet a professional finish.
- Optional extras. Fabric stiffener helps petals hold a curved shape, artificial flower stamens add realistic centers, and a drop of essential oil on a small wooden bead hidden inside the bouquet can add a gentle fragrance.
The Best Flowers for a Crochet Bouquet
A beautiful bouquet usually mixes three types of blooms: focal flowers (larger, eye-catching blooms like roses or sunflowers), secondary flowers (medium blooms like tulips and daisies that fill the space around the focal flowers), and filler flowers and greenery (small sprigs like lavender and leaves that soften the shape and fill the gaps). Here are the most popular flowers to choose from.
1. Roses
The rose is the queen of crochet bouquets, and luckily it is also one of the easiest flowers to make. The most popular method is the rolled rose: you crochet a long, narrow strip with scalloped shell stitches along one edge, then roll the strip into a spiral and sew it together at the base. The scallops become the petals, and the tighter you roll the center, the more realistic the bud looks.
Roses work in almost any color, from classic red and soft blush to ivory, peach and dusty mauve. Because they are quick to make, you can easily crochet a dozen in a weekend. For extra realism, make the outer shells slightly bigger than the inner ones so the rose opens gently toward the edges, and attach two small leaves just under the bloom.
2. Tulips
Tulips bring a fresh, springtime feeling to any bouquet. A crochet tulip is usually worked from the bottom up in continuous rounds of single crochet. You increase until the cup is wide enough, work several rounds even to build the height, and then shape three pointed petal tips at the top. A little fiberfill inside the cup helps it keep a plump, rounded shape.
Some patterns make each petal separately and sew three or six petals around a stuffed center, which creates a slightly more open, realistic tulip. Both methods look lovely. Tulips are perfect in pastel shades like butter yellow, blush pink, lilac and white, and they pair beautifully with long, slim crochet leaves that wrap slightly around the stem.
3. Daisies
Daisies are the sweetest filler flower and one of the best first projects for beginners. You crochet a small yellow center in a magic ring, then join white yarn and make the petals with simple chain loops worked back down with single crochet. Each petal takes only a few seconds, and a whole daisy can be finished in about twenty minutes.
Because they are flat and light, daisies are perfect for filling gaps between larger blooms. They also look adorable on their own, gathered in a small jar for a casual, country-style bouquet. If you want a fun variation, try making the petals in soft pink or lilac, or make a larger version with a brown center to create a black-eyed Susan.
4. Sunflowers
Nothing feels happier than a sunflower. A crochet sunflower has a large center worked in dark brown or chocolate yarn, often with bobble or popcorn stitches to create a textured, seed-like surface. Bright yellow petals are then worked around the edge in one or two layers, usually with taller stitches such as double or treble crochet to make long, pointed petals.
Sunflowers make a bold focal flower, so you only need one to three in a bouquet. They look especially lovely with white daisies and a few green leaves, wrapped in kraft paper or placed in a rustic mason jar. Because they are heavier than other flowers, always use a strong 18-gauge wire and consider doubling it for extra support.
5. Lavender
Lavender sprigs are the secret to a bouquet that looks airy and natural. Each sprig is usually made by crocheting a short chain with tiny bobbles, puff stitches or picot loops along it, then winding that chain around the top few inches of a thin wire and securing it with a dot of glue. The result is a slim spike of tiny purple buds that adds height and soft texture.
Lavender is a wonderful filler flower because it fits almost any color palette and it adds lovely vertical lines between round blooms. Make five to seven sprigs at once and tie them with twine for a charming mini bouquet, or tuck a few behind your roses. For a sweet finishing touch, add a single drop of lavender essential oil to the stems.
6. Lily of the Valley
Lily of the valley is a delicate, romantic flower that is especially popular in bridal bouquets. Each tiny bell-shaped flower is worked in white cotton in just a few rounds, then sewn or glued along one side of a thin, gently curved wire stem, usually five to nine bells per stem. Two wide green leaves at the base complete the look.
This flower takes a little more patience because the bells are small, but the result is truly elegant. Use a fine cotton thread or fingering-weight yarn with a 2 mm to 2.5 mm hook to keep the bells dainty. Add several stems to a white or pastel bouquet, or let them peek out from behind roses for a soft, graceful finish.
7. Calla Lilies
Calla lilies are elegant, modern and surprisingly simple. Each bloom is made from a single flat, rounded piece shaped a bit like a teardrop or heart, which you roll into a funnel around a slim yellow center called the spadix. The spadix can be a short tube crocheted in yellow, a tightly rolled strip, or even a chain wrapped around the wire.
Because each calla lily needs only one petal and one center, they are fast to make and perfect for beginners who want a sophisticated look. White callas are a classic choice for weddings, while deep burgundy, blush and lavender callas look striking in modern bouquets. Their long, smooth stems look best when you leave them a little longer than the other flowers.
Quick Flower Comparison
| Flower | Role in the Bouquet | Skill Level | Approx. Time per Flower | Traditional Meaning |
|---|---|---|---|---|
| Rose | Focal flower | Beginner | 30 to 45 minutes | Love and appreciation |
| Tulip | Secondary flower | Beginner to intermediate | 45 to 60 minutes | Cheerfulness and caring |
| Daisy | Secondary or filler | Beginner | 15 to 25 minutes | Innocence and new beginnings |
| Sunflower | Focal flower | Intermediate | 60 to 90 minutes | Loyalty and happiness |
| Lavender | Filler | Beginner | 20 to 30 minutes | Calm and devotion |
| Lily of the valley | Filler | Intermediate | 60 to 90 minutes | Return of happiness |
| Calla lily | Focal or secondary | Beginner | 30 to 40 minutes | Beauty and purity |
Times are estimates for a confident beginner using DK cotton, and they do not include stems or assembly. You will get faster after your first few flowers.
Three Easy Beginner Patterns to Start Your Bouquet
These three patterns are all you need for a simple, beautiful bouquet. They use US crochet terms and DK-weight cotton with a 3 mm to 3.5 mm hook.
Abbreviations: ch = chain, sl st = slip stitch, sc = single crochet, hdc = half double crochet, dc = double crochet, tr = treble crochet, st = stitch, MR = magic ring.
Easy Rolled Rose
- Foundation: Ch 42. This long chain becomes the base of your rose, and it is important to keep it relaxed rather than tight, because a tight chain makes the strip curl and harder to roll.
- Row 1: Sc in the 2nd ch from the hook and in each ch across (41 sc). This row forms the solid base that you will later sew through when you roll the rose.
- Row 2: Ch 1, turn. Sl st in the first sc. Skip 1 sc, 5 dc in the next sc, skip 1 sc, sl st in the next sc. Repeat from * to * across, for 10 shells in total. Each shell becomes one petal of your rose. For a fuller rose, work 6 or 7 dc in the last three shells so the outer petals are larger.
- Finishing: Fasten off, leaving a tail of about 12 in (30 cm), and weave in the beginning tail. Starting from the end without the long tail, roll the strip into a spiral, keeping the sc base edge level at the bottom. Roll tightly for the first two or three shells to form the bud, then more loosely so the outer petals open. Thread the long tail onto a tapestry needle and sew back and forth through all the layers at the base to hold the rose together.
Simple Daisy
- Center (yellow): Make a MR. Round 1: 6 sc in the ring, pull the ring closed and join with a sl st to the first sc (6 sc). Round 2: Ch 1, 2 sc in each st around, join with a sl st (12 sc). Fasten off and weave in the ends on the back.
- Petals (white): Join white yarn with a sl st in any stitch of the center. Ch 8, sc in the 2nd ch from the hook and in each ch back down to the center (7 sc), sl st in the next st of the center. Repeat from * to * around until you have 12 petals, one in each stitch of the center.
- Finishing: Join with a sl st at the base of the first petal, fasten off and weave in the ends on the back. Gently pull each petal straight so they all point outward evenly. If you want a slightly domed center, place a tiny pinch of fiberfill behind it before attaching the stem.
Classic Leaf
- Foundation: With green yarn, ch 10.
- Round 1: Starting in the 2nd ch from the hook, work sc, hdc, dc, dc, tr, dc, dc, hdc, then 3 sc in the last ch. This creates the first side of the leaf and turns the tip.
- Second side: Rotate the work and continue along the other side of the foundation chain: hdc, dc, dc, tr, dc, dc, hdc, sc. Join with a sl st to the first sc. The tall treble stitches on each side make the leaf widest in the middle, and the shorter stitches taper it toward the tip and base.
- Finishing: Fasten off, leaving a short tail at the base that you can use to tie or glue the leaf to its stem. Make two to six leaves for every rose, depending on how lush you want the bouquet to look.
How to Assemble Your Crochet Flower Bouquet Step by Step
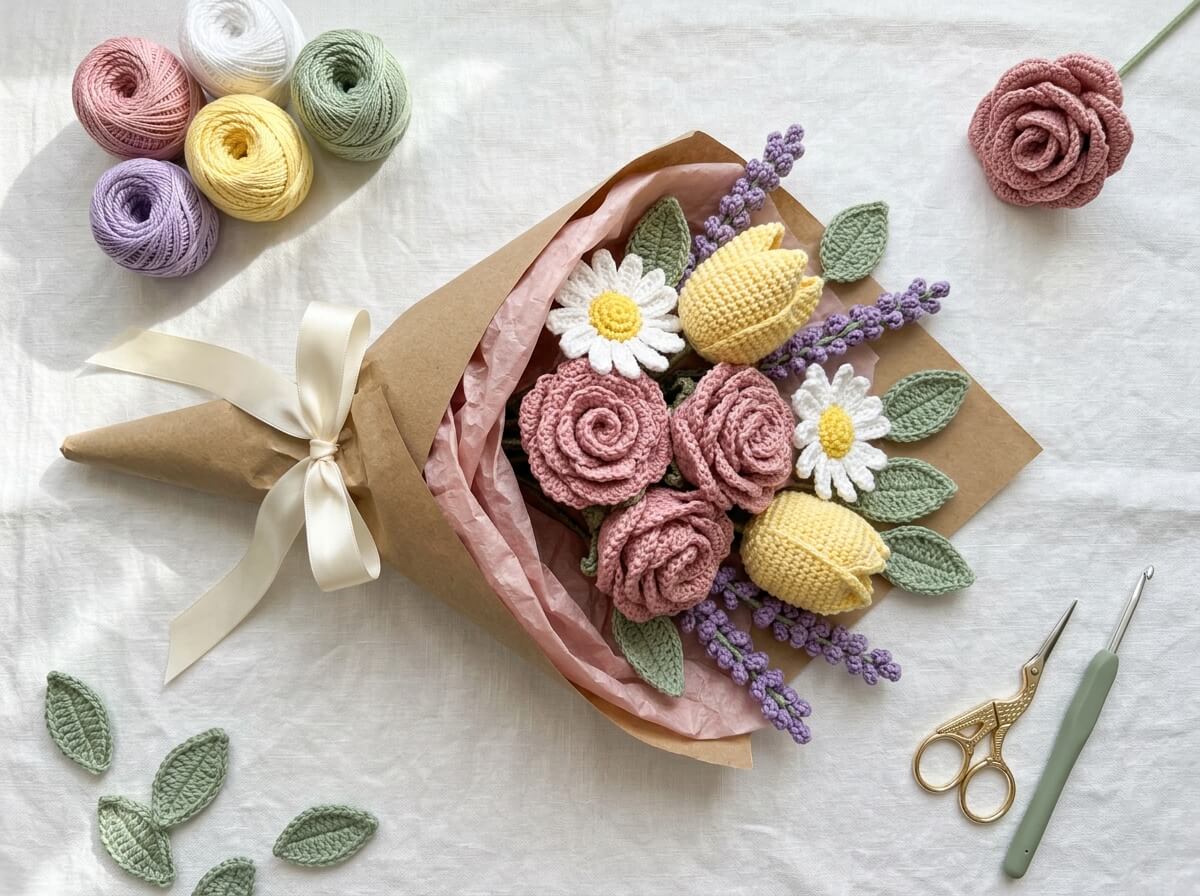
Once your flowers and leaves are made, the fun part begins. This example bouquet uses 3 dusty-rose pink roses, 2 butter-yellow tulips, 3 white daisies, 4 lavender sprigs and 6 sage-green leaves, but you can follow the same steps with any mix of flowers.
Step 1: Lay Out All Your Flowers and Leaves
Before you add any stems, lay every flower and leaf on a clean table, grouped by type. This lets you see your color balance at a glance and check that you have enough focal, secondary and filler flowers. If one color feels too strong or something is missing, it is much easier to make one more flower now than after the bouquet is taped together.
Step 2: Attach a Wire Stem to Each Flower
Cut a 12 in (30 cm) piece of 18-gauge floral wire for each rose, tulip and daisy. Using pliers, bend the top end of the wire into a small closed loop about 0.25 in (6 mm) wide, so the wire grips the flower and cannot poke through the petals. Push the straight end of the wire down through the center of the flower from the top, then pull it until the loop sits hidden inside the bloom. Add a small dab of hot glue at the base where the wire leaves the flower, and hold it still for a few seconds until the glue sets. The lavender sprigs already have their thin wire stems, so you can simply lengthen them by taping on an extra piece of wire if needed.
Step 3: Wrap the Stems with Floral Tape
Start just under the flower, holding the end of the floral tape against the base of the bloom at an angle. Stretch the tape gently as you go, because stretching activates its slightly sticky surface, and twist the stem so the tape spirals down the wire in slightly overlapping layers. Cover the glue spot and the whole length of the wire for a smooth, natural finish. If you prefer a fully crocheted look, you can instead cover the stems with a narrow tube of green single crochet or wrap them tightly with green yarn and a little glue.
Step 4: Add the Leaves
Place a leaf against the stem about 1 to 2 in (2.5 to 5 cm) below the bloom, with the base of the leaf pointing down. Wrap the leaf’s short tail around the stem, then cover it with a few more turns of floral tape so it sits firmly and looks like it grows naturally from the stem. For the roses, add two leaves on opposite sides, one slightly lower than the other. Tilt the leaves gently outward so they do not lie flat against the stem.
Step 5: Arrange and Bind the Bouquet
Start with your focal flowers: hold the three roses together in the center, with the middle rose slightly taller. Add the tulips and daisies around them one by one, turning the bouquet a little each time and placing each new stem at a slight angle, which florists call the spiral technique. This keeps the stems from crossing in a messy way and gives the bouquet a rounded, domed shape. Tuck the lavender sprigs in last, letting them rise a little above the other flowers at the top and sides. When you are happy with the shape, wrap floral tape firmly several times around all the stems at the binding point, about 4 in (10 cm) below the blooms.
Step 6: Trim the Stems Evenly
Lay the bouquet on the table and use wire cutters to trim all the stems to the same length, about 6 to 7 in (15 to 18 cm) below the binding point. Cut straight across so the bottom is flat and even. If any cut wire ends feel sharp, wrap a small piece of floral tape over the bottom of the stems to cover them, which makes the bouquet safer and more comfortable to hold.
Step 7: Wrap It Like a Florist
Cut two squares of wrapping paper about 20 x 20 in (50 x 50 cm): one in kraft paper and one in soft blush-pink tissue paper. Fold each square diagonally, slightly off-center, so you get two layered points. Place the tissue paper behind the bouquet first, with its points rising just above the blooms, then wrap the kraft paper around the front and sides in a cone shape so the pink tissue peeks out along the top edge. Gather the paper tightly at the binding point and tie it with a satin ribbon in a full bow, leaving two long tails. For a Korean-style wrap, add a second smaller kraft square on one side and let the layers fan out like petals.
Crochet Flower Bouquet Ideas for Every Occasion
1. The Forever Bridal Bouquet
A crochet bridal bouquet is a beautiful keepsake that can sit on a shelf for decades and even be passed down. Ivory and white roses, elegant calla lilies and delicate lily of the valley create a timeless, romantic look, especially with sage-green leaves for a soft natural touch. Instead of paper, wrap the stems tightly in ivory satin ribbon and secure it with pearl-head pins for a classic bridal finish.
Many brides also make matching mini bouquets for their bridesmaids, boutonnieres for the groomsmen, and a single crochet rose to toss so they can keep the main bouquet. Start early, because a full bridal bouquet with 25 to 35 flowers can take several weeks of evening crochet.
2. Pastel Mother’s Day Tulip Bouquet
Tulips in soft pastels are a sweet, cheerful way to say thank you to your mom, grandmother or any special woman in your life. Mix blush pink, butter yellow, lilac and white tulips, add a few long slim leaves, and arrange them in a pretty ceramic pitcher or vintage jar. Because the bouquet comes with its own vase, it is ready to display the moment it is unwrapped.
To make it extra personal, tie a small handwritten tag to the vase with twine, or choose her favorite colors. A bouquet of seven to nine tulips looks generous and full without taking too long to make.
3. Classic Red Rose Valentine’s Bouquet
Nothing says romance like red roses, and a crochet version shows that you put real time and love into your gift. Six or twelve deep red rolled roses with dark green leaves make a classic bouquet, especially when wrapped in crisp white or black paper with a red satin ribbon. A few white daisies or a sprig of baby’s breath style filler can soften the look if you want something less formal.
For a modern touch, try a mix of deep red, blush pink and white roses, or add a small crochet heart on a wire among the blooms. The best part is that, unlike fresh roses, this bouquet will still look perfect next Valentine’s Day.
4. Sunflower and Daisy Friendship Bouquet
This happy, sunny bouquet is perfect for a best friend’s birthday, a get-well-soon gift, or a teacher at the end of the school year. Combine two or three big sunflowers with white daisies and green leaves, then place them in a mason jar tied with a gingham ribbon for a rustic, country-style look.
Because sunflowers are so bold, you need only a few flowers to make a strong impression, which makes this one of the fastest full-size bouquets to finish. It also looks wonderful on a kitchen table all year round.
5. Mini Bud Vase Gifts
If you do not have time for a full bouquet, single-stem flowers in small bud vases are an adorable alternative. One rose, one tulip or a small bunch of daisies makes a thoughtful gift for coworkers, wedding guests, baby shower favors or a cozy desk decoration. They are also a great way to practice before tackling a bigger bouquet.
Choose small glass bottles or ceramic bud vases, and tie a thin ribbon around the neck in a coordinating color. Making a set of three in different flowers creates a charming windowsill display.
Pretty Color Palettes to Try
- Blush and cream: Soft pink roses, ivory daisies and cream tulips with sage leaves create a gentle, romantic bouquet that suits weddings, baby showers and neutral home decor. This palette is very forgiving, because pale colors blend easily even if the shades do not match perfectly.
- Pastel garden: Mix lilac, butter yellow, baby pink and mint green for a fresh springtime look. Pastels are perfect for Mother’s Day and Easter, and they look especially pretty with white daisies and lavender sprigs scattered between them.
- Sunset glow: Coral, peach, warm orange and golden yellow give your bouquet a bright, joyful energy. Add a few deep orange or terracotta roses in the center to anchor the lighter shades.
- Earthy boho: Terracotta, mustard, dusty rose and olive green create a warm, rustic bouquet that looks beautiful wrapped in kraft paper or placed in a woven basket. This palette suits autumn weddings and cozy home decor.
- All white and green: Ivory, white and soft green flowers look timeless, elegant and modern. Mix different textures, such as smooth calla lilies, ruffled roses and tiny lily of the valley bells, so the bouquet stays interesting without color.
- Bold and romantic: Deep red, burgundy and blush pink roses with dark green leaves create a dramatic, passionate bouquet that is perfect for Valentine’s Day and anniversaries.
As a simple rule, choose one main color for your focal flowers, one or two supporting colors for secondary flowers, and keep your greenery consistent. This keeps the bouquet balanced and stops it from looking busy.
Tips for a Professional-Looking Bouquet
- Keep your tension tight. Tight, even stitches make petals hold their shape and hide the stuffing and wire inside. If your flowers look floppy, try going down half a hook size or two.
- Vary the heights. Real bouquets are never perfectly flat on top. Let the focal flowers sit slightly higher in the center and the fillers peek out around the edges for a natural, domed shape.
- Use odd numbers. Groups of three, five or seven flowers usually look more natural than even numbers. For example, three roses in the center often feel more balanced than two or four.
- Mix shapes and textures. Combine round blooms like roses with cup-shaped tulips, flat daisies and tall spikes of lavender, so each flower stands out against its neighbors.
- Shape your petals. Gently pinch, curl or bend petals with your fingers after finishing each flower. A light spray of fabric stiffener or starch helps them stay in place.
- Do not skip the greenery. Leaves make a huge difference, because they fill gaps, frame the flowers and make the bouquet look fuller and more realistic.
- Hide every end. Weave in all yarn tails carefully, and cover every glue spot and wire end with floral tape, so the bouquet looks neat from every angle.
Common Mistakes to Avoid
- Using fuzzy or very soft yarn. Fluffy acrylic or mohair yarns blur the stitches and make petals look shapeless. Smooth cotton or cotton blends give the crisp definition that makes crochet flowers look elegant.
- Choosing wire that is too thin. Thin wire bends under the weight of large flowers like roses and sunflowers, so the blooms droop. Use 18-gauge wire for heavier flowers, and double it if needed.
- Letting the wire poke through. A straight wire can push through the top of the flower over time. Always bend a small loop at the top and add a dab of glue to hold everything in place.
- Making every flower the same size. If all your roses are identical, the bouquet can look stiff. Make a few slightly smaller buds and slightly larger open blooms for a more natural look.
- Arranging flat, in a straight line. Placing all the stems side by side creates a fan shape instead of a bouquet. Turning the bouquet as you add each stem gives it a full, rounded shape.
- Trimming the stems unevenly. Uneven stems make the bouquet look unfinished and harder to stand in a vase. Always cut them straight and to the same length.
How to Care for Your Crochet Bouquet
Crochet flowers are low-maintenance, but a little care keeps them looking fresh for years. Dust your bouquet every few weeks with a soft makeup brush, or use a hairdryer on the cool setting to blow away dust from between the petals. This is especially important for bouquets displayed on open shelves.
Keep your bouquet out of direct sunlight, because strong light can slowly fade bright colors like red, coral and lilac. If a flower gets a small stain, gently dab it with a damp cloth and a tiny amount of mild soap, then let it air dry completely. Never soak or machine wash a bouquet with wire stems, because the wire can rust and stain the yarn. If a petal loses its shape, simply reshape it with your fingers and give it a light mist of fabric stiffener.
Frequently Asked Questions
Are crochet flowers good for beginners? Yes. Rolled roses, daisies, leaves and calla lilies use only basic stitches like chain, single crochet and double crochet, so they are an ideal first project. Start with a small bouquet of five to seven flowers, then add more complex blooms like sunflowers or lily of the valley as you gain confidence.
How long does it take to crochet a flower bouquet? A small bouquet of 7 to 10 flowers usually takes about 6 to 10 hours, including stems and wrapping, which is easy to finish over a weekend. A full bridal bouquet with 25 or more flowers can take several weeks of evening crochet.
What is the best yarn for crochet flowers? Smooth cotton or cotton-blend yarn in a DK, sport or fingering weight is the most popular choice. It shows stitches clearly, holds its shape well and does not pill or get fuzzy over time.
How many flowers do I need for a bouquet? A small gift bouquet looks lovely with 7 to 12 flowers plus leaves, while a fuller bouquet usually needs 15 to 20. For a bridal bouquet, plan for 25 to 35 flowers, depending on their size.
Can I make stems without floral wire? Yes. Green pipe cleaners work well for small, light flowers, and wooden skewers or paper straws covered with green yarn or floral tape can also work. Wire is still the best option for larger bouquets, because you can bend it to adjust the angle of each flower.
Can I sell crochet flower bouquets? Many makers sell them at craft fairs and online, and they are popular for weddings and gifts. If you use someone else’s pattern, check the designer’s terms first, because some allow you to sell finished items and others do not.
Conclusion
A crochet flower bouquet is so much more than a craft project. It is a gift that never wilts, a keepsake that holds a memory, and a little piece of handmade beauty that brightens any room. With a few balls of cotton yarn, some floral wire and the simple patterns in this guide, you can create roses, tulips, daisies and lavender that look as charming in five years as they do on the day you finish them.
Start small with a few easy roses and daisies, practice your stems and wrapping, and soon you will be making bouquets for every birthday, wedding and special moment in your life. Once you see how much joy a handmade bouquet brings, you may never want to buy fresh flowers again.