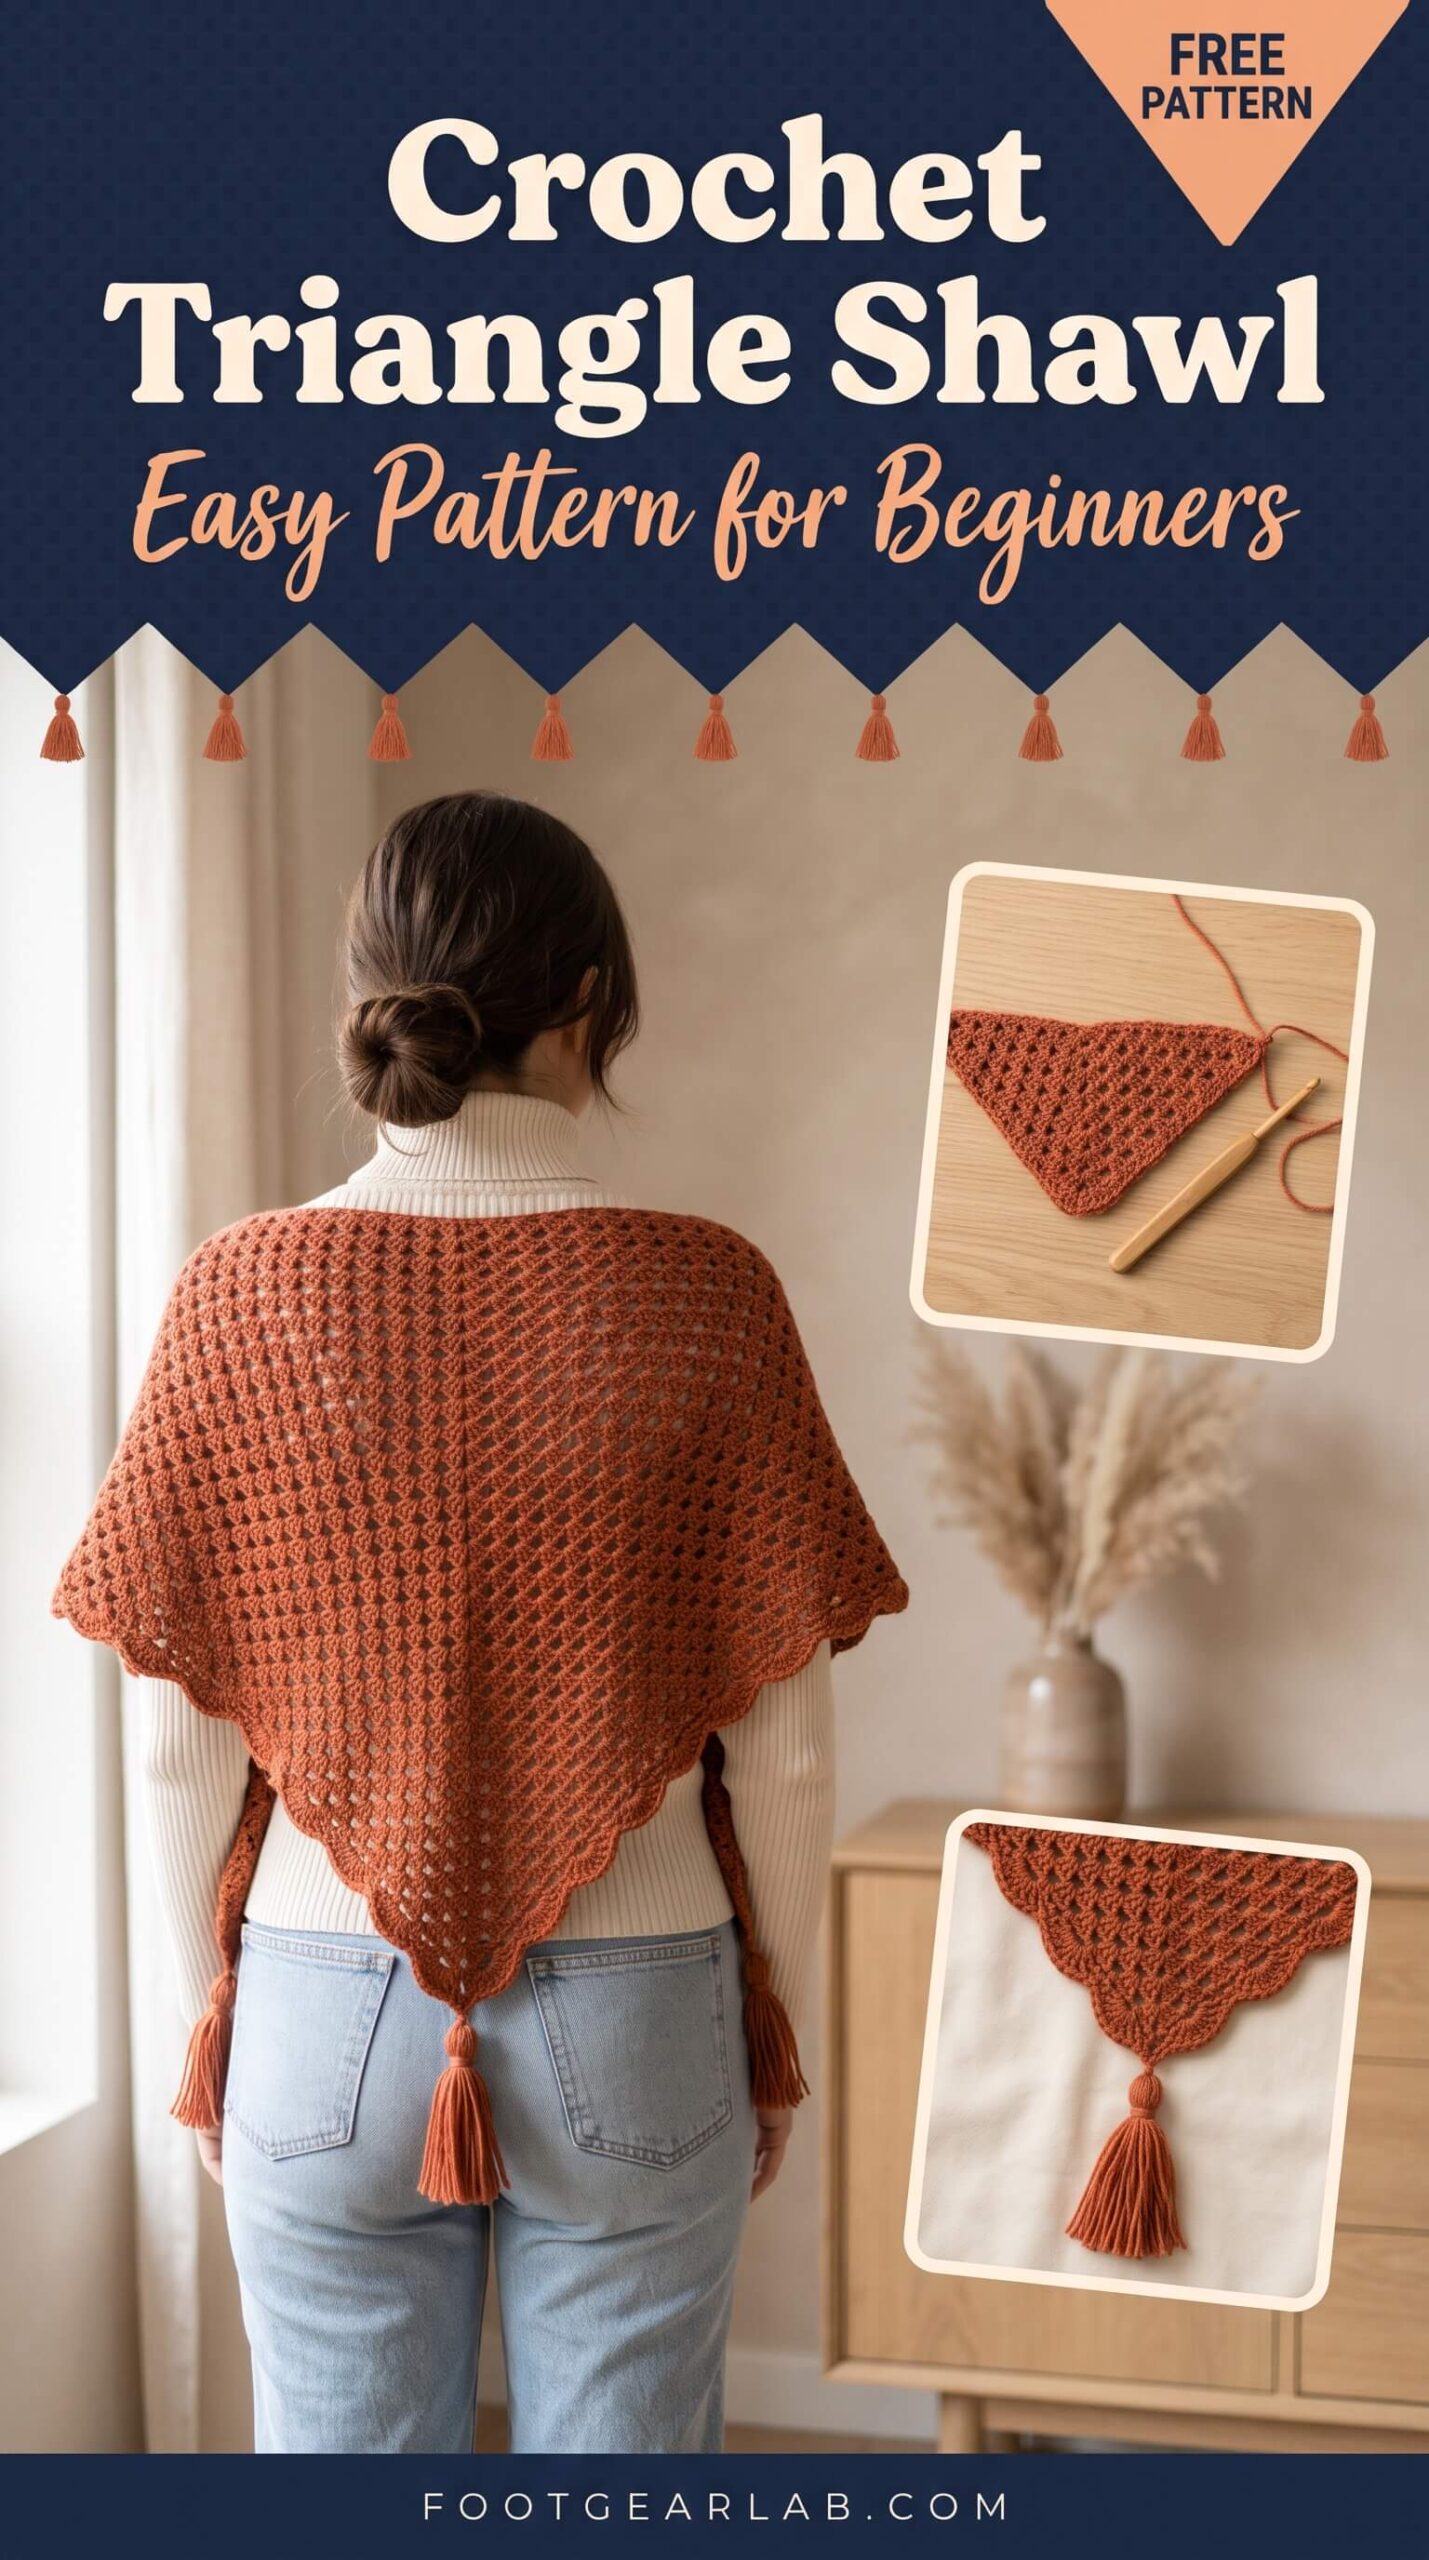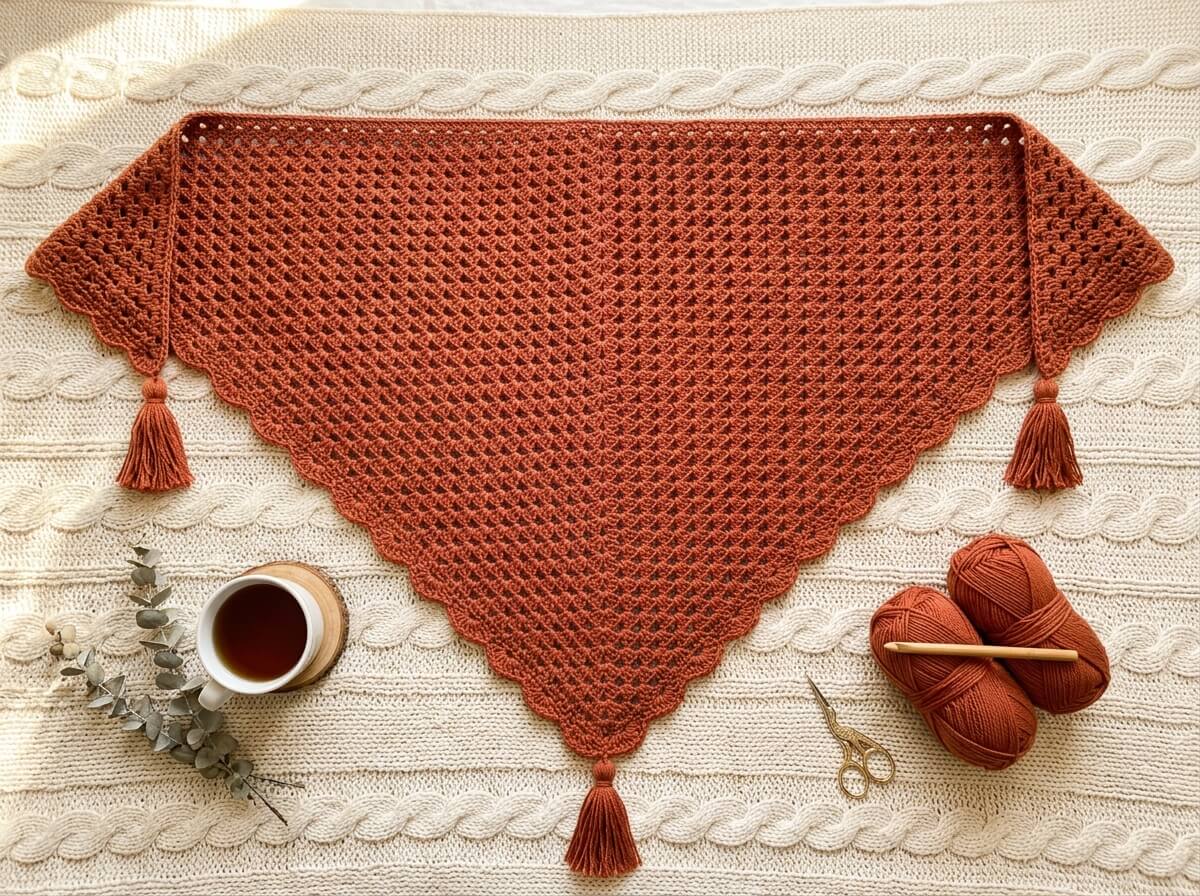
There is something timeless about a crochet triangle shawl. Draped over your shoulders on a chilly morning, knotted at the front over a simple sweater, or wrapped around you on the couch with a cup of tea, it is one of those pieces that feels cozy, feminine and useful at the same time. It also happens to be one of the best projects you can choose when you are still learning to crochet, because the shape grows naturally row by row and the stitch pattern repeats in a way that becomes almost meditative.
In this guide, you will learn how to crochet a classic top-down granny stitch triangle shawl from the very first ring to the finishing tassels. You will also find a size and yarn guide, a pretty shell border, blocking tips, fixes for the most common beginner mistakes, and stylish ideas for wearing your shawl. By the end, you will have a beautiful handmade wrap and the confidence to make another one in any color you love.
Why a Triangle Shawl Is the Perfect Beginner Project
A triangle shawl is a wonderful first “real” project because it only uses a few basic skills: making a chain, working double crochet, and placing stitches into spaces. Once you understand how the first few rows work, every row after that follows exactly the same logic, so you can relax and enjoy the process instead of constantly checking the pattern. Most beginners memorize the repeat within the first evening.
It is also very forgiving. Granny stitch is worked into the gaps between stitch groups rather than into the tops of individual stitches, so small differences in tension or the occasional slightly uneven stitch disappear into the overall texture. You do not need to count dozens of stitches on every row, because the pattern is built from groups of three that are easy to see and easy to fix.
Finally, there is no fitting involved. Unlike a sweater or a pair of slippers, a shawl does not need to match your exact measurements. You simply keep crocheting until it looks the size you want, which means you can turn the same pattern into a small neck kerchief, a classic shoulder shawl or a big oversized blanket wrap.
What You Will Need
You only need a handful of supplies for this project, and many of them you may already have in your crochet basket.
- Yarn: About 750 to 950 yards of worsted weight yarn (category 4) for a classic-size shawl. A smooth yarn with good stitch definition, such as a soft acrylic or a wool blend, is the easiest choice for beginners because you can clearly see each stitch and each space you are working into.
- Crochet hook: A 5.5 mm (US I-9) hook. This is slightly larger than the size usually recommended for worsted yarn, which keeps the fabric soft, light and drapey instead of stiff, and helps the shawl hang nicely around your shoulders.
- One locking stitch marker: You will place this in the center space of each row so you never lose track of the spine of the shawl. Once the triangle is big enough, the center becomes obvious, but the marker is very helpful in the early rows.
- Scissors and a tapestry needle: You will use the needle to weave in your yarn ends neatly at the end, so they do not pop out after washing or wearing.
- A piece of cardboard about 5 inches (13 cm) long: This is for making tassels. A sturdy piece cut from a cereal box works perfectly.
- Measuring tape and blocking pins (optional): These help you check the size as you go and pin the shawl into a perfect triangle during blocking.
Choosing the Best Yarn for Your Shawl
The yarn you choose shapes how your shawl feels, how warm it is and how it drapes. This quick comparison will help you decide.
| Fiber | How it feels | Best for | Things to know |
|---|---|---|---|
| Acrylic | Soft, light and smooth | First shawls, everyday wear, easy care | Machine washable and affordable; choose a “soft” or “premium” acrylic so the shawl does not feel stiff |
| Wool or wool blend | Warm, springy and cozy | Winter shawls and outdoor wear | Blocks beautifully into a crisp triangle; check the label for washing instructions |
| Cotton | Cool, smooth and slightly heavy | Spring and summer shawls | Very clear stitch definition, but less stretchy, so keep your tension relaxed |
| Cotton-acrylic blend | Soft with light drape | All-season shawls | A great middle ground: breathable, lighter than pure cotton and easy to wash |
| Gradient yarn cakes | Depends on fiber | Shawls with color change | Creates beautiful color stripes without changing yarns; buy all cakes in the same colorway |
If this is your very first shawl, a solid or softly heathered color is the best choice. Dark colors and very fuzzy yarns make it harder to see the spaces you need to crochet into, while a medium shade like terracotta, sage, dusty rose or mustard lets you see every stitch clearly.
Shawl Sizes and How Much Yarn You Need
One of the best things about a top-down triangle shawl is that you can stop whenever it reaches the size you want. The numbers below are for worsted weight yarn with a 5.5 mm hook. Your own size may be slightly different depending on your tension, so measure as you go.
| Size | Approximate rows | Wingspan (top edge) | Depth (neck to point) | Approximate yarn |
|---|---|---|---|---|
| Kerchief / shawlette | 20 to 24 | 40 to 48 in (100 to 120 cm) | 20 to 24 in (50 to 60 cm) | 300 to 400 yards |
| Classic shoulder shawl | 34 to 40 | 68 to 80 in (170 to 200 cm) | 34 to 40 in (85 to 100 cm) | 750 to 950 yards |
| Oversized blanket wrap | 46 to 52 | 92 to 104 in (235 to 265 cm) | 46 to 52 in (115 to 130 cm) | 1,500 to 1,800 yards |
A handy rule of thumb with this yarn and hook is that each row adds roughly 1 inch to the depth of the shawl and about 2 inches to the wingspan. After about 10 rows, measure the depth from the starting ring down to the point and use that number to estimate how many rows you will need for your chosen size. Always buy one extra ball of yarn from the same dye lot, because a shawl that runs out of yarn a few rows before the end is very frustrating, and matching the color later can be difficult.
Abbreviations Used in This Pattern (US Terms)
This pattern is written in US crochet terms. If you usually follow UK patterns, use the conversions below so your stitches come out the right height.
| Abbreviation | US term | UK term |
|---|---|---|
| ch | chain | chain |
| sl st | slip stitch | slip stitch |
| sc | single crochet | double crochet (dc) |
| dc | double crochet | treble crochet (tr) |
| sp | space (the gap made by a chain) | space |
| ch-1 sp / ch-2 sp | the space under 1 or 2 chains | the space under 1 or 2 chains |
| cluster | a group of 3 dc worked in the same space | a group of 3 tr worked in the same space |
How a Top-Down Triangle Shawl Is Built
Before you pick up your hook, it helps to understand the shape you are making, because once you see the logic, the pattern feels easy instead of confusing.
This shawl starts with a small ring at the center of the neckline and grows downward, getting wider with every row. Each row is worked back and forth, and you turn your work at the end of every row. The shawl is made of two identical halves, one on each side of a center line called the spine. The spine runs straight down from the starting ring to the bottom point of the shawl.
Every row increases in two places on each half. First, at the very center, you work the special “corner” of (3 dc, ch 2, 3 dc) into the ch-2 space of the row below, which pushes the point of the triangle a little lower each time. Second, at each outer edge, the turning chain and the edge cluster add a little extra width, which keeps the top edge straight. Thanks to these increases, every row has exactly one more cluster on each half than the row before it. Row 1 has one cluster on each side of the spine, Row 2 has two, Row 10 has ten, and so on. This is the easiest way to check your work at any point: count the clusters on each half and make sure the number matches your row number.
If this sounds familiar, there is a good reason. A top-down granny triangle is essentially half of a classic granny square, so if you have ever made a granny square, you already know most of the techniques you need.
Step-by-Step Crochet Triangle Shawl Pattern
Step 1: Make the Starting Ring
Chain 4 and join the last chain to the first chain with a slip stitch to form a small ring. This ring sits at the very center of your neckline, so keep it neat. If you know how to make a magic ring, you can use one instead and pull the tail tight at the end of Row 1, which closes the center completely for a cleaner finish.
Step 2: Row 1
Ch 4 (this counts as your first dc plus ch 1). Working into the center of the ring, make 3 dc, ch 2, 3 dc, ch 1, and finally 1 dc. Turn your work.
You now have a tiny downward-pointing triangle with one cluster of 3 dc on each side of a ch-2 space. That ch-2 space is the first point of your spine, so place your locking stitch marker in it now. The ch-1 at each end and the single dc at each corner will form the beginning of your straight top edge.
Step 3: Row 2
Ch 4 (counts as dc and ch 1). Make 3 dc into the first ch-1 space, then ch 1. In the center ch-2 space, work the spine corner: 3 dc, ch 2, 3 dc. Ch 1, then make 3 dc into the last ch-1 space, which is the space formed by the turning chain of the row below. Ch 1, and finish with 1 dc into the 3rd chain of the turning chain. Turn.
Count your clusters: you should now have two clusters on each side of the spine. Move your stitch marker up into the new center ch-2 space. Moving the marker at the start of the spine corner on every row is a small habit that saves a lot of frustration later.
Step 4: Row 3 and Every Row After
This is the row you will repeat until your shawl reaches the size you want:
Ch 4 (counts as dc and ch 1). Make 3 dc into the first ch-1 space, ch 1. Make 3 dc into the next ch-1 space, ch 1. Repeat from * to * until you reach the center ch-2 space. Work the spine corner (3 dc, ch 2, 3 dc) into the ch-2 space. Ch 1. Make 3 dc into the next ch-1 space, ch 1. Repeat from * to * until you reach the last ch-1 space under the turning chain. Make 3 dc into that last space, ch 1, and finish with 1 dc into the 3rd chain of the turning chain. Turn.
On every row, remember these three key points. You always start with ch 4 and finish with 1 dc into the top of the turning chain, which keeps your top edge straight. You always work the spine corner into the center ch-2 space, which keeps the point sharp. And you always end up with one more cluster on each half than on the previous row. After about six rows, the shape becomes very clear: you will see nested V-shaped rows that meet in a straight line down the center, and a neat, straight neckline across the top.
Step 5: Joining a New Ball of Yarn
A classic shawl uses several balls of yarn, so you will need to join new yarn a few times. The neatest place to do this is at the edge of a row, never in the middle, because edge joins are much easier to hide. When you have about 12 inches of yarn left at the start of a row, check whether it is enough to finish the row; if not, fasten off at the end of the previous row instead. Join the new ball with a slip stitch into the top of the last dc, leave a 6-inch tail, and continue with the next row as usual. Later, you will weave both tails into the side of the shawl along the top edge, where they will be completely invisible.
Step 6: Keep Going Until It Is Your Size
Continue repeating Row 3 until your shawl reaches your chosen size from the size table. Every 10 rows or so, lay the shawl flat on a table and measure both the wingspan and the depth. A good time to stop is when the depth is about 1 to 2 inches shorter than your goal, because the border and blocking will add a little extra length. If you are not sure, wrap the shawl around your shoulders in front of a mirror; it is often easier to decide by feel than by numbers.
Adding a Pretty Shell Border
A shell border turns a simple granny shawl into something that looks truly finished and special. It adds a gentle scalloped edge along the two lower sloping sides and makes a neat point at the bottom for your tassel. Work it right after your last row, without fastening off.
Shell border row: Ch 1. Make 1 sc into the first dc, then 1 sc into the next ch-1 space. Skip 1 dc, make 5 dc into the next dc (the middle stitch of the cluster), skip 1 dc, and make 1 sc into the next ch-1 space. Repeat from * to * until you have worked a shell into the middle of the last cluster before the center. At the center ch-2 space, work (1 sc, ch 3, 1 sc), which creates a small loop at the very point. Then continue the same way along the other side: skip 1 dc, make 5 dc into the next dc, skip 1 dc, make 1 sc into the next ch-1 space. Repeat to the end, and finish with 1 sc into the 3rd chain of the turning chain.
Optional neat top edge: Without fastening off, ch 1 and work single crochet evenly along the top edge of the shawl, making 2 sc around each row-end stitch. If the edge pulls tight or makes the shawl curl, switch to 3 sc around each row end. This finishes the neckline and makes it softer against your skin. Fasten off and weave in all your ends.
Finishing Touches: Tassels or Fringe
Tassels are the classic finish for a triangle shawl. They add a little weight to the corners, which helps the shawl hang beautifully, and they give it a boho, handmade charm. If you prefer a softer, more casual look, you can add fringe along the lower edges instead.
How to Make Tassels
- Wrap the yarn: Wrap your yarn around the 5-inch piece of cardboard about 25 times, keeping the tension gentle and even so the strands lie side by side instead of stacking into a tight bundle. More wraps create a fuller, heavier tassel.
- Tie the top: Cut a 12-inch piece of yarn, slide it under all the wraps along the top edge of the cardboard, and tie it in a tight double knot. Leave both ends long, because you will use them to attach the tassel to the shawl.
- Cut the bottom: Slide your scissors under the wraps along the bottom edge of the cardboard and cut straight across, then remove the cardboard. You now have a bundle of strands folded at the top.
- Wrap the neck: Cut another 12-inch piece of yarn and wrap it tightly around the bundle about ¾ inch below the top fold, five or six times. Tie a knot and use your tapestry needle to pull the ends down inside the tassel so they disappear among the other strands.
- Trim and attach: Trim the bottom of the tassel so all the strands are even. Then thread the long ends of the top tie through the ch-3 loop at the bottom point and knot them tightly on the wrong side. Make two more tassels for the wing tips and attach them through the corner stitch at each end of the top edge.
How to Add Fringe Instead
Cut strands of yarn about 12 inches long. Take three strands together, fold them in half, and use your crochet hook to pull the folded loop through a ch-1 space along a lower edge of the shawl. Pull the cut ends through the loop and tighten gently to make a lark’s head knot. Repeat in every ch-1 space along both lower edges, or in every other space for a lighter fringe, then lay the shawl flat and trim all the fringe to the same length. Keep in mind that fringe uses quite a lot of yarn, often 100 to 150 extra yards for a classic shawl, so plan for it when you buy your yarn.
Blocking: The Secret to a Professional-Looking Shawl
Blocking is the step that many beginners skip, and it is also the step that makes the biggest difference. It relaxes the stitches, evens out small tension differences, opens up the granny clusters and turns your shawl into a crisp, symmetrical triangle with a perfectly straight top edge.
For wool and wool blends, use wet blocking. Soak the shawl in cool water with a drop of gentle wool wash for about 20 minutes, then press out the water without wringing or twisting. Roll it in a towel to remove more moisture, then lay it flat on foam blocking mats or a thick towel on a bed. Pin the top edge first in a perfectly straight line, then pin the bottom point directly below the center, and finally pin the two sloping edges, placing a pin at the tip of each shell scallop so it opens into a neat curve. Leave it pinned until it is completely dry, usually 24 hours.
For acrylic yarn, use pin and steam blocking. Pin the dry shawl into shape in the same order, then hold a steamer or steam iron about an inch above the fabric, letting the steam soften the stitches. Never press the iron directly onto acrylic, because it can melt or flatten the yarn permanently. Let the shawl cool and dry completely before you unpin it.
For cotton, wet blocking works well. Cotton holds its blocked shape nicely but is heavy when wet, so support the whole shawl while you move it to the mats.
Common Beginner Mistakes and How to Fix Them
Every crocheter runs into small problems with their first shawl. The good news is that each of them has a simple cause and an easy fix.
| Problem | Why it happens | How to fix it |
|---|---|---|
| The top edge curves or pulls in | The turning chain or the last dc of the row was skipped | Always start with ch 4 and end with 1 dc into the 3rd chain of the turning chain; count your edge stitches every few rows |
| The shawl is lopsided | Extra or missing clusters on one half | Count the clusters on each side of the spine; both halves should match your row number |
| The center point looks rounded | The spine corner was worked without the ch 2, or into the wrong space | Always work (3 dc, ch 2, 3 dc) into the center ch-2 space, and keep the stitch marker there |
| The shawl ruffles or waves | Too many increases, or a very loose tension on the edges | Recount your clusters, and check that you are not adding an extra cluster at the edges |
| The fabric feels stiff | The hook is too small for the yarn | Go up a hook size; shawls look best with a soft, open drape |
| The shell border flares or ruffles | Tight crochet in the main body, or loose shells | Try 4 dc instead of 5 dc in each shell, or block the border firmly |
If you notice a mistake a few rows back, do not be afraid to unravel. Granny stitch rows come out quickly and cleanly, and fixing the problem now will save you from a shawl that never quite lies flat.
Pretty Variations to Try Next
Once you have made your first granny triangle shawl, the same simple structure opens the door to many beautiful variations.
- Granny stripes: Change colors every two or three rows to create bold stripes that follow the V shape of the rows. Earthy tones such as terracotta, mustard, cream and sage look beautifully boho, while soft pastels create a sweet, vintage feel. Change colors at the edge of a row for invisible joins.
- Gradient cake shawl: Use a long-color-change yarn cake for a stunning ombré effect without any color changes on your part. As the rows get longer, each color band becomes narrower, creating a lovely fading look from the neckline to the point.
- Chunky blanket wrap: Use a bulky yarn (category 5 or 6) with an 8 mm or 9 mm hook for a thick, squishy wrap that works up very quickly. This version is perfect for cold winter days and makes a wonderful handmade gift.
- Lacy summer shawl: Use a light cotton or cotton blend in DK or sport weight with a 4.5 mm hook and replace the ch-1 between clusters with ch 2. The fabric becomes airy and delicate, perfect for summer evenings or for wearing over a sundress.
- Bandana-size kerchief: Stop at about 16 to 20 rows and add a tie at each wing tip by making a long chain of about 60 chains. Tie it over your hair or around your neck for a cute retro look.
- Pom-pom edging: Swap the tassels for small yarn pom-poms attached along the lower edges for a playful, cozy look that is especially popular for winter shawls in cream, blush or grey.
Stylish Ways to Wear Your Triangle Shawl
A triangle shawl is surprisingly versatile. Here are a few easy ways to wear it so it fits naturally into your everyday outfits.
- Classic shoulder drape: Wear it with the point hanging down your back and the wing tips falling over your shoulders in front. This is the most elegant way to wear it, and it looks lovely over a simple sweater or a long dress for autumn evenings.
- Bandana style: Turn the shawl around so the point hangs down in front, wrap the wing tips around your neck and let the ends hang down at the back or tie them loosely. This is a cozy, modern way to wear a smaller shawl, and it pairs beautifully with a denim jacket or a long wool coat.
- Knotted front: Wear it like the classic drape, then tie the two wing tips in a loose knot at your chest. The knot keeps the shawl in place while you move, which makes it practical for walks, markets and busy days.
- Belted over a coat: On cold days, wrap a larger shawl over your shoulders and add a thin leather belt at your waist over the shawl and your coat. It creates a chic, layered silhouette and keeps the wind out.
- Cozy home wrap: An oversized shawl is just as lovely as a light blanket. Keep one on the sofa or at your desk to wrap around your shoulders while you read, work or enjoy your morning coffee.
How to Care for Your Crochet Shawl
A handmade shawl can last for many years with a little care. Always check the yarn label first, because the right washing method depends on the fiber.
Acrylic and most cotton blends can usually be machine washed on a gentle cycle in cool water. Place the shawl inside a mesh laundry bag to protect the tassels from tangling, and avoid hot water, which can relax acrylic and make it lose its shape. Wool shawls are best hand washed in cool water with a wool wash, unless the label says the yarn is superwash.
No matter the fiber, always dry your shawl flat. Hanging a wet shawl stretches it out of shape, and tumble drying can cause wool to felt and acrylic to fuzz. Lay it on a towel, gently pat it back into a triangle, and smooth the tassels so they dry straight. To store it, fold the shawl loosely and keep it in a drawer or on a shelf rather than on a hanger, which can stretch the top edge over time.
Frequently Asked Questions
How long does it take to crochet a triangle shawl? A classic-size granny triangle shawl in worsted yarn usually takes about 12 to 18 hours for a beginner. That might sound like a lot, but because each row repeats the same easy steps, it works up comfortably over a few evenings or a relaxed weekend. A small kerchief can be finished in about 4 to 6 hours.
Can a complete beginner make this shawl? Yes. If you can make a chain and a double crochet, you have all the skills you need. The trickiest part is the first two rows, so take your time with those, use the stitch marker, and count your clusters. Once the triangle shape appears, the rest of the shawl is the same row repeated again and again.
What is the best yarn weight for a crochet triangle shawl? Worsted weight (category 4) is the best choice for a first shawl because it is easy to see, works up quickly and creates a cozy but still drapey fabric. DK and sport weight yarns create lighter, more delicate shawls, while bulky yarns make thick winter wraps.
Why is my shawl not lying flat? In most cases, the stitch count is off. Count the clusters on each half of the shawl and compare them with your row number. If one side has more clusters, or if the spine corner or edge stitches were skipped, the shawl will curve, ruffle or lean to one side. Blocking also helps a lot, especially with the top edge.
Can I make the shawl from the bottom point up? Yes, triangle shawls can also be worked from the bottom point upward by decreasing at each edge, or sideways from one wing tip to the other. However, the top-down method is the most beginner-friendly, because you can stop whenever the shawl reaches the size you like, and you never have to worry about running out of yarn before the top edge is finished.
Conclusion
A crochet triangle shawl is one of the most rewarding projects you can make. It uses only a few basic stitches, grows naturally into a beautiful shape, and becomes a piece you will reach for again and again, whether you drape it over your shoulders, knot it at the front or wrap yourself in it on a cozy evening at home.
Start with a smooth worsted yarn in a color you love, count your clusters on each row, take a few minutes to add a shell border and tassels, and give your shawl a gentle blocking. Those small details turn a simple granny triangle into a wrap that looks truly handmade with love. Once you finish your first one, you might find yourself planning the next in a new color, a gradient yarn or a chunky winter version.